Junwoo
2022-09-13 15:40:44
University
[Creating Videos with Multiple Solutions] 2. Video Editing with Premiere
📖
Ring in 2026 Lunar New Year with a snazzy video greeting template—no firecrackers required! 🧧
Hey there! 🐉 2026 is charging in on a fiery red horse, and Lunar New Year is almost here. From everyone at Videostew, may your year overflow with good fortune, ...

📣
Small-Biz Marketing in One Word: Video—How to Automate It Like a Pro with Videostew API
Meet Hi-3D: the startup that’s been turning corporate daydreams into 3D-printed prototypes. These days, though, they’ve gone full sci-fi—leveraging AI-driven ma...

🤔
In the Age When Video-Making Got Easy, Direction Is the New Superpower 🎬✨
Videostew just made a cameo on YouTube’s “Laughing Class”! 🎬Getting name-dropped alongside rock stars like Grock and ChatGPT? We’ll take it. But the real win wa...

🗞️
[Update] More natural Korean speech TTS — introducing the DIVE engine!
Meet DIVE—our brand-new TTS engine that’s been fine-tuned for Korean content. Ready to plug in 100+ AI voices right out of the gate? Yep, we thought so. 😉Don’t ...
![[Update] More natural Korean speech TTS — introducing the DIVE engine!](https://cdn.videostew.com/files/thumb/fb37b7107-7tqwnfe8w)
🗞️
[Update] Cartoon-Style Newspaper Comics & More Fresh AI Image Styles Are Live! 🗞️🎨
You asked, we delivered: the most-wanted AI image styles have just landed in your timeline!Head to the [Visual] tab > [Stock] > AI Illustration and swipe ...
![[Update] Cartoon-Style Newspaper Comics & More Fresh AI Image Styles Are Live! 🗞️🎨](https://cdn.videostew.com/files/thumb/19635f8ae-7to5sno3b)
🗞️
[Update] Pick Up Where You Left Off – Seamless Long-Form Rendering is Here! 🚀
Until today, Videostew quietly tapped you on the shoulder when your video hit the plan’s length limit. Not anymore—say hello to the new “Project Merge” update! ...
![[Update] Pick Up Where You Left Off – Seamless Long-Form Rendering is Here! 🚀](https://cdn.videostew.com/files/thumb/323962b5e-7td8vjudu)
🗞️
[Update] Your Personal Dictionary (AI Voice Pronunciation Customization)
Your AI voice keeps butchering that one fancy word? Meet the shiny-new User Dictionary—your pronunciation fairy-godmother! 🪄Check out these real-life hacks:Got ...
![[Update] Your Personal Dictionary (AI Voice Pronunciation Customization)](https://cdn.videostew.com/files/thumb/bf4e93e99-7t74wq86j)
🗞️
[Update] Project Favorites Are Here! 🌟
Your go-to My Template just got a turbo-boost: meet Project Bookmarks! ⚡️Hit the gear icon on any project, drop it into your bookmarks bar, and boom—next time y...
![[Update] Project Favorites Are Here! 🌟](https://cdn.videostew.com/files/thumb/079dab158-7t5owv1w8)
Welcome to the second installment of our video creation solution comparison series! Today, we're diving into video editing with Premiere — a go-to standard in the industry that really needs no introduction.
It comes with quite a steep learning curve, though; figuring out even basic functions can be a challenge if you're just starting out. But don't worry, we're going to take it slow.
We're going to try recreating the video below with Premiere. This video was originally created using VideoStew's Text To Video (TTV) mode, and you can find a detailed account of the creation process in this post.
<iframe src="https://www.youtube.com/embed/RVIJRKk6c6c" allowfullscreen=""></iframe>
Step-by-step: Creating Short-form Videos with Premiere
Creating Vertically Oriented Sequences
In Premiere, a sequence is a chunk of the video you're creating. Imagine each sequence as a scene in a movie — put a bunch of scenes together, and you get a movie.
To create a new sequence, go to File > New > Sequence, and set the frame size to 1080 for width, and 1920 for height.
Then you'll see a timeline where you can start populating with content, just like in the screenshot below.
Adding TTS
The transition from scene to scene is based on narration. So, let's start by adding an MP3 file of AI-generated narration first, then get onto the other tasks.
We used Clovadubbing for the AI voice. Just choose a voice, paste the prepared script, and hit the +Dubbing add button. Easy peasy, lemon squeezy.
After you're done with that, you'll see a timeline at the bottom. Make sure to check the preview before downloading the MP3. However, do note that once added, it's not modifiable. So, it might be a good idea to add dubbing sentence-by-sentence, even if it's a bit of a drag to do so.
Once you're happy with the result, hit the download button to save it as an 'audio file' in MP3 format. You can then add this file to Premiere's Media Browser.
You can simply drag and drop files from your explorer to add media in the Media Browser.
For the next step, drag and drop this audio file onto the sequence to create a timeline.
Taking Advantage of Premiere's Automatic Caption Creation Feature
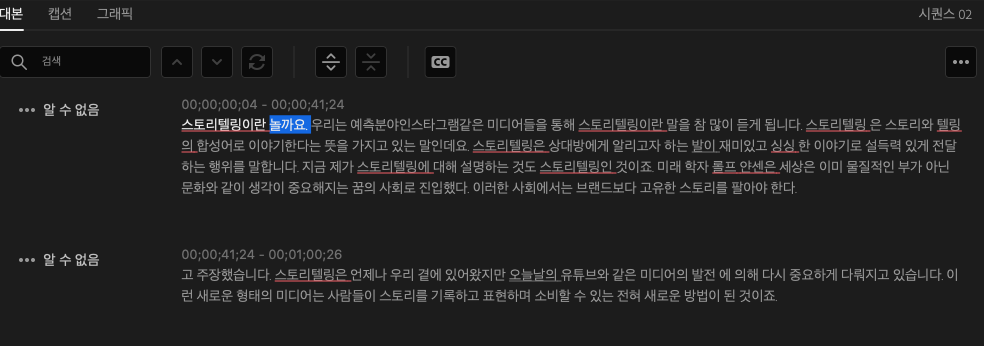
Next, let's utilize Premiere's automatic caption feature to set up captions. Go to Edit > Text > Transcribe Sequence, then select Korean as the language. (Adorably translated as 'Korean'...)
Now, we've reached the phase where we manually correct any misrecognized bits. I was quite surprised to see a few hiccups in recognition even with AI voices.
Luckily, since I had the original script, I simply copied and pasted it back in (Feels a bit like doing the work twice, doesn't it?).
Once you've finished with adjusting, hit the 'Create Caption' button at the top. This will take you to the video editing tab. Here, you'll need to set a few more things. Given that it's a short-form video, I shortened the maximum length and set the minimum duration to 1.5 seconds to generate the captions.
Then, just like magic, the captions will pop up on your screen.
Now let's restyle the captions a bit to make them pop! Select the whole block, adjust the font and alignment, and move the caption block placement to the top through the transform menu. And one more thing, make sure to activate the line shape and set the outline in black. That's gonna make things clear as day.
Adding Stock Videos
Now it's time to add stock videos for each caption segment. Adobe Stock could have been good if we were going to stay inside Premiere for searching and adding stock videos, but it is quite pricey. Thus, let's use Pixabay instead.
Unfortunately, while Pixabay has a fantastic trove of images, it falls short on videos. The search didn't yield many results, so I ended up sourcing from Pexels.
After downloading the desired image, add it to the Media Browser, then adjust the end point of the video to match the length of the text. The screenshot below shows the timeline after all stock videos and images have been added.
GIFs needed to be repeated to fill the duration of some scenes. Adjusting the length of each video clip to match the scenes was a bit laborious, but hey... Who said video editing was easy?
Adding Animation Effects
To animate elements — say, to make them move or zoom in/out in Premiere — knowledge of keyframes is essential.
For example, to have the text appear while moving from the bottom toward the top as in the sample video, you'll need to adjust the position of vector motion. Put keyframes at the start and end, and set different positions for each. Premiere will then automatically create a path and animate it accordingly.
Time Taken & Final Thoughts
Want to check out the end result first?
<iframe src="https://www.youtube.com/embed/--Qo7TdHPh4" allowfullscreen=""></iframe>
The complete production took a total of 1 hour and 40 minutes, even without creating a separate thumbnail or adding transition effects, like in the sample video. It took way longer than I expected.
Thankfully, the auto-caption feature saved a good amount of time. Without it, I would have needed at least an extra hour to manually input captions.
Despite using a MacBook Pro, there were noticeable lags and the computer seemed to have a hard time handling the work. Constantly previewing the project felt a bit burdensome as a result.
My final verdict is that Premiere provides a high level of freedom, but a thorough understanding of it is needed to fully take advantage of this freedom. You might find that achieving what you want involves more manual labor than you initially thought!
That's it for this post on creating short videos with Premiere! Stay tuned for the next post, where we will be sharing the process of creating the same video with Canva.
Subscribe to our newsletter below to receive useful info on video marketing, absolutely free!