Guide
Slide Properties
Edit screen > Slide Properties on the right
When you select one or more slides in the slide window, or when no element is selected in the Editing Window, the Properties Window displays properties related to the slide.
Transitions and Time
Edit screen > Slide Properties on the right > Transition and duration
The time when the slide appears is changed automatically or manually.
Playback time
Edit screen > Slide Properties on the right > Transition and duration > Playback duration
The slide is displayed and then the time it takes to move to the next slide is adjusted. Depending on what content is included in the slide by default, the playback duration of that slide is determined.
For example, if the criterion is narration, it is automatically adjusted to the length of the AI voice, and if the criterion is video, it is adjusted to the length of the inserted video clip.
Want to reduce the overall length of the video? If you organize them in the order of the most efficient methods, it will be as follows.
- Increase narration speed — If you increase the reading speed of the AI voice (e.g.: 120130%), the narration time becomes shorter, and the slide playback time also decreases automatically. This is the most efficient way to reduce the overall length while maintaining voice quality. → AI Voice Speed Settings
- Reduce narration text — If you shorten the text that needs to be read, the narration becomes shorter, and the playback time is reduced as well. This method involves deleting unnecessary sentences or leaving only the core content.
- Trim the video clip — If the video is an inserted slide, you can shorten the length of the corresponding slide by reducing the playback section (trim) of the clip.
- Manually adjust slide playback time — Use manual mode when you want to shorten only a specific slide to a fixed duration. Since the narration may get out of sync, caution is needed.
Narration(Default)
Edit screen > Slide Properties on the right > Transition and duration > Playback duration
If there is a narration in the slide, the duration of that narration is used as the standard. If the narration is the standard but there is no narration, a default of 3 seconds is provided. If a specific segment is set to play only with settings such as trim for the narration, only that duration will be played.
Video
Edit screen > Slide Properties on the right > Transition and duration > Playback duration
If a video is embedded in the slide, the duration of that video is used as the standard. If a specific segment is set to play only with settings such as trim for the video, only that duration will be played. In the case of multiple videos, the most important video is automatically determined as the standard and adjusted accordingly.
Manual
Regardless of what elements are within a slide, it sets to play only for the specified time. Usually, narration or video is the standard, but understanding the concept of time in Videostew is important, and it is used only to modify the duration for constructing different effects.
Transition Effects
The transition effect refers to the animation that plays when moving to the next slide. After selecting the desired transition effect, you can instantly preview how it looks through the preview feature, allowing you to quickly check with your own eyes.
Transition Effects Time
Edit screen > Slide Properties on the right > Transition and duration > Transition effect duration
The transition-effect duration is the time the animation keeps running. For example, if you want the "Cube" animation to appear a bit slower, insert 10 seconds, press Preview, and verify it with your own eyes.
For reference, the transition-effect duration cannot exceed the slide's total duration.
Narration
Edit screen > Slide Properties on the right > Narration
Sets the type and properties of the narration used when the slide is recreated.
Type
Edit screen > Slide Properties on the right > Narration > Type
Select the type of narration to be used in the slide.
Upload: Upload an MP3 file to use.
Record now: Record your own narration right now and use it.
AI Voice: Use the TTS provided by Videostew.
Upload
Edit screen > Slide Properties on the right > Narration > Type:Upload
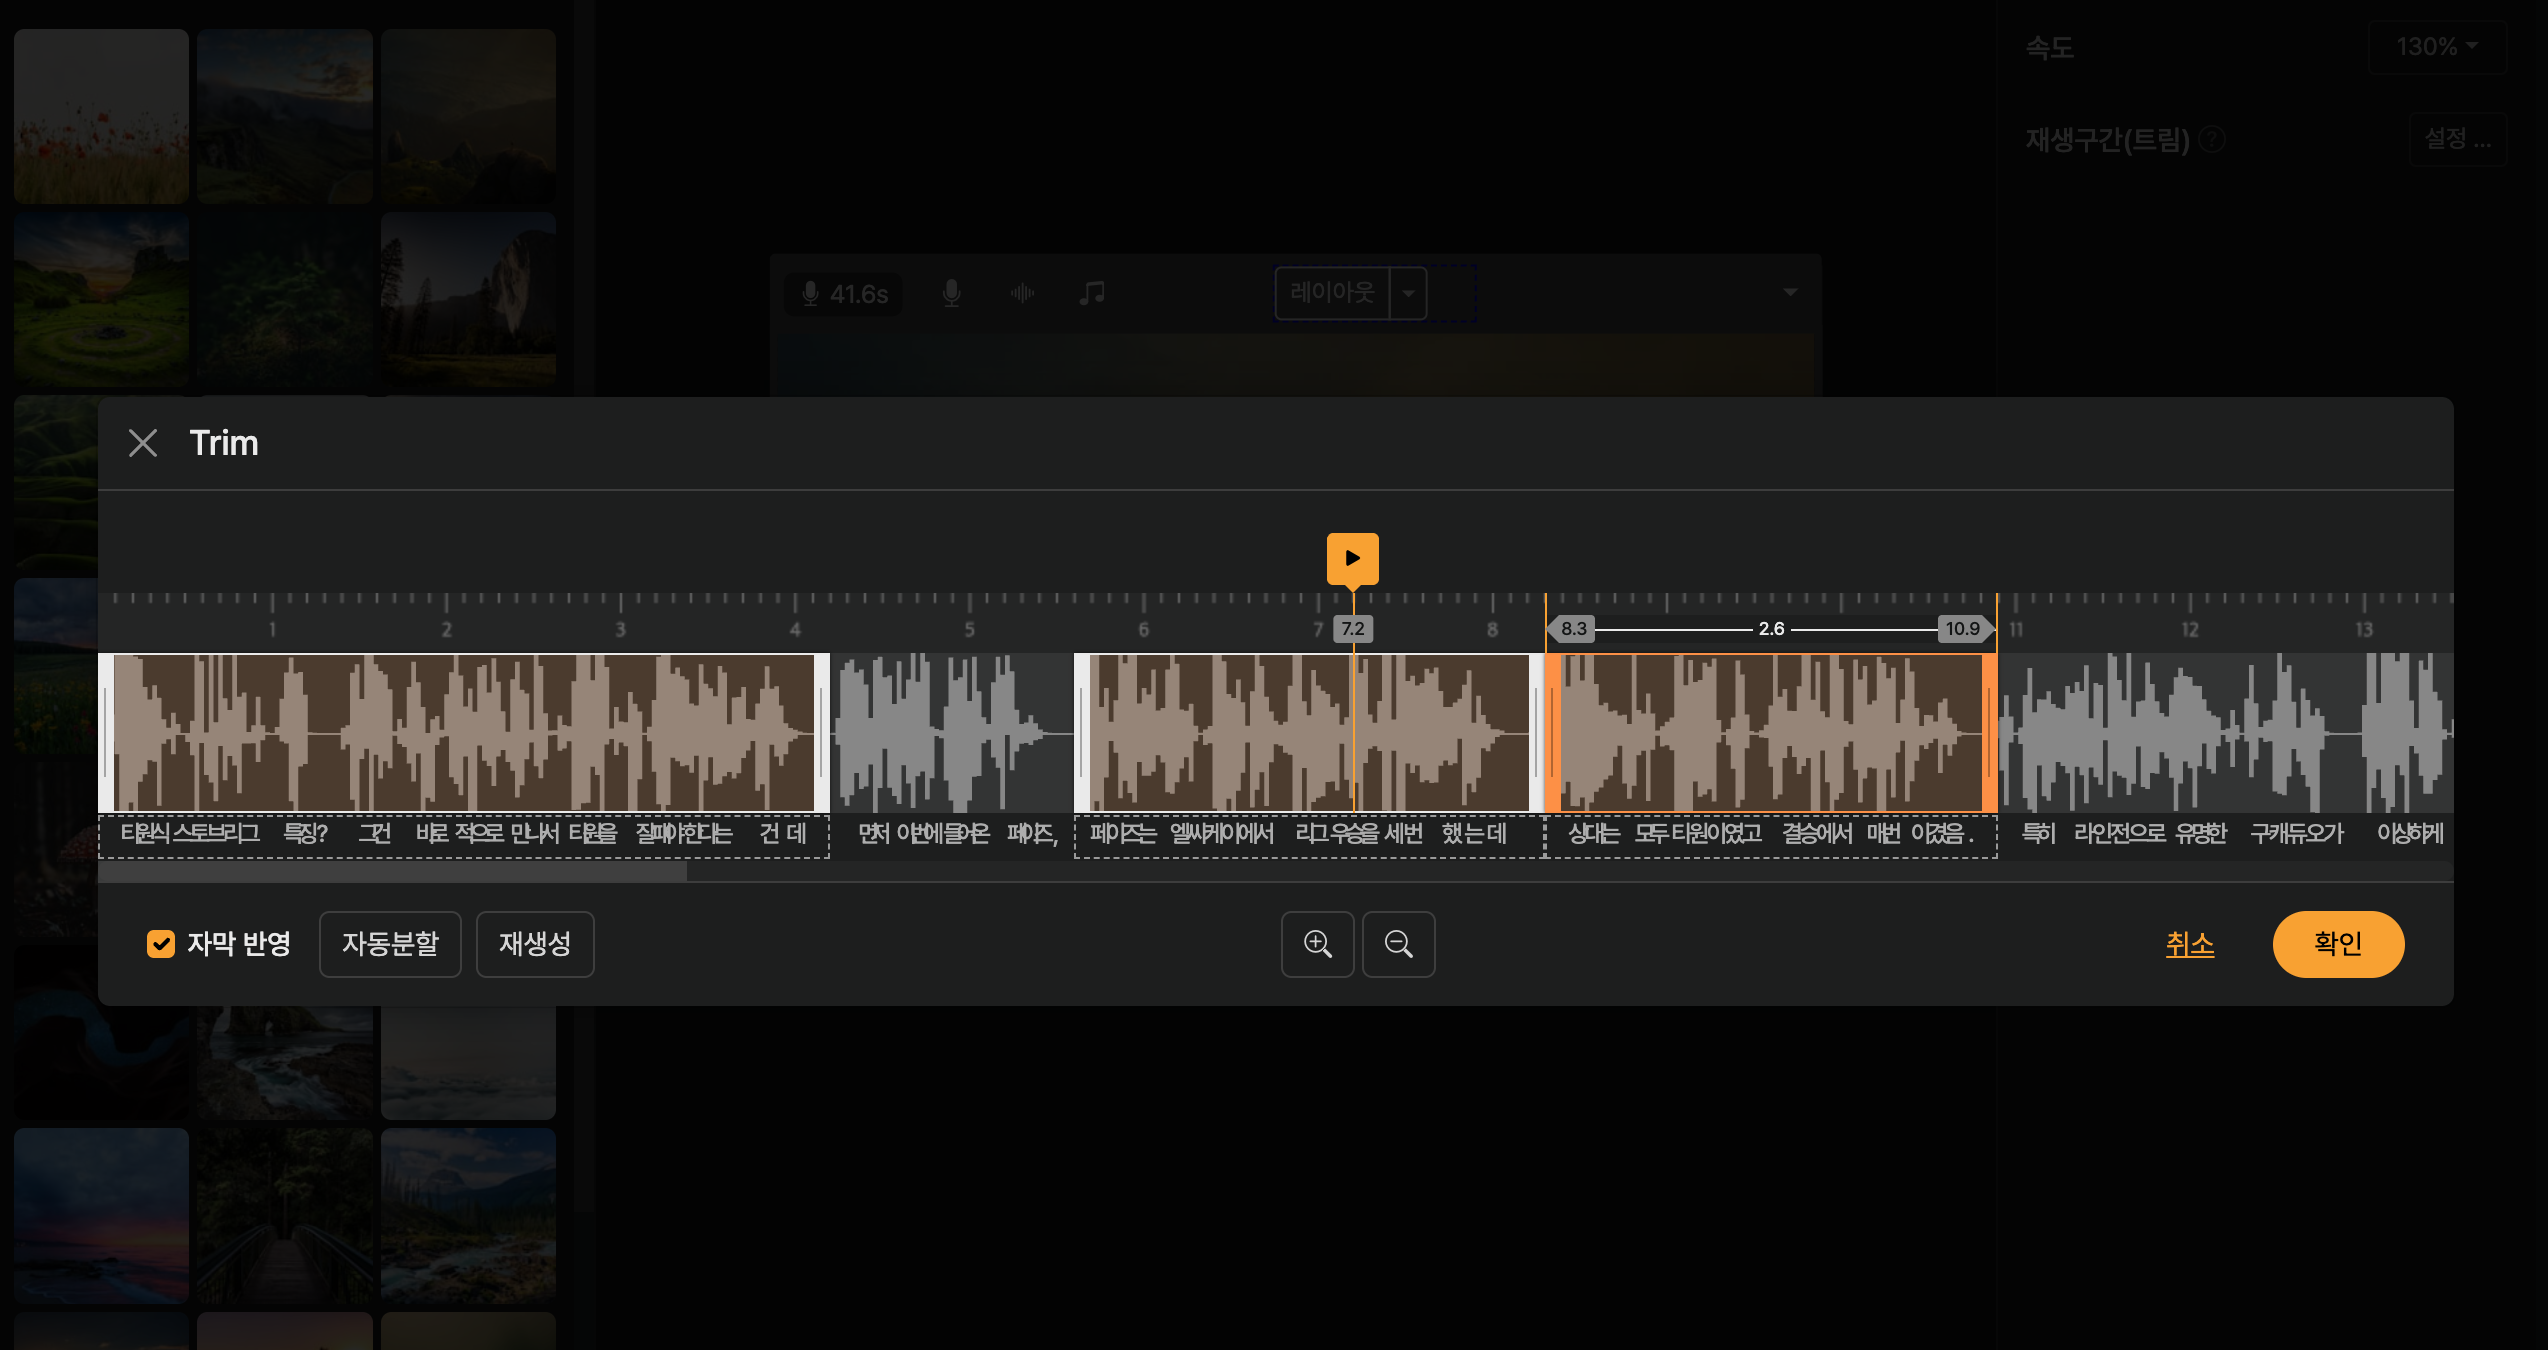
You can upload pre-recorded MP3 files. Using the trim feature, you can cut the 'fade-in' section for each slide.
Trimming
Edit screen > Slide Properties on the right > Narration > Type:Upload > Trim
While checking the format of the uploaded audio file, you can set the regeneration interval for each slide or have it automatically generate gaps.
Voice Recording
Edit screen > Slide Properties on the right > Narration > Type:Voice recording
You can record your voice directly on the website. The recording continues seamlessly, allowing you to time it just right to move on to the next slide. For a splendid content creation method using the voice recording feature, please refer to [Using the Voice Recording Feature].
Trimming
Edit screen > Slide Properties on the right > Narration > Type:Voice recording > Trim
If you want to regenerate only a specific section within a noisy timeline, adjust this setting
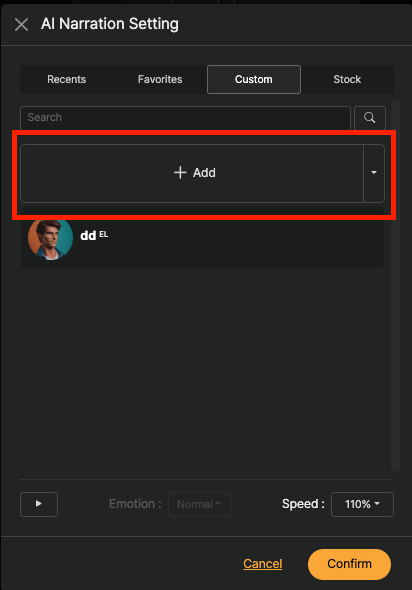
AI Voice
Edit screen > Slide Properties on the right > Narration > Type:AI Voice
Voice
Edit screen > Slide Properties on the right > Narration > Type:AI Voice > Voice
You can change the AI voice. Select the entire slide to change the voice for the whole presentation, or apply a different voice to each slide individually.
You can search and apply the AI voice you want by language, emotion, age, gender, etc.
Table of contents detailed information
Videostew uses TTS provided by ElevenLabs, Humelo, Google Wavenet, Amazon Polly, Naver Clova, and Microsoft Azure.
You can set up complex search criteria based on each engine, such as gender, age, emotion, atmosphere, and language, allowing you to quickly find the voice you want.
Pro Tip: Each slide will have AI-generated voice. Follow the guidelines to ensure each slide has a completed sentence. Use the enter key to provide line breaks and apply [text appearance effects] to create a natural flow.
Provided languages
Korean, English, Chinese, Spanish, Hindi, Arabic, Bengali, Portuguese, Russian, Japanese, German, French, Turkish, Malay, Tamil, Thai, Vietnamese, Urdu, Persian, Italian, Thai, Gujarati, Polish, Ukrainian, Dutch, Greek, Swedish, Romanian, Hungarian, Danish, Finnish, Slovak, Norwegian, Hebrew, Malay, Czech, Bulgarian, Slovenian, Lithuanian, Latvian, Estonian, Croatian, Malayalam, Kannada, Welsh, Irish, Basque, Icelandic, Swahili, Filipino, Mongolian, Maltese, Catalan
Speed
Edit screen > Slide Properties on the right > Narration > Type:AI Voice > Speed
Change the reading speed of AI voice. Generally, readers prefer a speed of 120% - 130%, but it can vary depending on the characteristics of the AI voice, so you can decide while pre-listening.
After regeneration
Edit screen > Slide Properties on the right > Narration > Type:AI Voice > Mute after playback
You can use this when you want to read all the AI voice in one slide and add a slight pause. By setting the time to around 0.5 seconds, you can prevent it from moving to the next slide too quickly.
Conversely, if you think the mute time increases when moving to the next slide, you can set it manually. It supports up to -0.2 seconds, and generally, -0.1 seconds will give a slightly faster transition.
Manual text placement
Edit screen > Slide Properties on the right > Narration > Type:AI Voice > Manual text input
When you enable the automatic text designation toggle, you can adjust the content to be read however you want, independent of the text shown on the screen.
It is generally used when you want to display only the words on the screen and read the detailed content separately, or to adjust the pronunciation.
Playback Time
Edit screen > Slide Properties on the right > Narration > Type: AI Voice > Playback time
If the AI voice does not reach the end due to a network issue, or if the voice length is not calculated correctly, press the "Recalculate" button to regenerate the AI voice and reset the duration of each slide.
Slide Repeat Playback
Edit screen > Slide Properties on the right > Narration > Type: AI Voice > Slide repeat playback
When you enable the slide repeat toggle, the same sentence is read repeatedly when it appears in multiple slides.
For example, it can be used when intentional repetition is required in educational videos.
Voice Cloning
Edit screen > Slide Properties on the right > Narration > Type:AI Voice
In addition to the AI voices provided by Videostew, you can directly create and use TTS that has learned your voice.
You can start recording your voice by clicking the 'Add' button on the custom tab. You can record in real-time on the website, or you can upload a pre-recorded file.
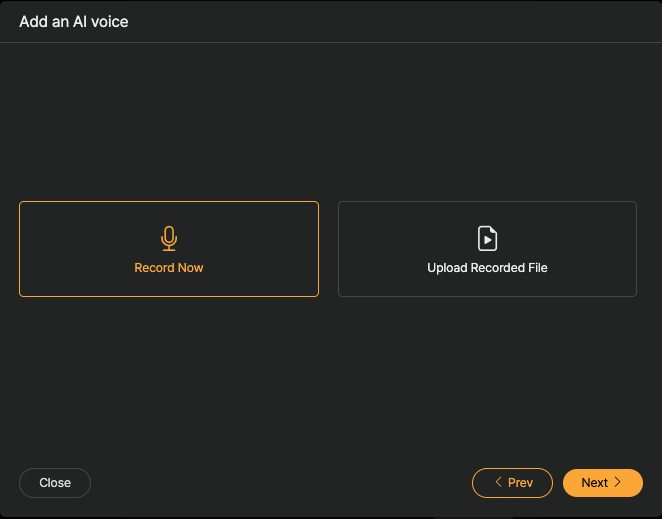
When recording, reading just five sentences is sufficient. When uploading a pre-recorded file, please upload an audio file that is longer than 15 seconds.
The reason for using voice-cloned TTS is to present a natural-sounding voice. Therefore, it is more effective to create a natural TTS without using professional recording equipment. It is also beneficial if the speaking style you frequently use comes out naturally. If you plan to create conversational content, please record a naturally conversing voice.
The cloned voice is tied to the workspace. If you want to use the AI voice you created in another workspace, press the Settings (▼) button next to the Add button and bring the voice you own to the other workspace via the “Import Voice from Another Workspace” button.
User Dictionary
When the AI voice reads proper nouns like personal names, brand names, or English loanwords awkwardly, you can directly specify the desired pronunciation.
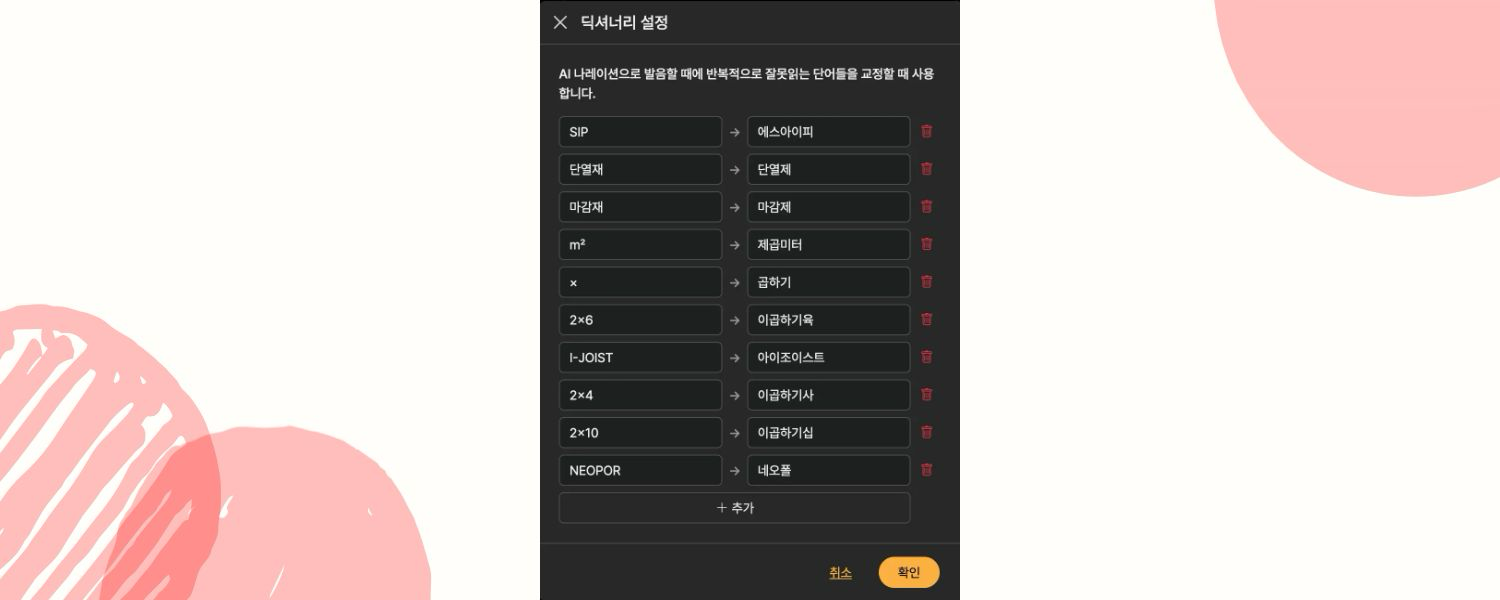
User-defined dictionaries can be managed separately for each workspace.
Sound Effects
Edit screen > Slide Properties on the right > Effects
Sets the effect that is regenerated when a slide starts. By default, the effect continues to regenerate until the slide ends, even if it is longer than the slide duration.
Type
Edit screen > Slide Properties on the right > Effects > Type
Clicking "Select" allows you to apply a sound effect to a slide. You can find sound effects by genre, and it is convenient to select while listening to previews by hovering the mouse. If you wish to remove a sound effect, select "None" after making your selection.
Volume
Edit screen > Slide Properties on the right > Effects > Blur
Change the speed of the sound effect. You can adjust it appropriately while listening to other elements through the preview.
Slide Repeat Playback
Edit screen > Slide Properties on the right > Effects > Slide repeat playback
If the same effect is applied to multiple slides, this option allows it to be regenerated repeatedly each time the next slide starts.
In the inactive state, the image is judged to have the same element (effect) continuously present on the slide, so it is regenerated only once.
Matching Slide Playback Duration
Edit screen > Slide Properties on the right > Effects > Match playback to slide
Activating this option will naturally fade out the effect if the effect's duration is longer than the slide's playback time, without exceeding the duration of the slide.
Background Music
Edit Screen > U-mute Slide Properties > Background Music
You can set background music that is used throughout the entire project and background music that is used only in specific slides.
Slide Background Music
Edit Screen > U-mute Slide Properties > Background Music > Select
After pressing the "Select" button, you can preview the music and apply it; if the same audio is already used in consecutive slides, it will continue seamlessly.
Volume
Edit screen > Slide Properties on the right > Background music > Volume
You can decide on the appropriate volume while previewing.
If the original audio is separate and you are only adjusting the volume, the global background music will automatically apply fade in/out effects, so the volume is adjusted smoothly.
Background Color
Edit screen > Slide Properties on the right > Background color
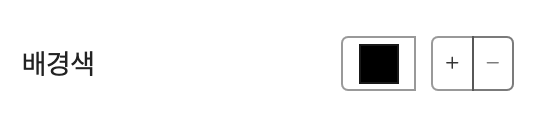
You can change the slide's background color from the default (black) to a different color. Additionally, you can add other colors by clicking the '+' button and specify gradient effects.
Recent
Edit screen > Slide Properties on the right > Background color > Recent
The colors recently used are displayed.
Favorites
Edit screen > Slide Properties on the right > Background color > 즐겨찾기
Frequently used colors can be added to Favorites for easy access. Favorites are managed separately for each workspace.
User
Edit screen > Slide Properties on the right > Background color > 사용자
< Add Custom Color >
Click the '+' button to directly add a custom color. You can easily find and add the desired color using the color spectrum in the 'Add Color' window.
Stock
Edit screen > Slide Properties on the right > Background color > 스톡
There are about 140 default colors prepared in the color palette. Selecting a color will apply it to the background of the slide, and you can also change the colors of multiple slides at once. Please refer to [Edit Multiple Slides at Once] for how to edit multiple slides simultaneously.