Changes the vertical alignment inside the text box. The default option is "Auto", and you can set it to "Top", "Middle", or "Bottom".

Activating height fixation allows you to change the vertical size of the text box. This is useful when specifying a consistent box size across multiple slides.
Change the alignment of the text within the box to "Left", "Center", or "Right".
Activating height lock adds handlers to the top/bottom of the box, allowing you to change the height of the text box.
Generally, when using text boxes in auto mode, even if the text is one or two lines, you can maintain the same box size.
Editing with just a mouse can be limiting for quick operations. Therefore, Videostew provides various keyboard shortcuts for common editing tasks, which can be used alone or in combination with the mouse.
Area|Shortcut|Description
--|--|--
General|`Space`|Execute/Close preview of the selected slide
General|`Ctrl`+`S`|Save project
General|`ESC`|Close modal window, cancel operation, deselect
Entire|`Ctrl`+`Z`|Undo action
Entire|`Ctrl`+`Shift`+`Z`|Redo action
Editing Window|`Space`+`Drag`|Move stage view
Editing Window|`Ctrl`+`Click`|Select/Deselect multiple elements
Editing Window|`Ctrl`+`C`|Copy selected element (includes style copy)
Editing Window|`Ctrl`+`V`|Paste copied element
Editing Window|`Ctrl`+`Alt`+`V`|Paste copied element with style only
Editing Window|After selecting an element `L/R/U/D`|Move position of selected element
Editing Window|After selecting an element `Shift`+`L/R/U/D`|Move position of selected element by 1 pixel
Slide window|`Ctrl`+`Click`|Select/Deselect multiple slides
Slide window|`Shift`+`Click`|Select range of slides
Slide window|`Left`|Select previous slide
Slide window|`Shift`+`Left`|Extend selection to previous slide
Slide window|`Right`|Select next slide
Slide window|`Shift`+`Right`|Extend selection to next slide
Slide window|`Ctrl`+`A`|Select all slides
Videostew contains many advanced utilization tips hidden within. Here we will introduce various tips to better leverage Videostew.
In Videostew, you can upload your own shot videos and perform cut editing operations. For detailed information, please refer to [Playing Around with Playback Intervals](https://videostew.com/guide/edit/element-property/video/trim).
Creating video content often involves adding many slides, even if they are in slide format. That means a tremendous amount of editing work is necessary. Videostew has introduced a bulk editing concept to block such laborious tasks and provide a comfortable editing environment.

< Change the text color of multiple slides at once >
Then you can see that the font color of the text has been changed in all selected slides. The location or size, typeface (font), etc., are all applicable. And besides the text, all things such as videos/images/shapes are also possible.
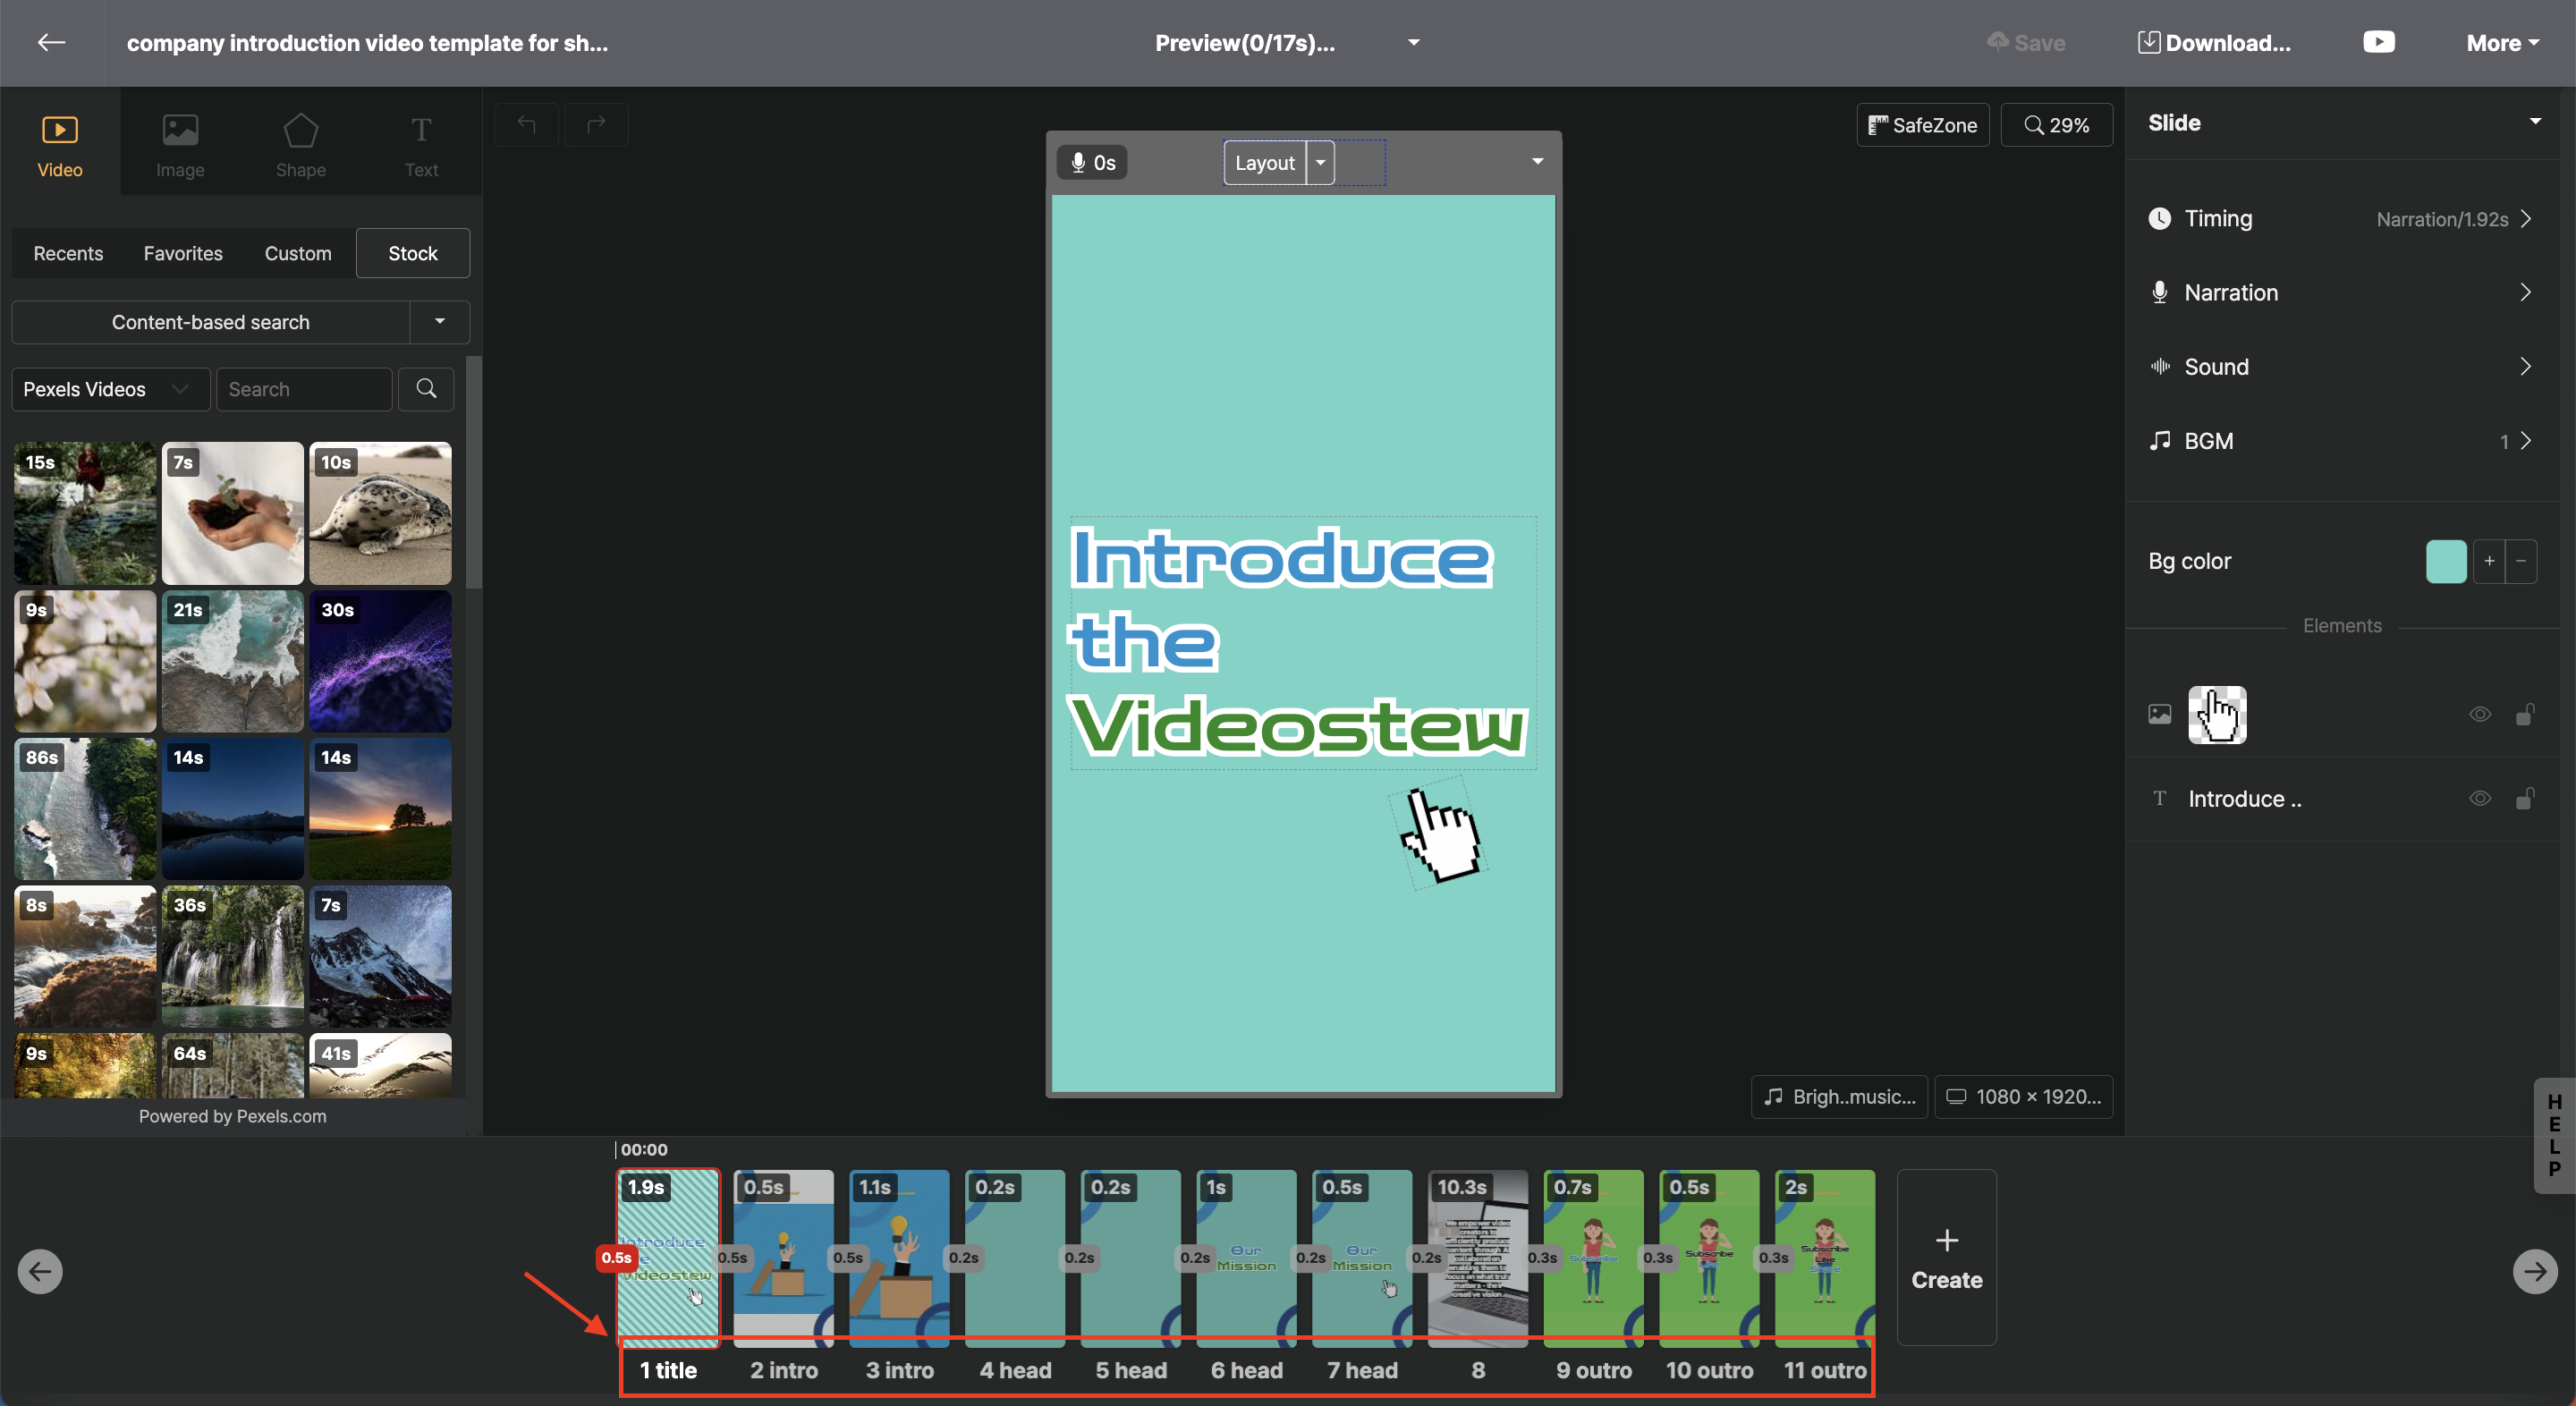
By using the [Set Slide Note] feature of Videostew, you can apply a specific format to each slide. When editing, there are often times when you just want to select a particular layout and edit everything at once.
For example, if you want to edit a `head` slide to insert an interstitial title at once, you can select the relevant slide and then press the `Ctrl` key to select the number on the bottom navigator.

< Select the same format slides at once >
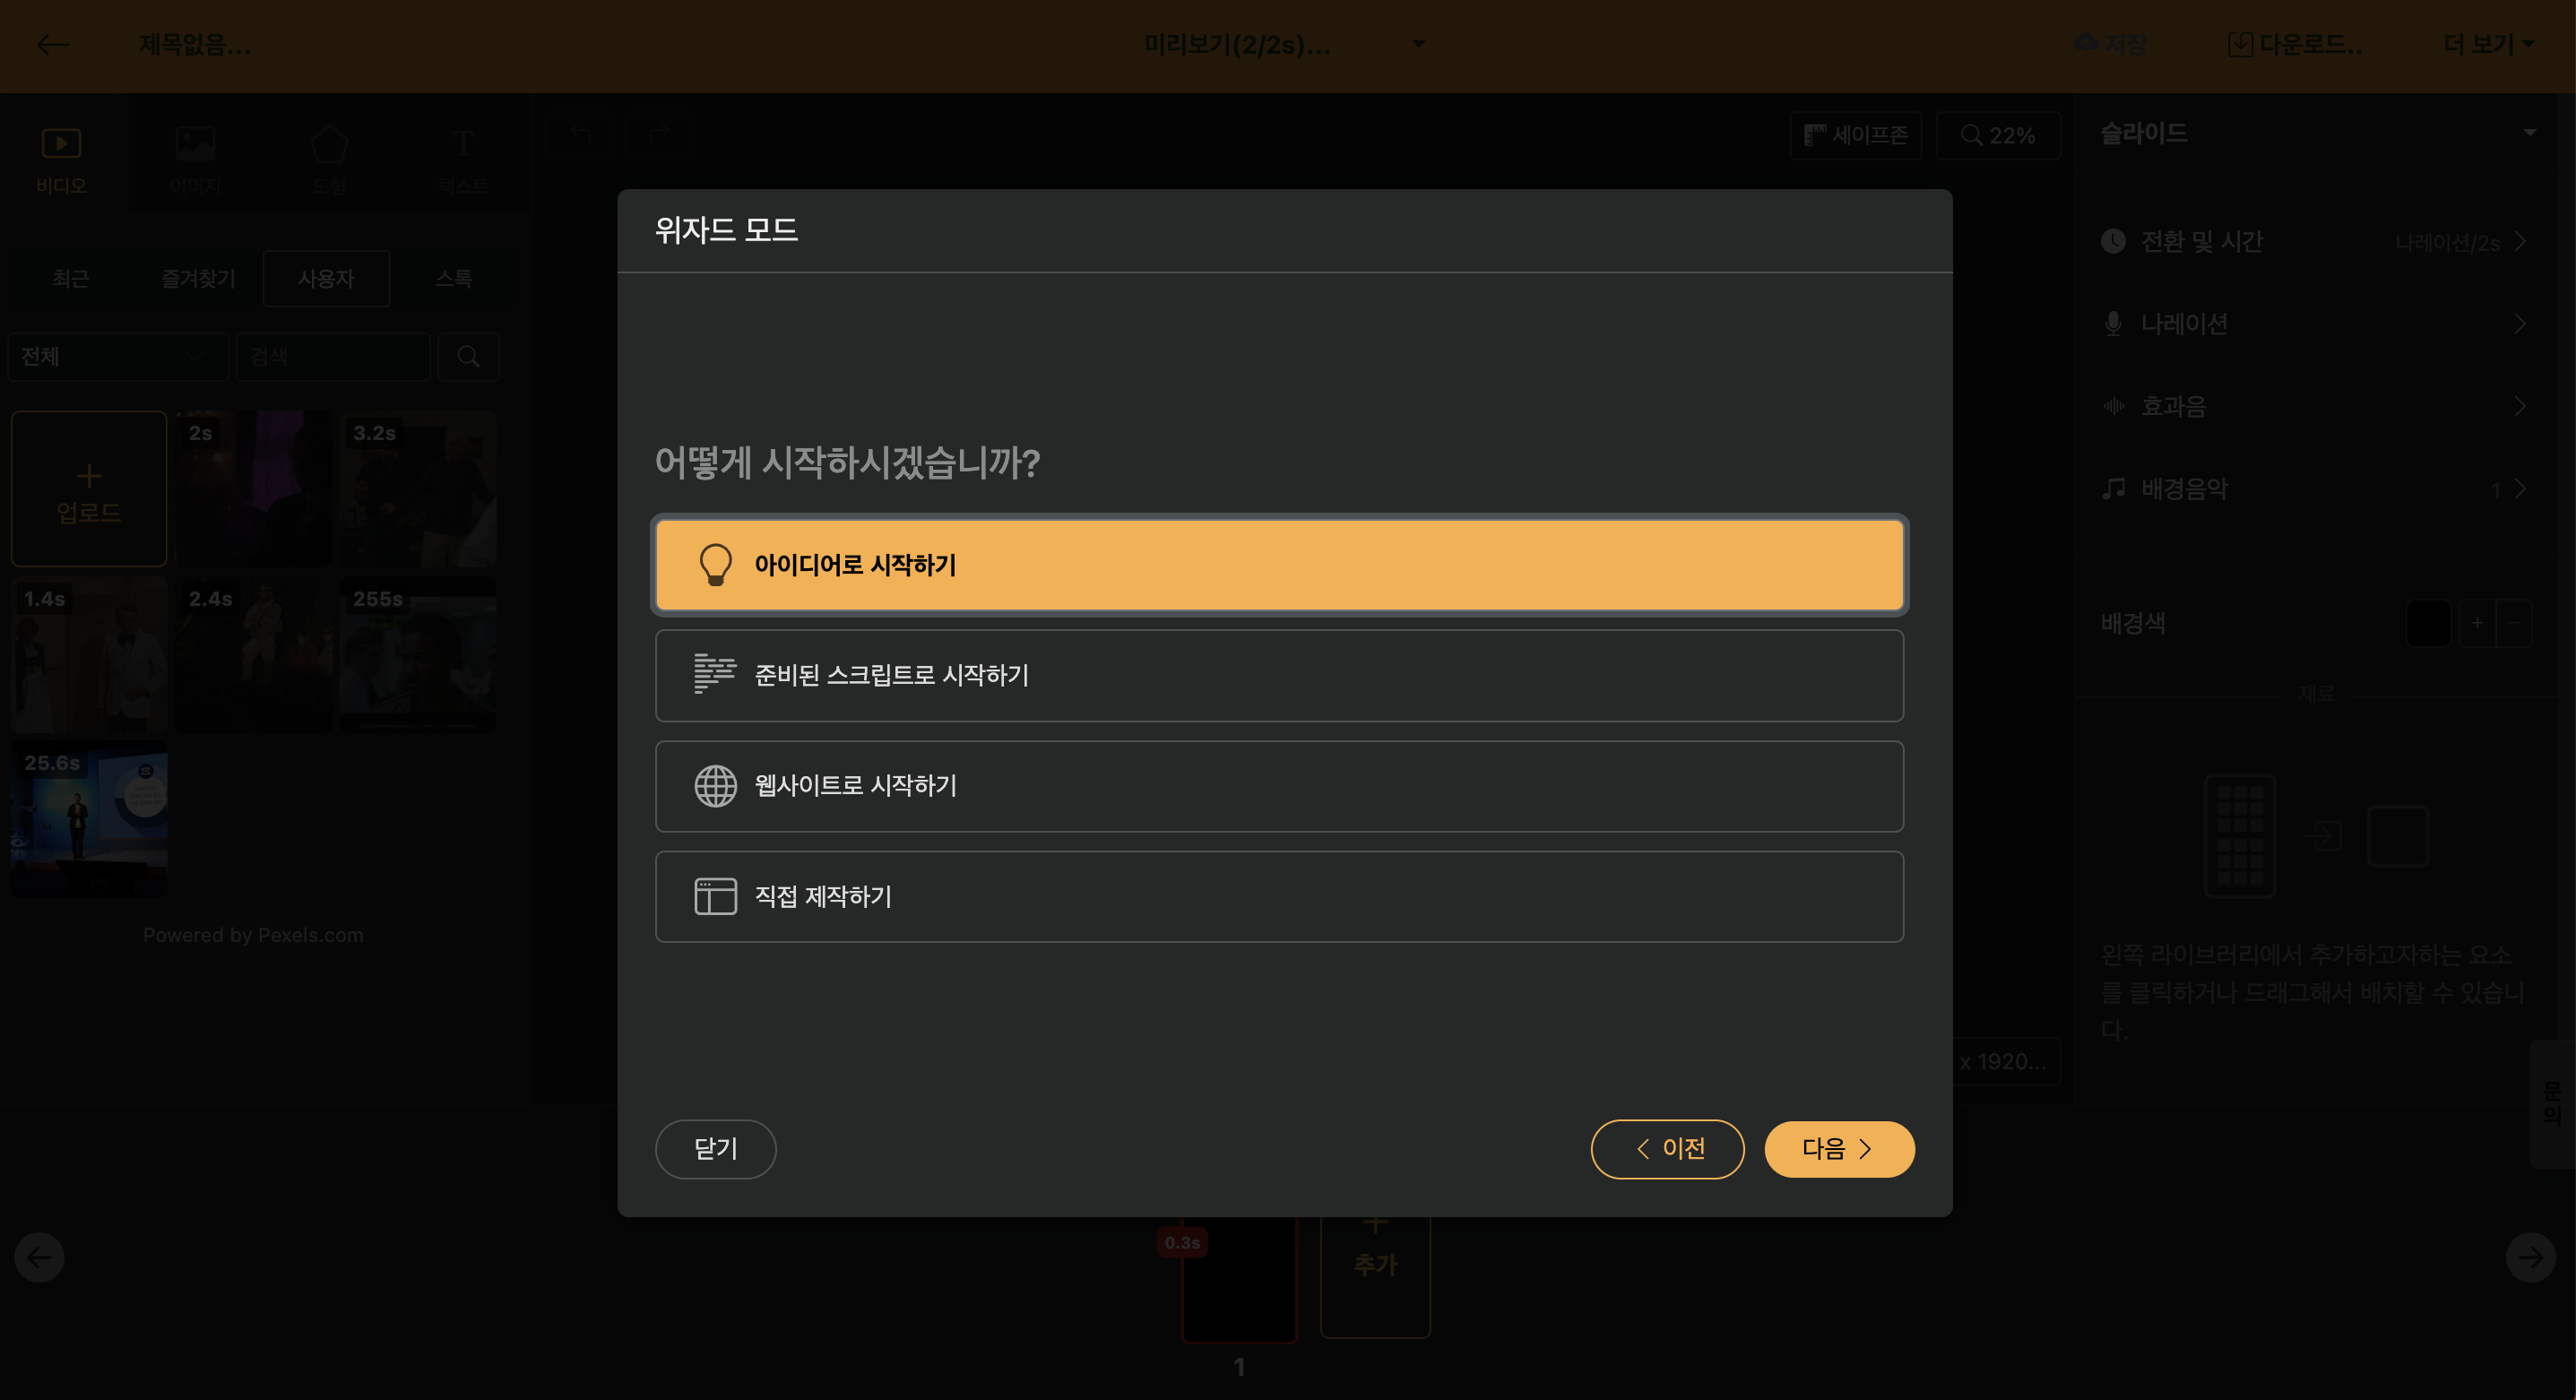
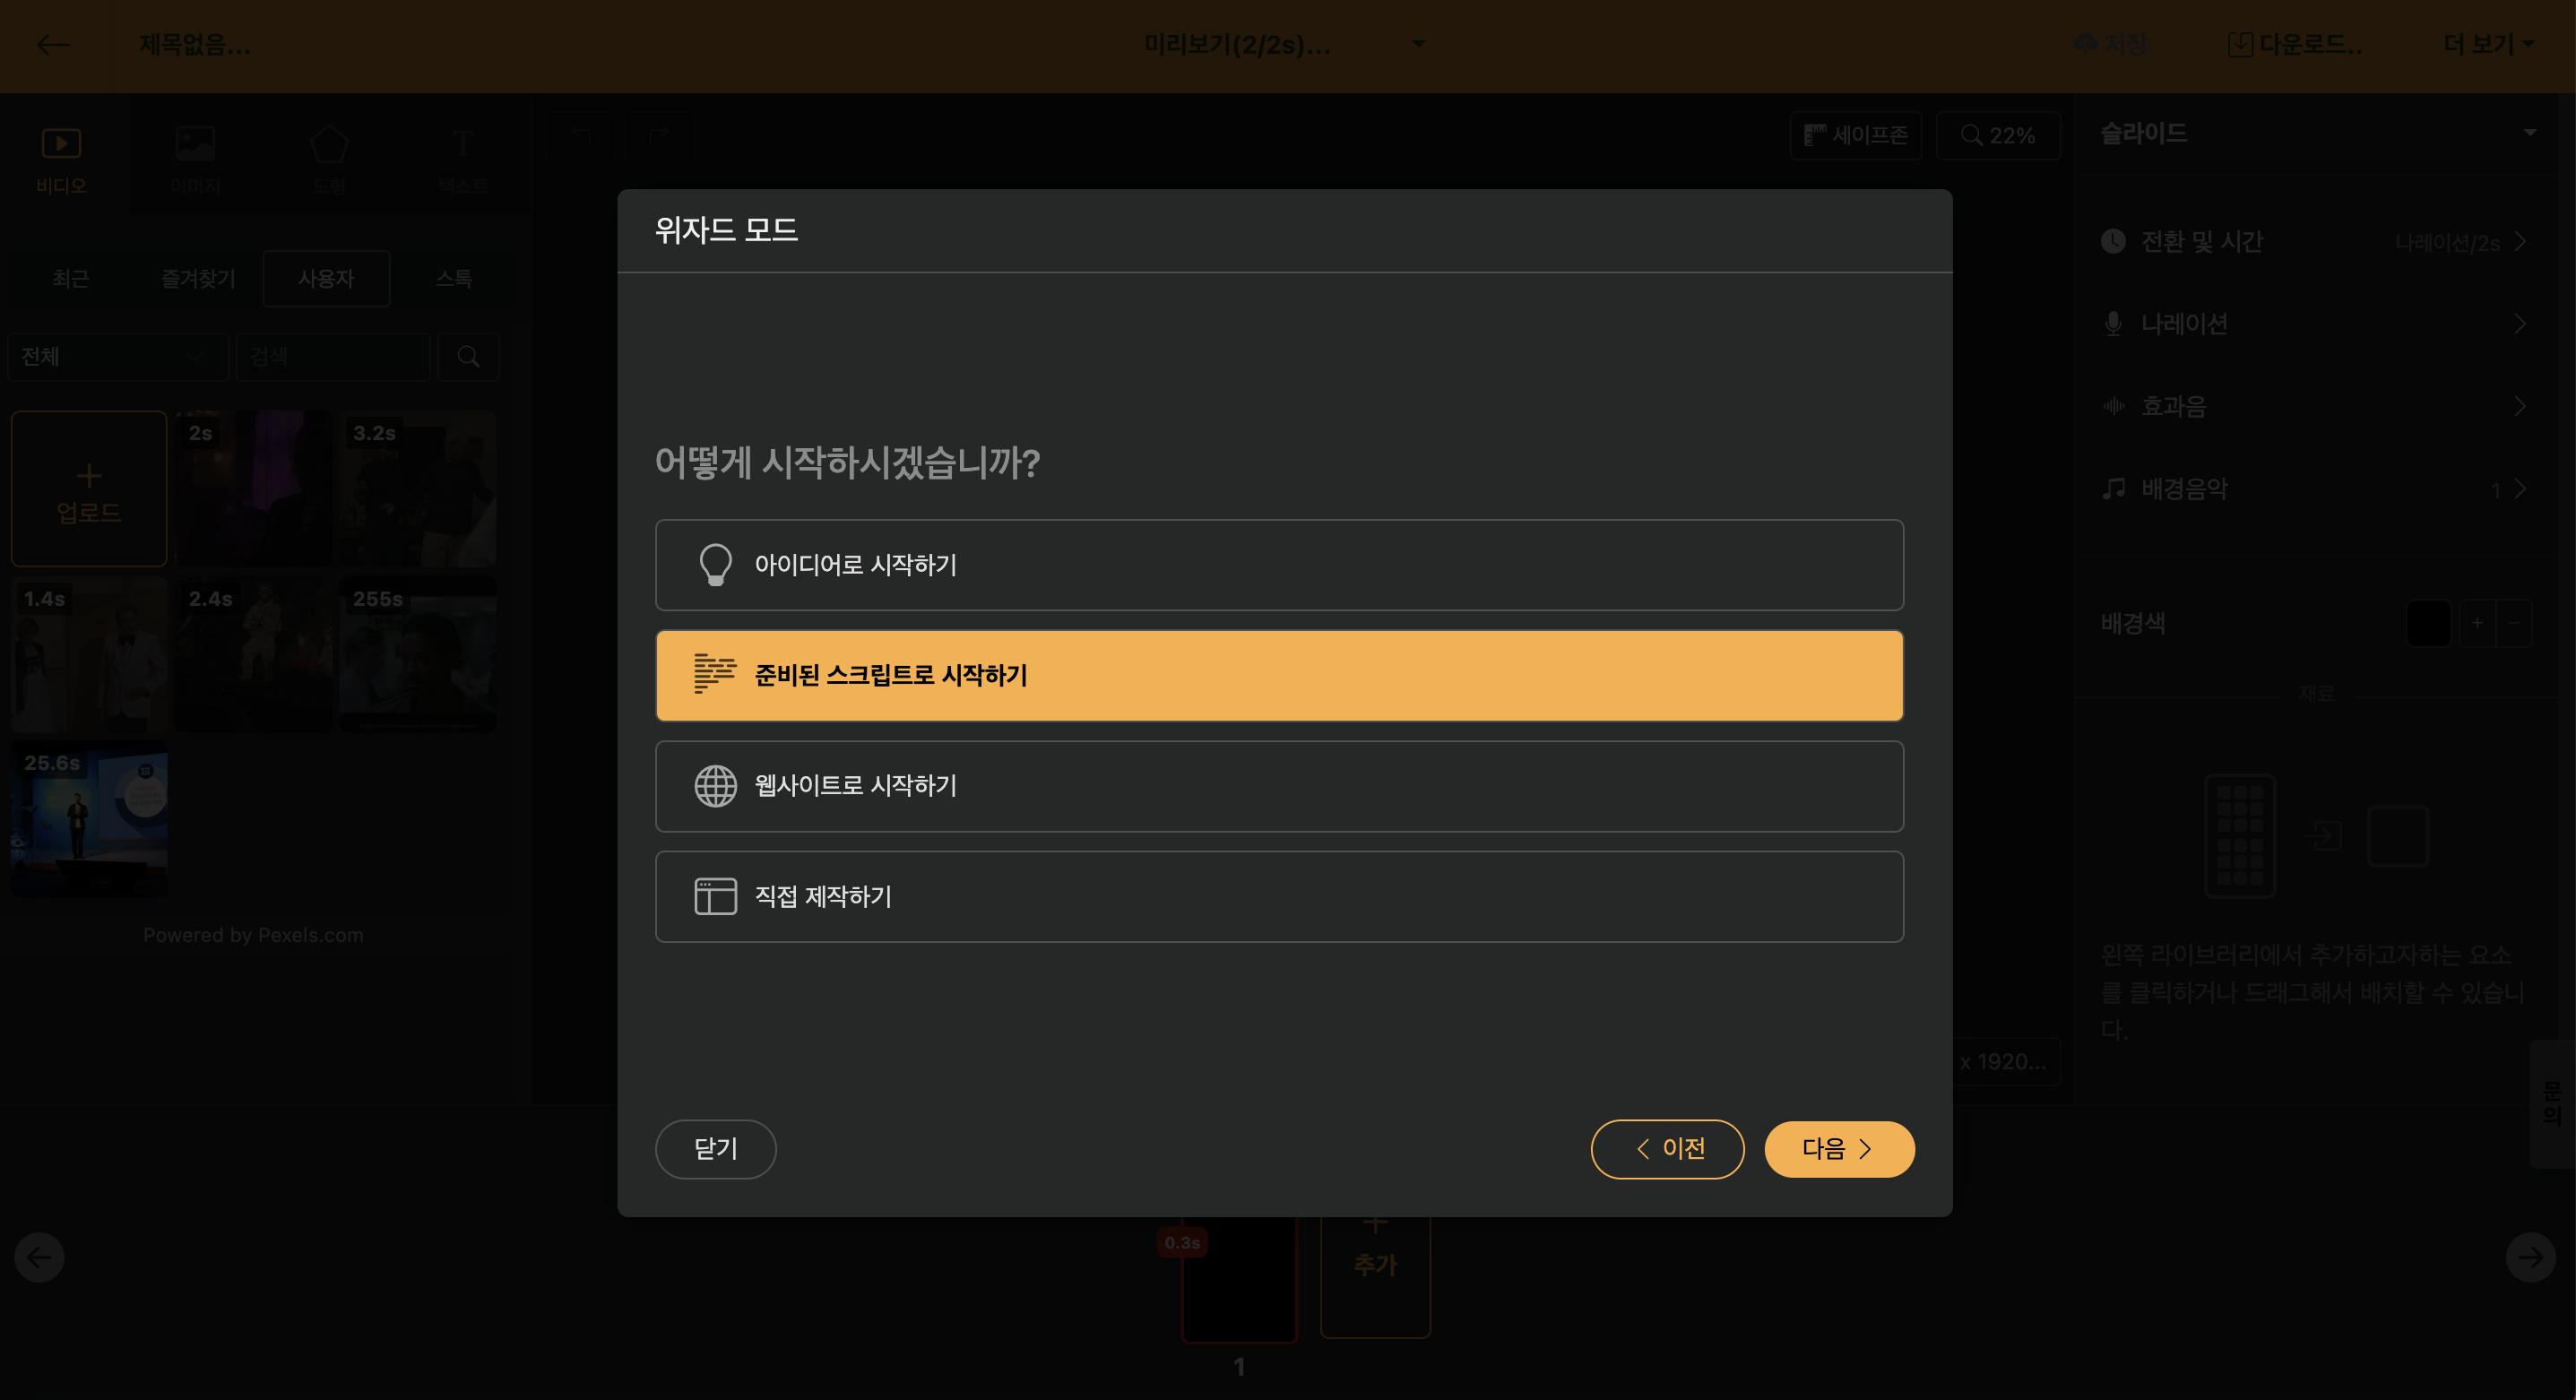
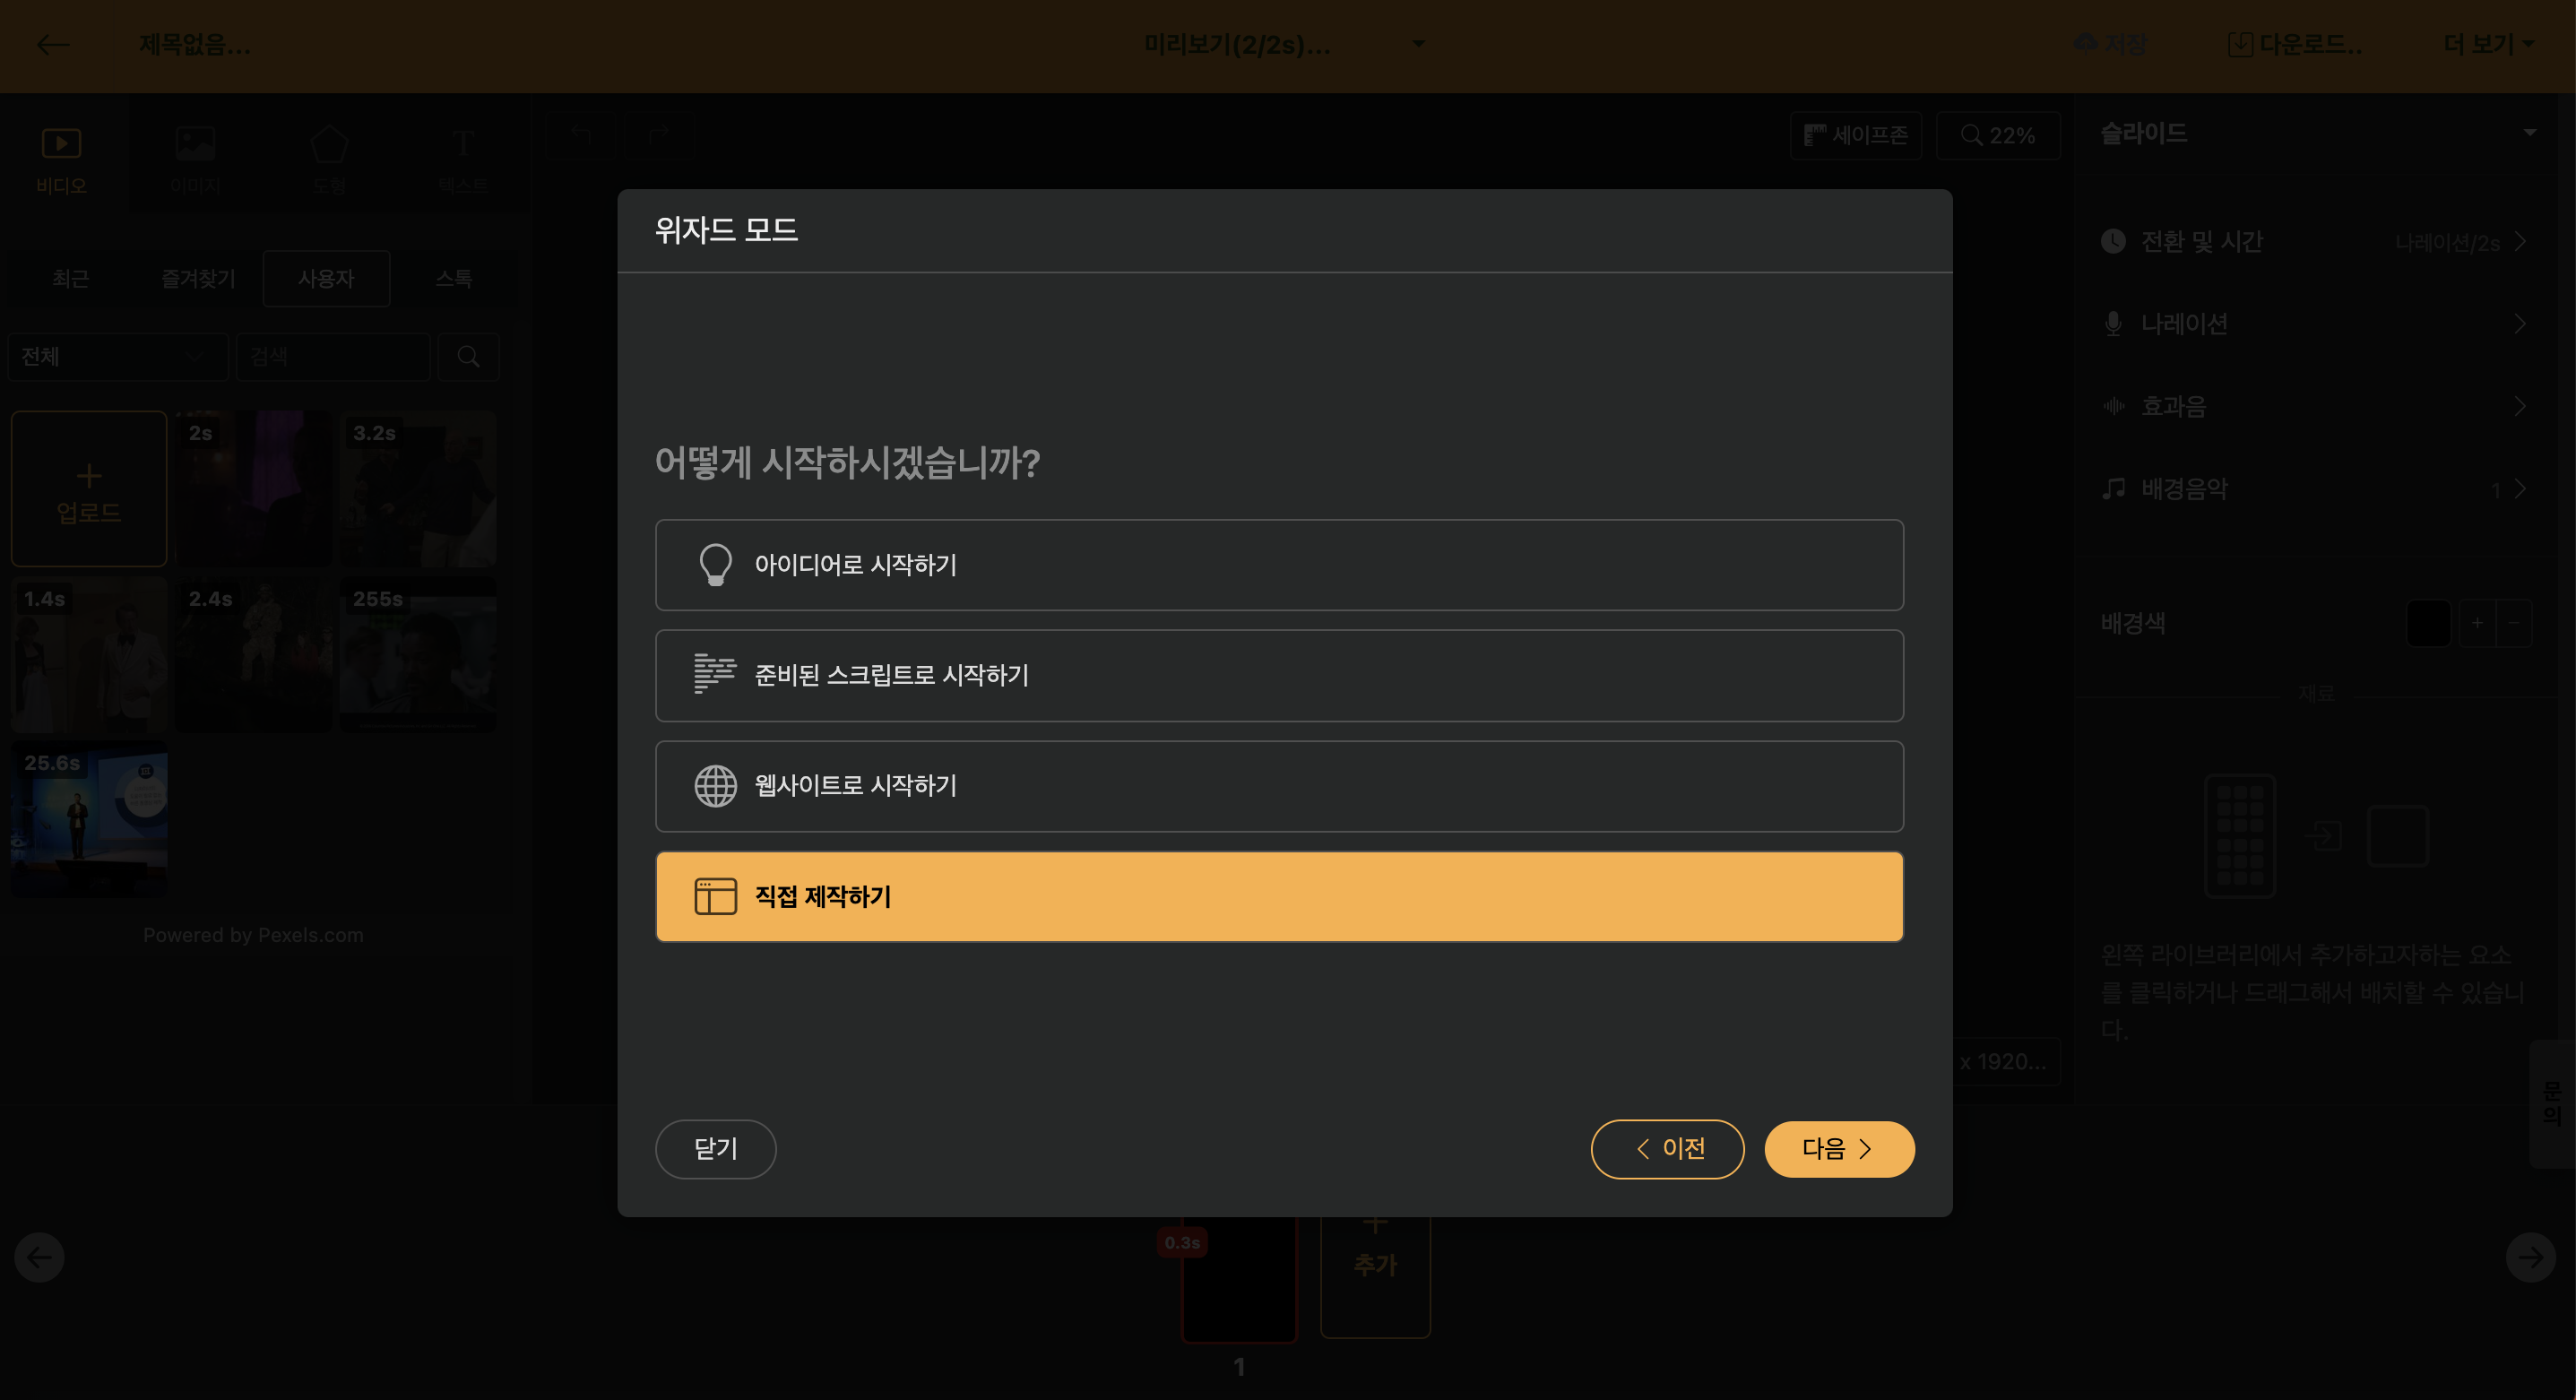
When you start a new project, Wizard mode automatically opens. This Wizard mode is a method that allows you to easily create videos from default input or a blog URL. If you want to do it yourself, you can cancel the Wizard mode by clicking [Start Immediately].
The method to start a project in wizard mode is to follow the [Follow the Wizard] section to practice.
Videostew allows you to use various materials to create and edit videos for everyone.
With this option, you can create a script for a short film or a long film with simple text input. You can specify 'target segment' and 'style' with the supported styles being as follows.
Style|Detailed Description
--|--
Informational Content|Creates a script that conveys fun knowledge and information easily and accurately.
Insight Column|Creates a high-quality script with specialized knowledge and communication skills in a specific field.
Tutorial Video|Creates a systematic script that accurately explains step-by-step guides and tips.
Brand Story|Creates a script that emotionally conveys the value and vision of a brand with a storytelling approach.
Customer Participation Event|Creates an attractive event promotion video script that encourages customer participation.
Case Study|Creates a professional script that analyzes and conveys successful case studies effectively.
Our Company News|Creates a news-type script that effectively conveys the latest news and achievements of the company.
Photo Essay|Creates a beautiful video script with images and emotional narration.

< Style Specification and Keyword Creation Preview >
Select each style and move to the next step to prepare a team for the best results. Refer to the relevant content and create the content with keywords or short sentences, then move to the next step to complete the script.
Of course, you can recreate the completed script or edit only the desired parts.
If you have prepared a draft video through Word or Memo, you can use Copy & Paste to utilize it.
If you want to change the length, you can use the [Trim] function at the top right. This function changes the length while maintaining the style of the script entered by the user as much as possible.

You can start editing videos with the URL of a blog content or news article URL.
When you enter the URL, it fetches the text and images included on the website, and if needed, you can change the length through the [Trim] function.
You can end wizard mode and start working directly in the editing screen. It is useful when creating intro and outro videos using [Auto Animation](/guide/tips/auto-transition) or [Language Learning Videos](/guide/tips/conversational-video).
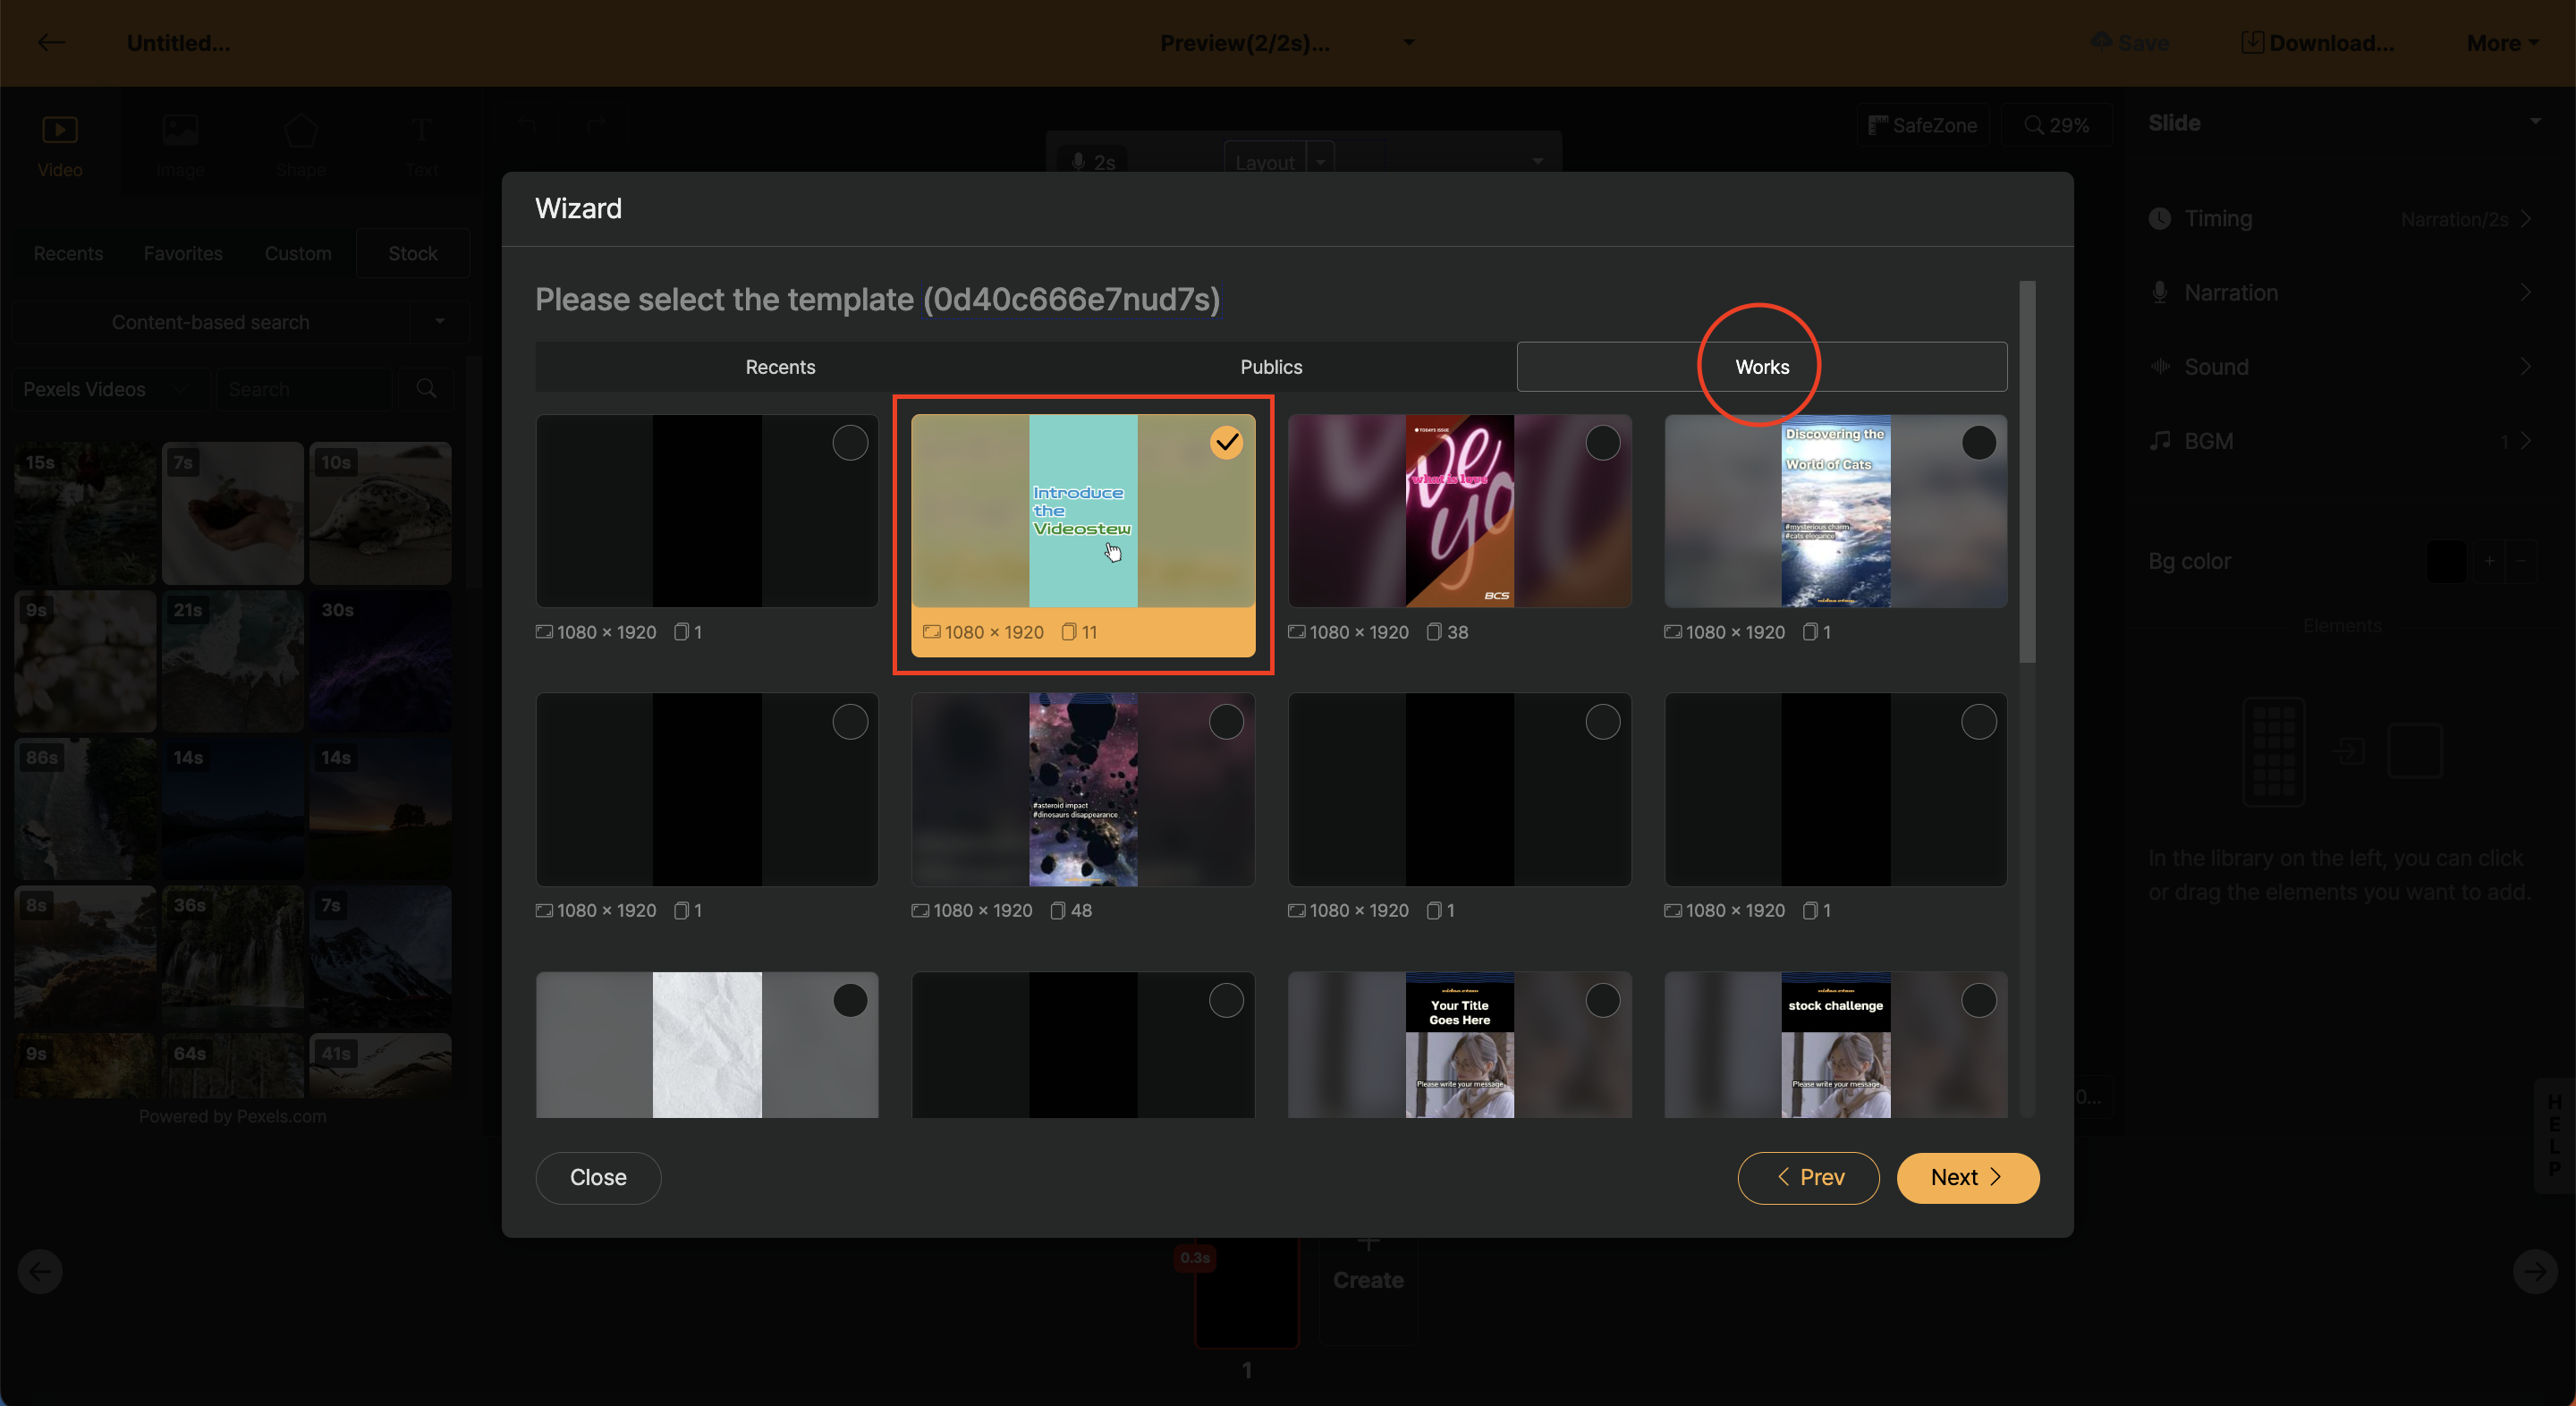
If multiple scripts have been created, the screen that allows you to select the template that will be applied afterward appears. After creating a script, the template, or stage, to which the script will be uploaded, is displayed.
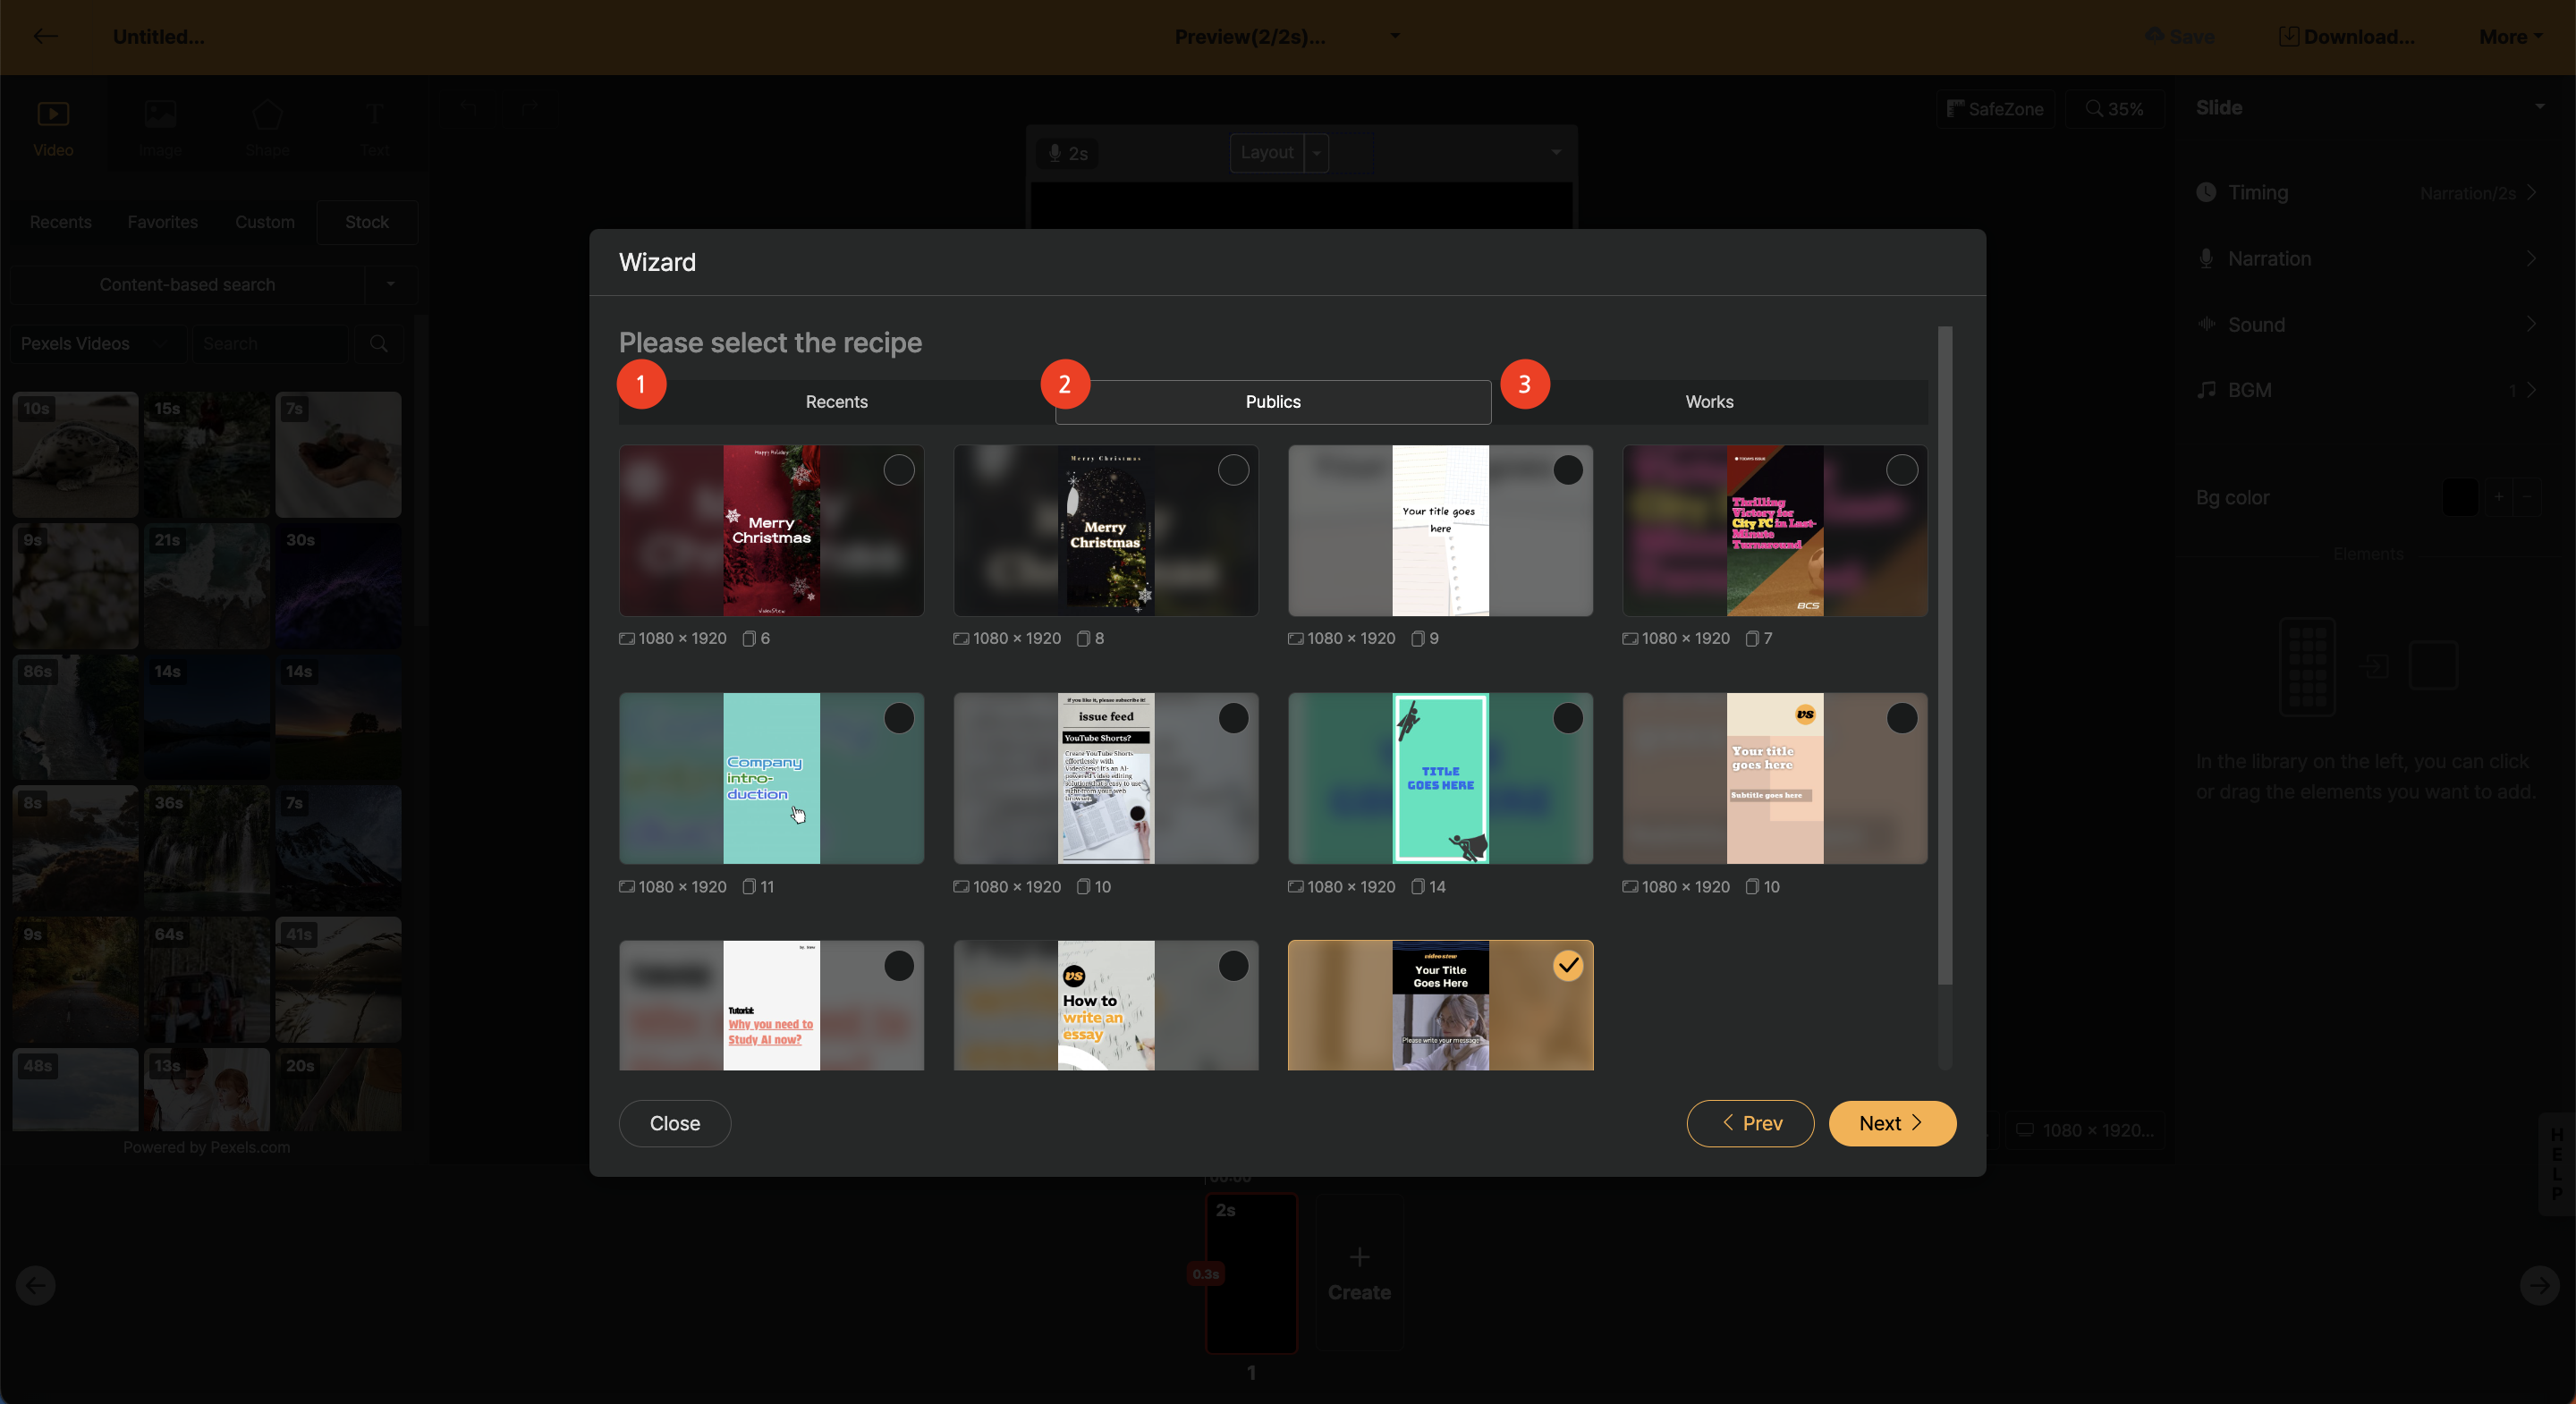
< Selecting a Template in Widget Mode >
1. Recent: The most recently worked projects list is output.
2. Basic Template: A list of basic templates provided by Videostew.
3. My History: If you create and repeatedly use [My Template], all the projects you create will be listed here.
In the final stage, you can view detailed information of the template to be applied and directly modify the necessary elements before proceeding to the editing screen.
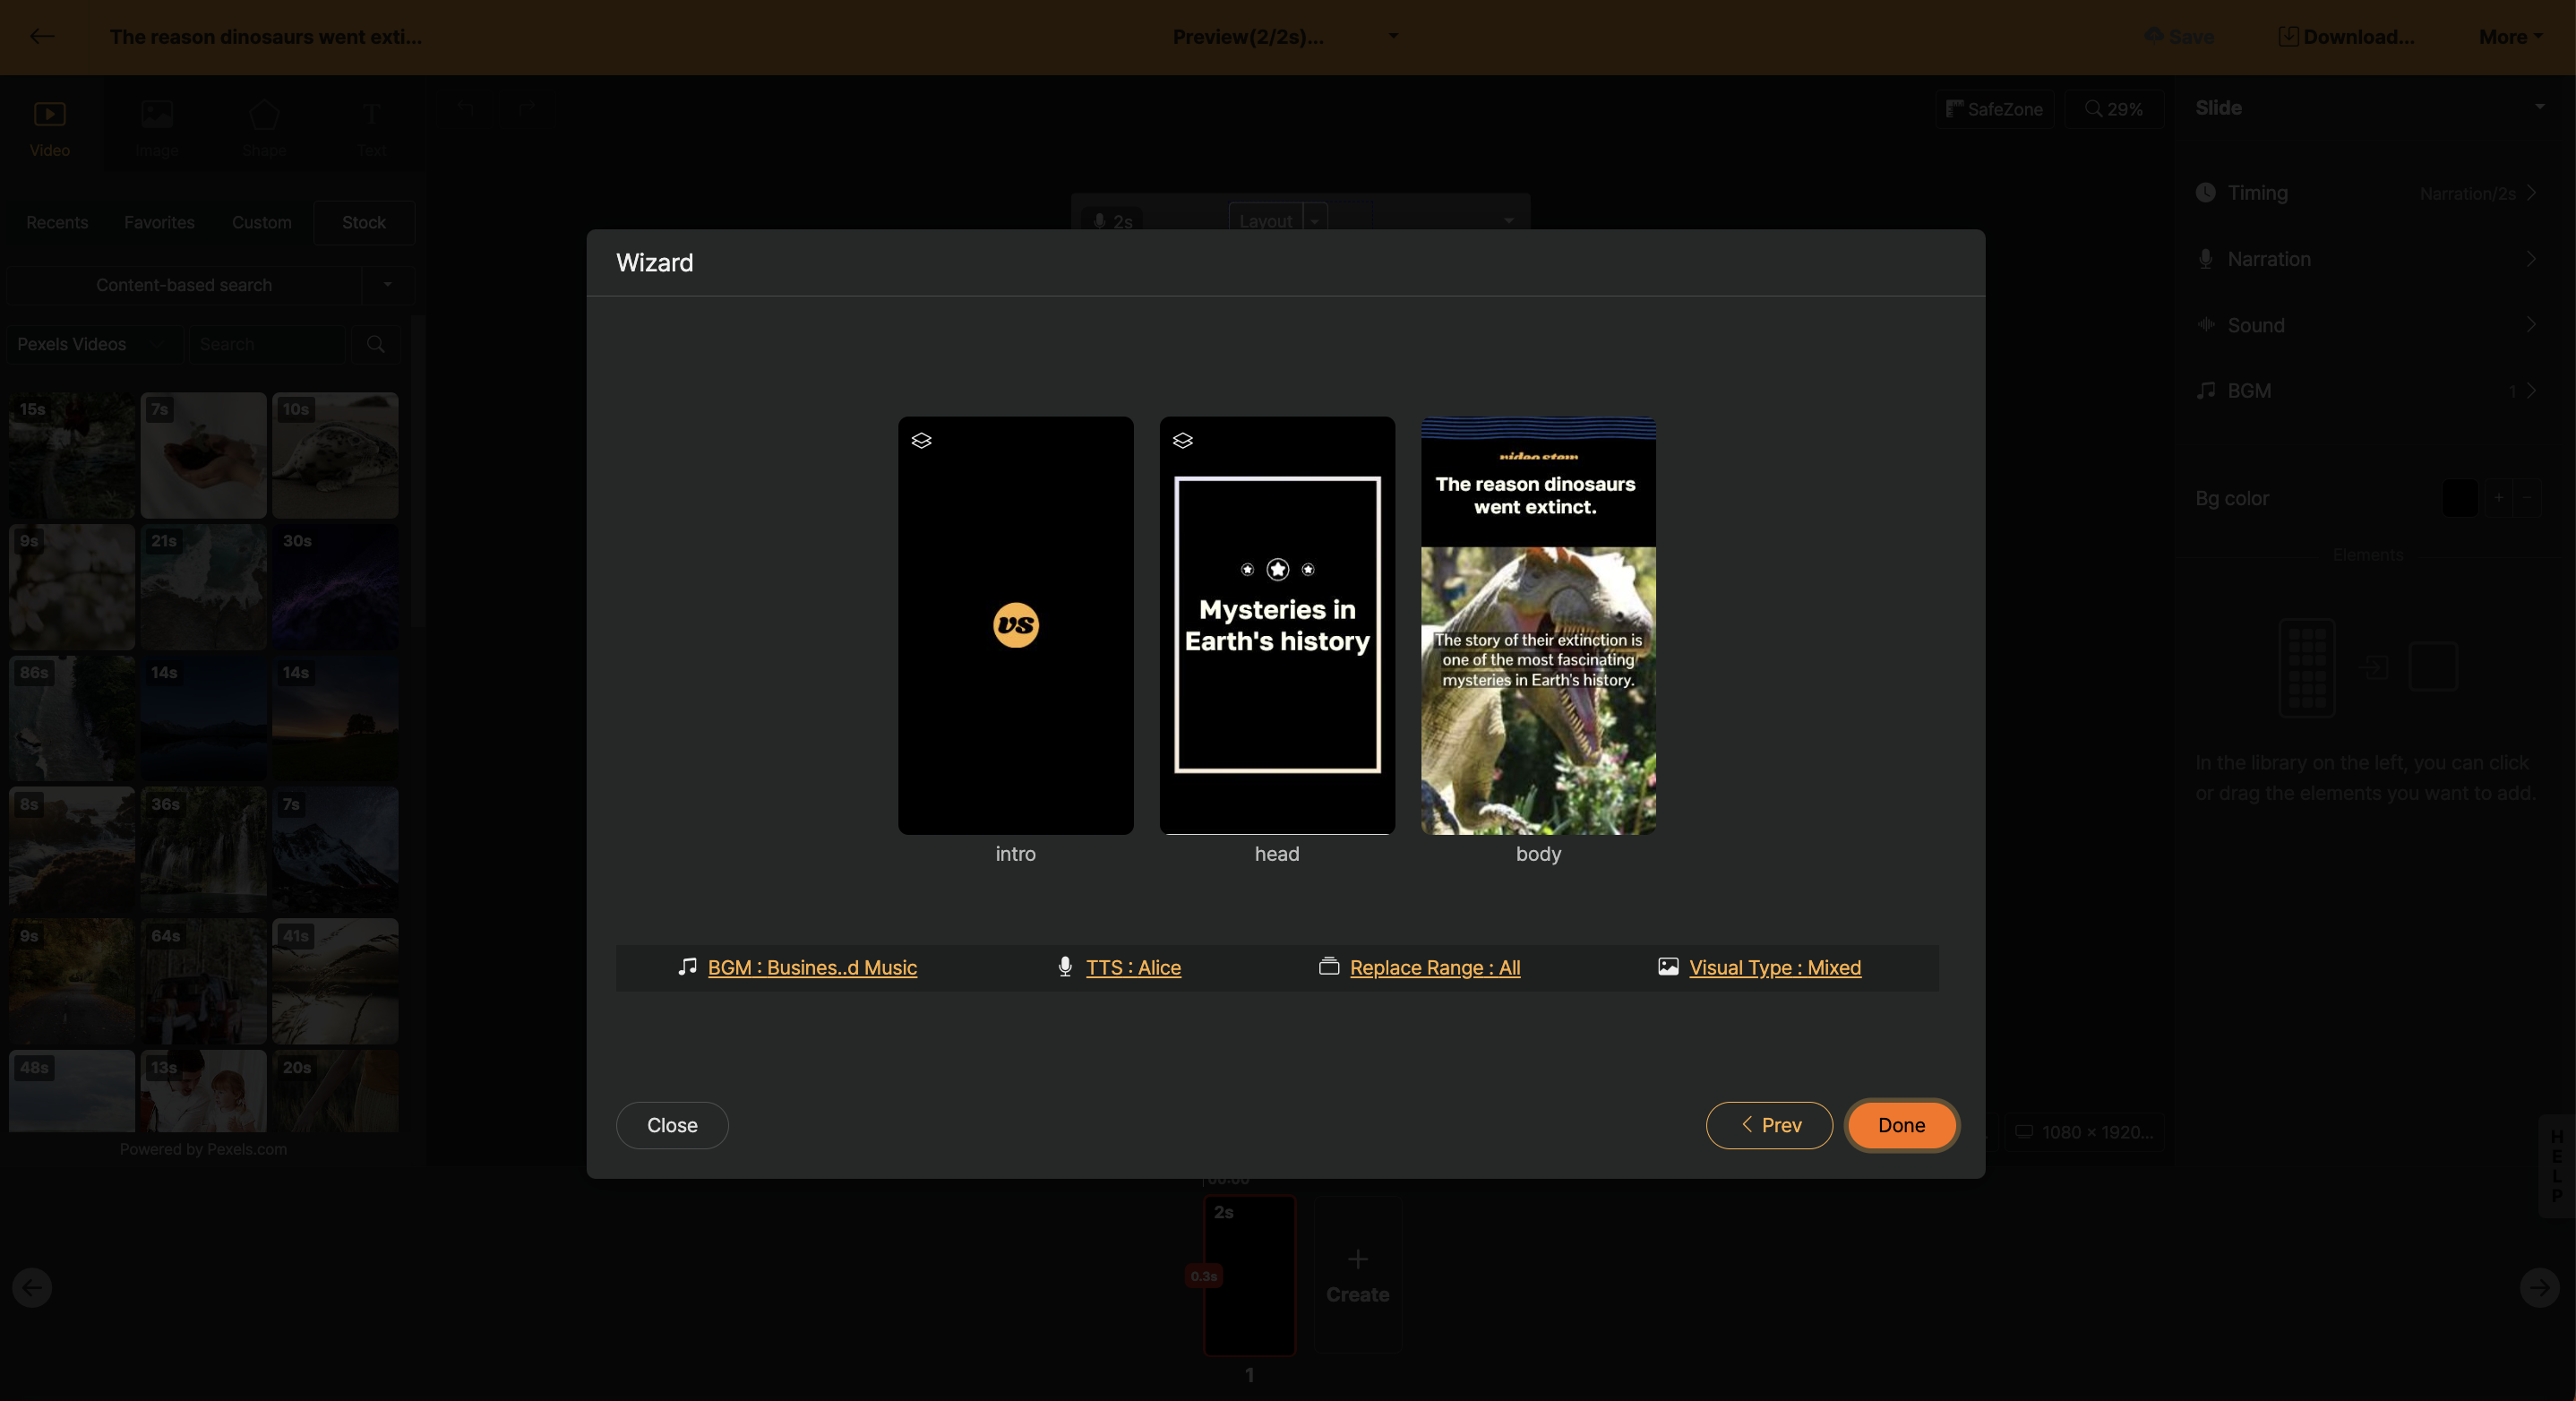
< Detailed Settings Screen for Template >
1. Change BGM: Change the BGM to be used in the project to be created.
2. Change AI Voice Actor: Change the AI voice actor to be used in the project to be created.
3. Replacement range: Choose whether to change the entire template or just the actual text part. For example, if the template is an intro animation commonly used by your brand, it is recommended to set it to change only the text.
4. Visual type: Select the type of video/image library that matches the content. By default, it is set to 'mixed', which uses both video and image libraries.
Videostew allows you to record multiple voices directly or upload pre-recorded files for use instead of AI voice. Shall we look at each method?
Selecting 'Voice Recording' in the narration allows you to record voices immediately through your computer.
<3, 2, 1 After recording starts!>
When recording yourself, you can press the `→` key on your keyboard to continue recording into the next slide seamlessly. Think of it as naturally narrating while watching a PowerPoint slide. And once the recording is done, you can press the `ESC` key or click the "Stop Recording" button to finish the recording.
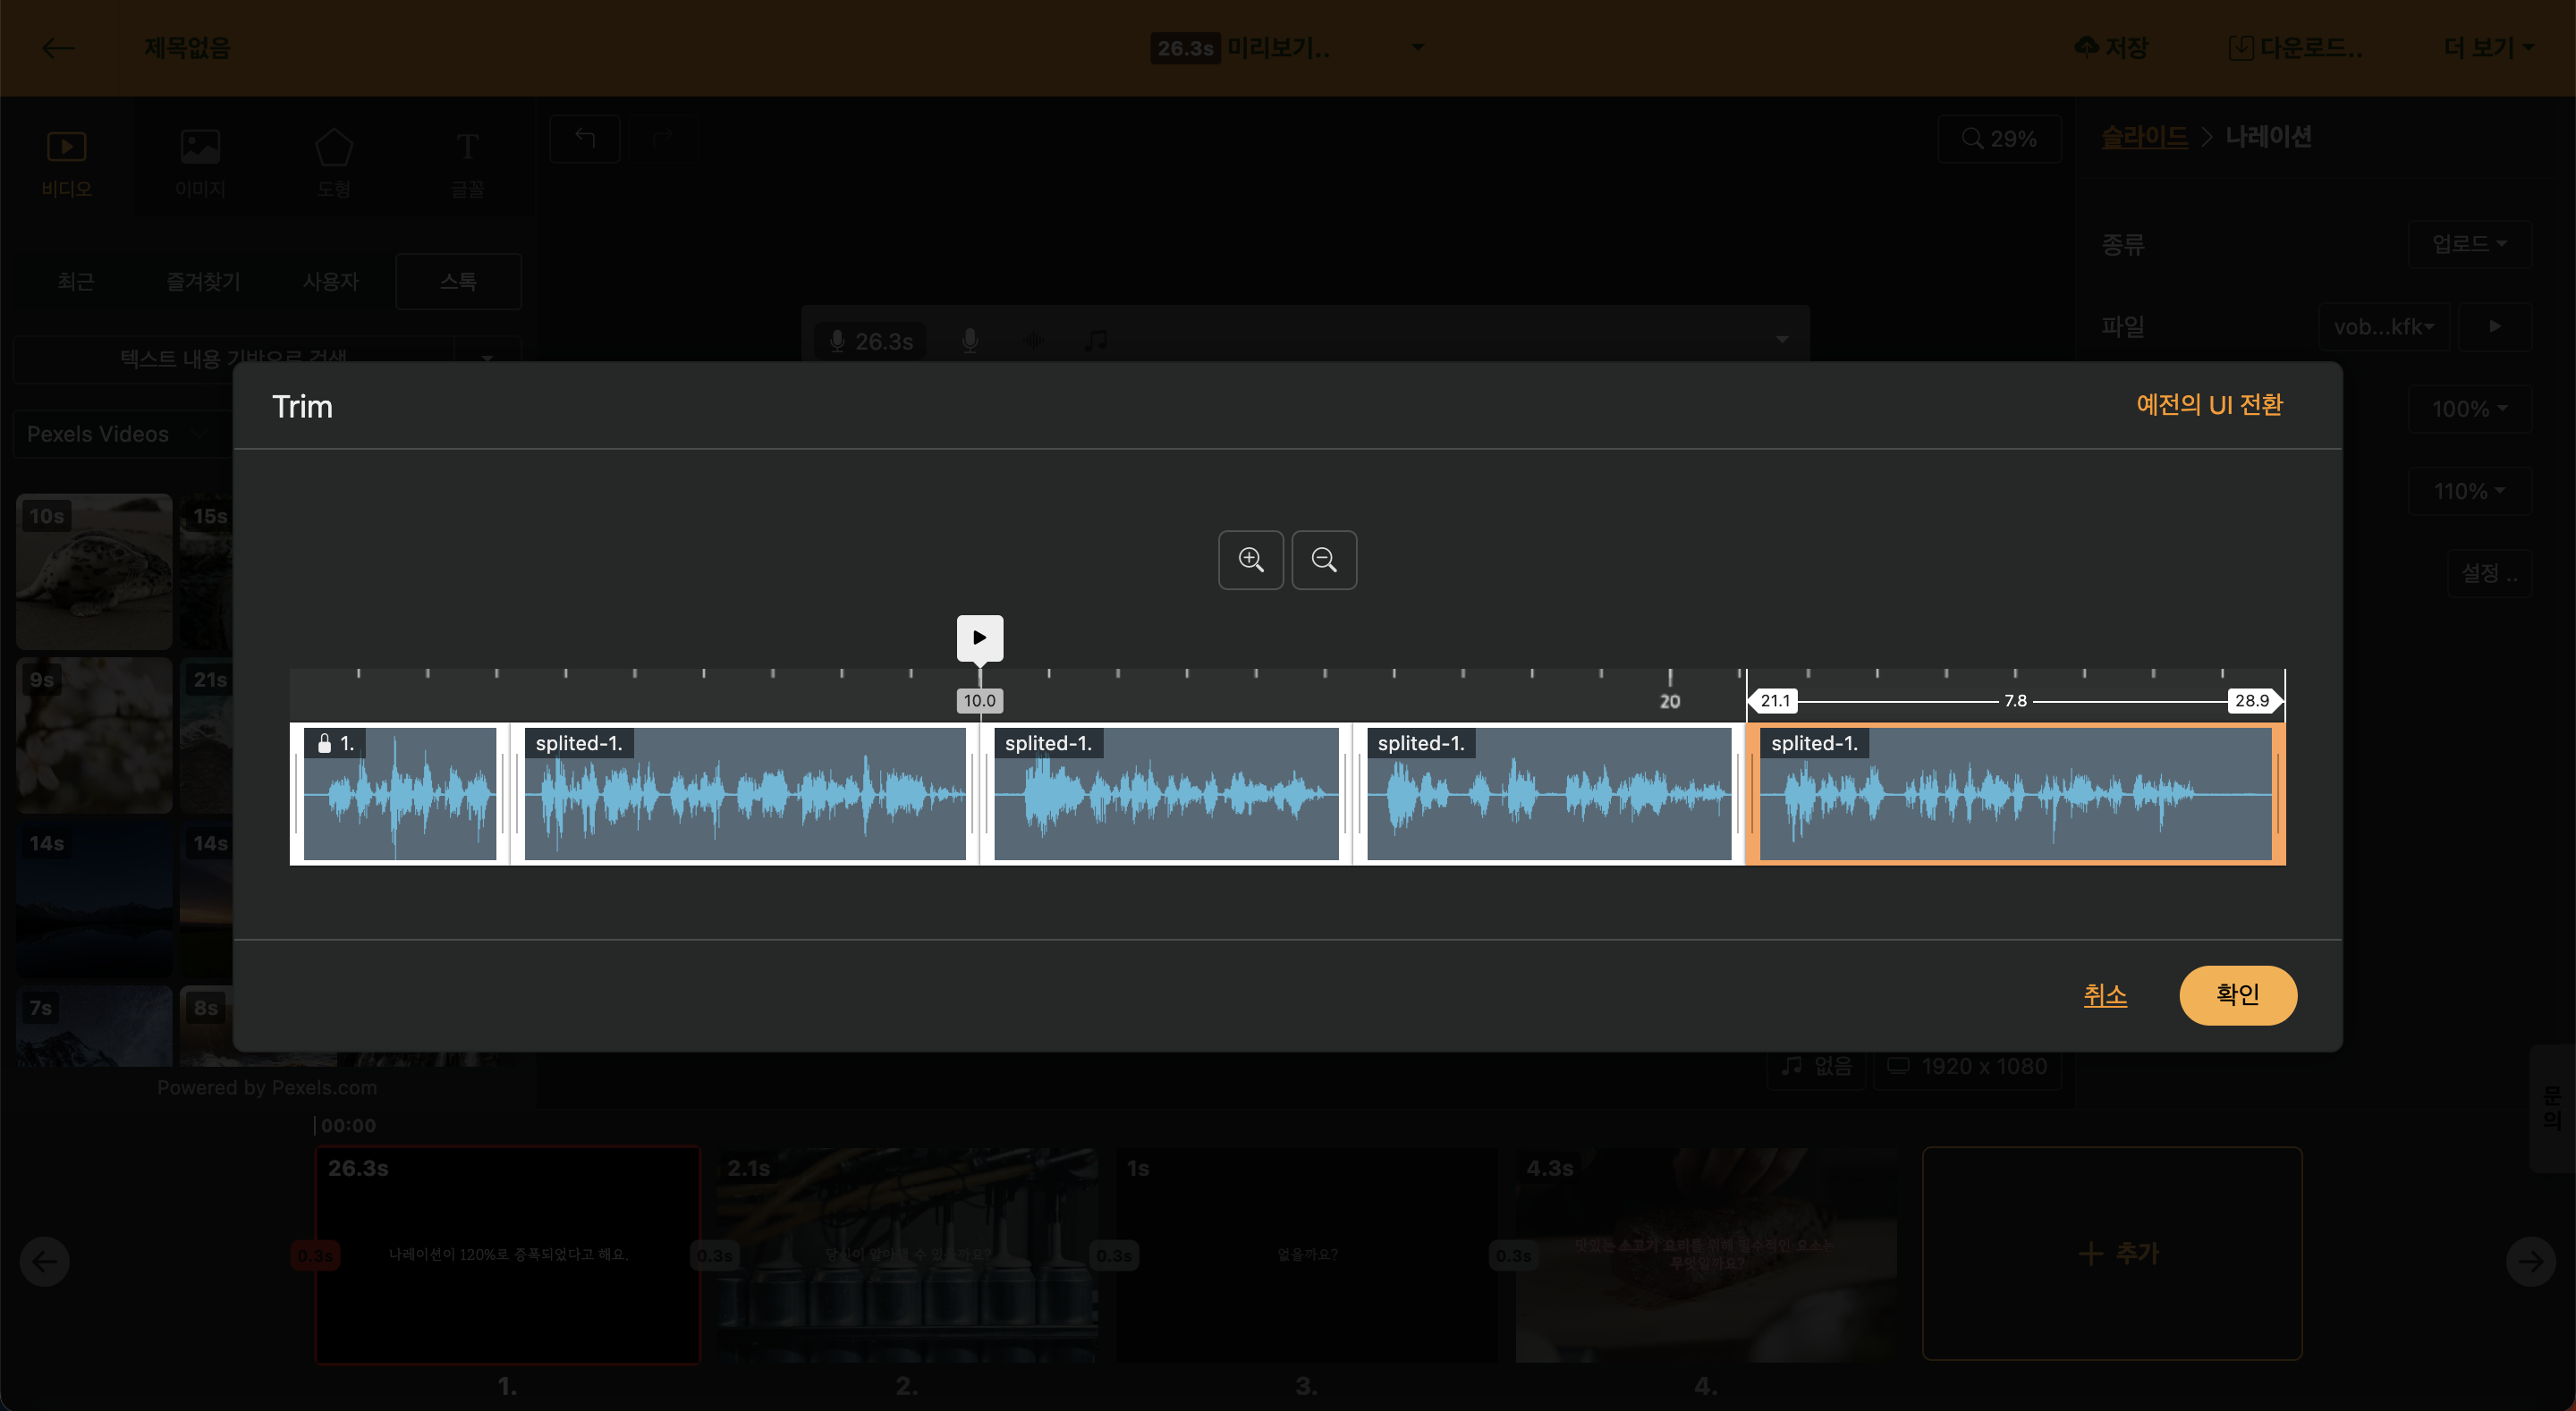
If you have recorded using a different solution, you can directly upload the recorded file (MP3) to Videostew for use. After clicking "Navigation > Upload", press "Choose File" to select your MP3 file.

In this guide, let's assume the MP3 file is not existing separately for each slide, but rather as a complete audio file for the whole presentation. First, select all the slides to edit at once and choose the uploaded audio file. However, the portions to be read for each slide have not yet been set.
So, for the next step, click 'All' next to 'Narration > Playback Interval' to set the 'Falling Interval' for each slide. Once the work is done, you can automatically check that each slide's duration has changed. The trimming method is detailed in [Playback Interval (Video Trim)](/guide/edit/basic/video/trim), so please refer to that for confirmation.
If it is an MP3 file with audio, captions will be automatically generated, and you can conveniently compose and edit slides according to the captions.
https://youtu.be/e6P9dO9QAdE
< Creating and Editing Automatic Captions >
Users with a Brand plan or higher can invite other users. This is a feature typically used for team projects or collaboration within a single brand channel.
In addition to the invitation, the user can also utilize an individual workspace.
To invite another user to the workspace, go to “Workspace Settings(▼) > Edit” screen, enter the email address and press the “Invite” button. Please make sure to press “Complete” at the end for the changes to apply. Remember this.

< Invite another user to the workspace >
The invited user is provided with a "Default Workspace" that can be used exclusively by the respective user, apart from the cooperative workspace. It is also possible to share work materials through the project copy and transfer functions to the cooperative workspace.
Videostew recognizes changes between each slide and creates animations. Generally, you can utilize this when creating intro or outro templates that require flashy movements.
Please refer to the following two videos for how to use auto animation.
https://youtu.be/2v5FM6idmbE
< Creating an animation like flipping through photos >
https://youtu.be/EU-81TZzXfU
< Making a typographic video >
Shall we take a closer look at how to use auto animation?
< Click the Add Project button >
[Wizard mode] will skip the setup and start "Immediately".

< Click Start Immediately on the bottom left >
You'll see an empty slide like the screen below. Let's insert a "shape" element here. After searching for any element, click it to insert into the [Editing Window](/guide/edit/view/stage).

< Click to insert element >
Now, click the "+ Add" button in the [Slide Window](/guide/edit/view/slide-navigator) at the bottom right to duplicate the first slide. Then, we will reduce the size of the elements in the second slide and arrange them in a grid.
Next, set the [Transition Effect] to "Auto" and the [Transition Duration] to about 2 seconds. When in "Auto" mode, the auto-animation will be generated because the system operates the animation automatically. Here, applying 2 seconds means that the movement for the second slide will be created over the duration of 2 seconds when it starts.
And if you try the preview in advance, you can confirm that the image element shrinks and moves towards the bottom right over 2 seconds in the animation that has been created.
!Animations only operate when the same element is on multiple slides. Even if it's the same image, if you have uploaded it several times, it may be treated as a different element, so please be careful. If you are sure that it is the same element but the movement is not applied, please check if the [Transition Effect] is set to "Auto" or if the [Transition Duration] is more than 0 seconds.
You can try out various "transition effects" from simple movements to common animations. If you look at the bottom of the "Playback Time", you will see a message that says "Transitions are applied to the entire project, currently [OutExpo]," along with a "Change" button. Here, you can set up different movement effects.

While holding the mouse, you can preview how the movement will be realized. Try setting different effects and previewing them to find the movement you want.
In Videostew, you can designate a specific slide as a thumbnail and download it as an image file. When set as a thumbnail, it is included in the video file itself and is automatically reflected when uploading to YouTube.
YouTube Shorts does not yet support thumbnails. Therefore, you cannot use a custom thumbnail for YouTube Shorts.
Click on the settings (▼) at the top right corner of the slide and press the "Set as Thumbnail" button. The slide set as a thumbnail will also be used on the [Home Screen](/guide/edit/view/top/more/setting/home), making it convenient to find your created works.
Click the settings (▼) on the upper right side of the slide and press the “Download” button to save the image file to your computer.
In the editing screen, you can enter keywords like `intro` or `outro` into each slide note to create reusable templates. These templates with predefined slide notes will remain as they are when [starting with widget mode], so if you create intro or outro videos that fit my channel in advance, it becomes easier.
< Set layout-specific objectives using slide notes >
First, create a new project or open a project that you have already worked on.
The first thing to do is to specify slides that will be repeatedly used as intros and outros, as well as the thumbnail images. When you click the number in the [Slide Window](/guide/edit/view/slide-navigator), the 'Slide Note' menu appears. Here, you can assign the role for each slide.
The available slide note types are as follows.
|Code|Role|
|--|--|
|title|Specify the first slide of the project for the thumbnail. It will not be included in the actual video as it is excluded from rendering.
|intro|Use to display the channel logo or convey important core messages|
|head|A slide for expressing transitions between scenes or the sequence of first, second, etc., in the middle of content|
|body (생략 가능)|The space where the actual text is entered. When [starting with this template], new content is reflected.|
|outro|Placed at the end of the project and used for CTA (likes, subscription requests)|
! When using the [start with this template] function from my past works, if no slide note like `intro` or `outro` is specified, the [wizard mode] will not be invoked. If it's a template that doesn't use separate `intro` or `outro`, a slide named `body` is needed.
The way to start video editing by inserting a new script into a template made just for me is in two ways.
When starting a new project, you begin video editing by entering a title and content through the wizard mode. At this time, at the last stage, if you select my works, you can see the projects that you have edited in the past.
You can choose a project that will be utilized as a template among these.
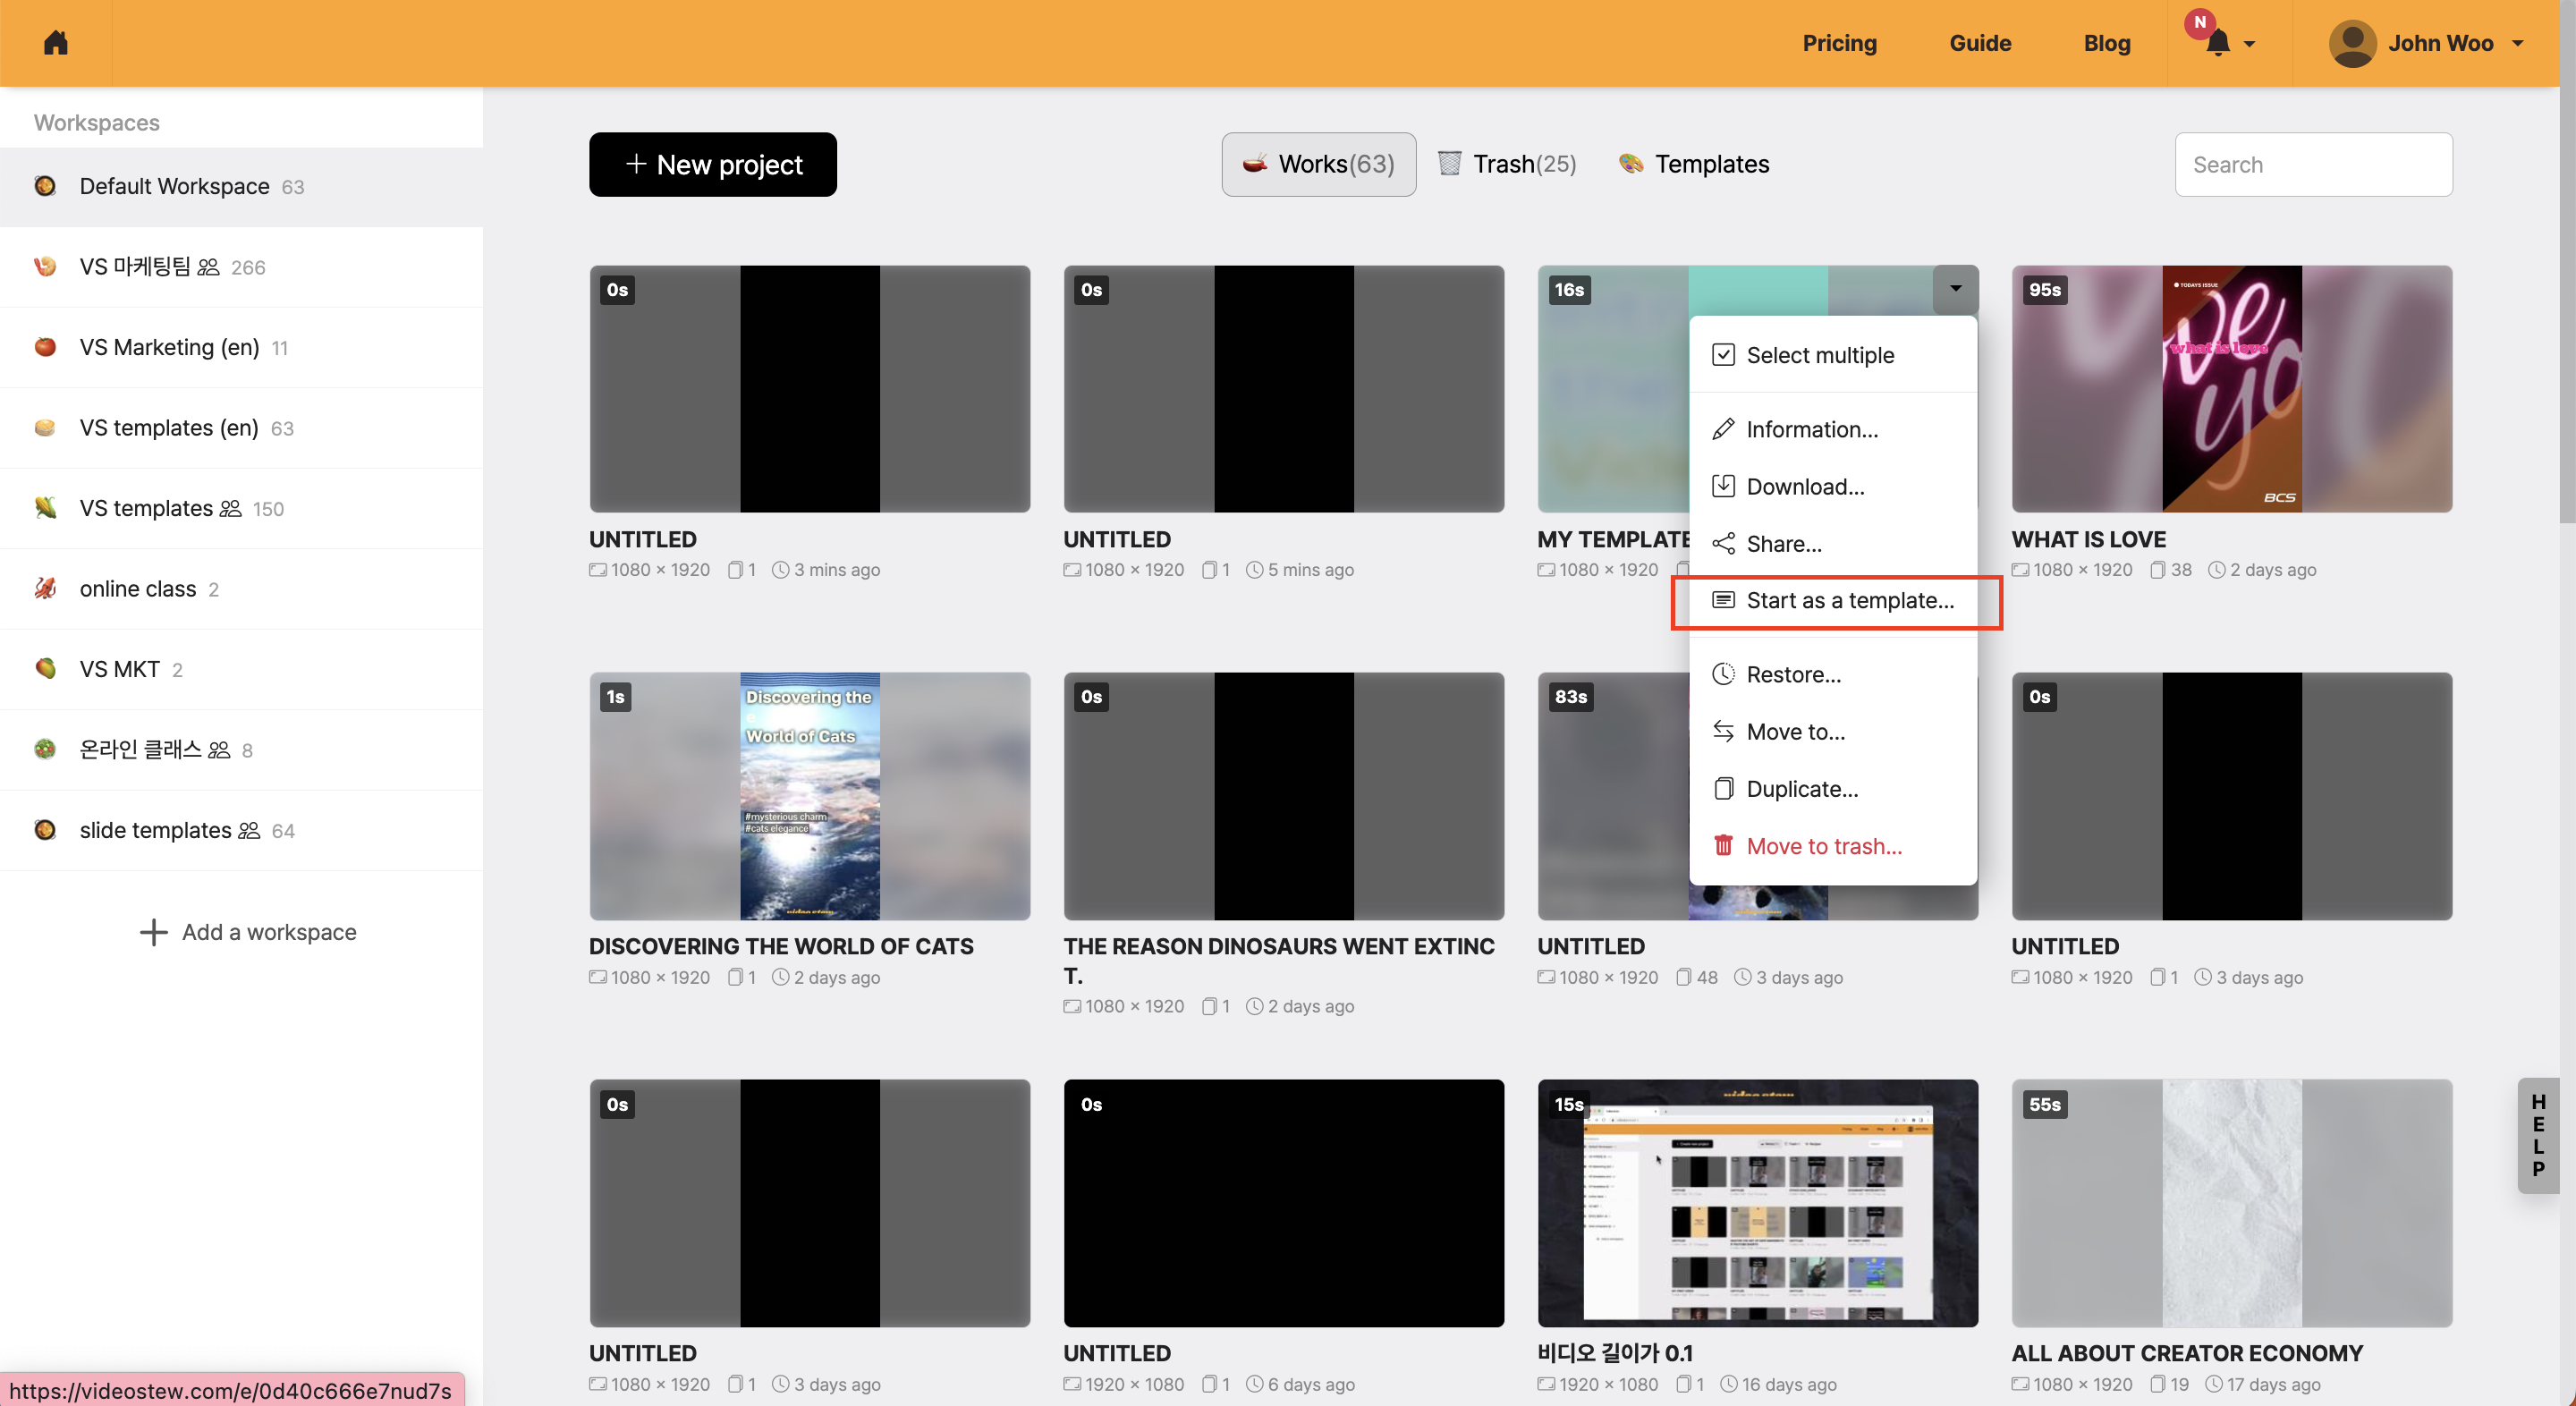
The second method is to open the drop-down menu of the projects you want to use as templates in the project list and start the project immediately with the [Start with this template](/guide/edit/view/top/more/start-as-template) function.
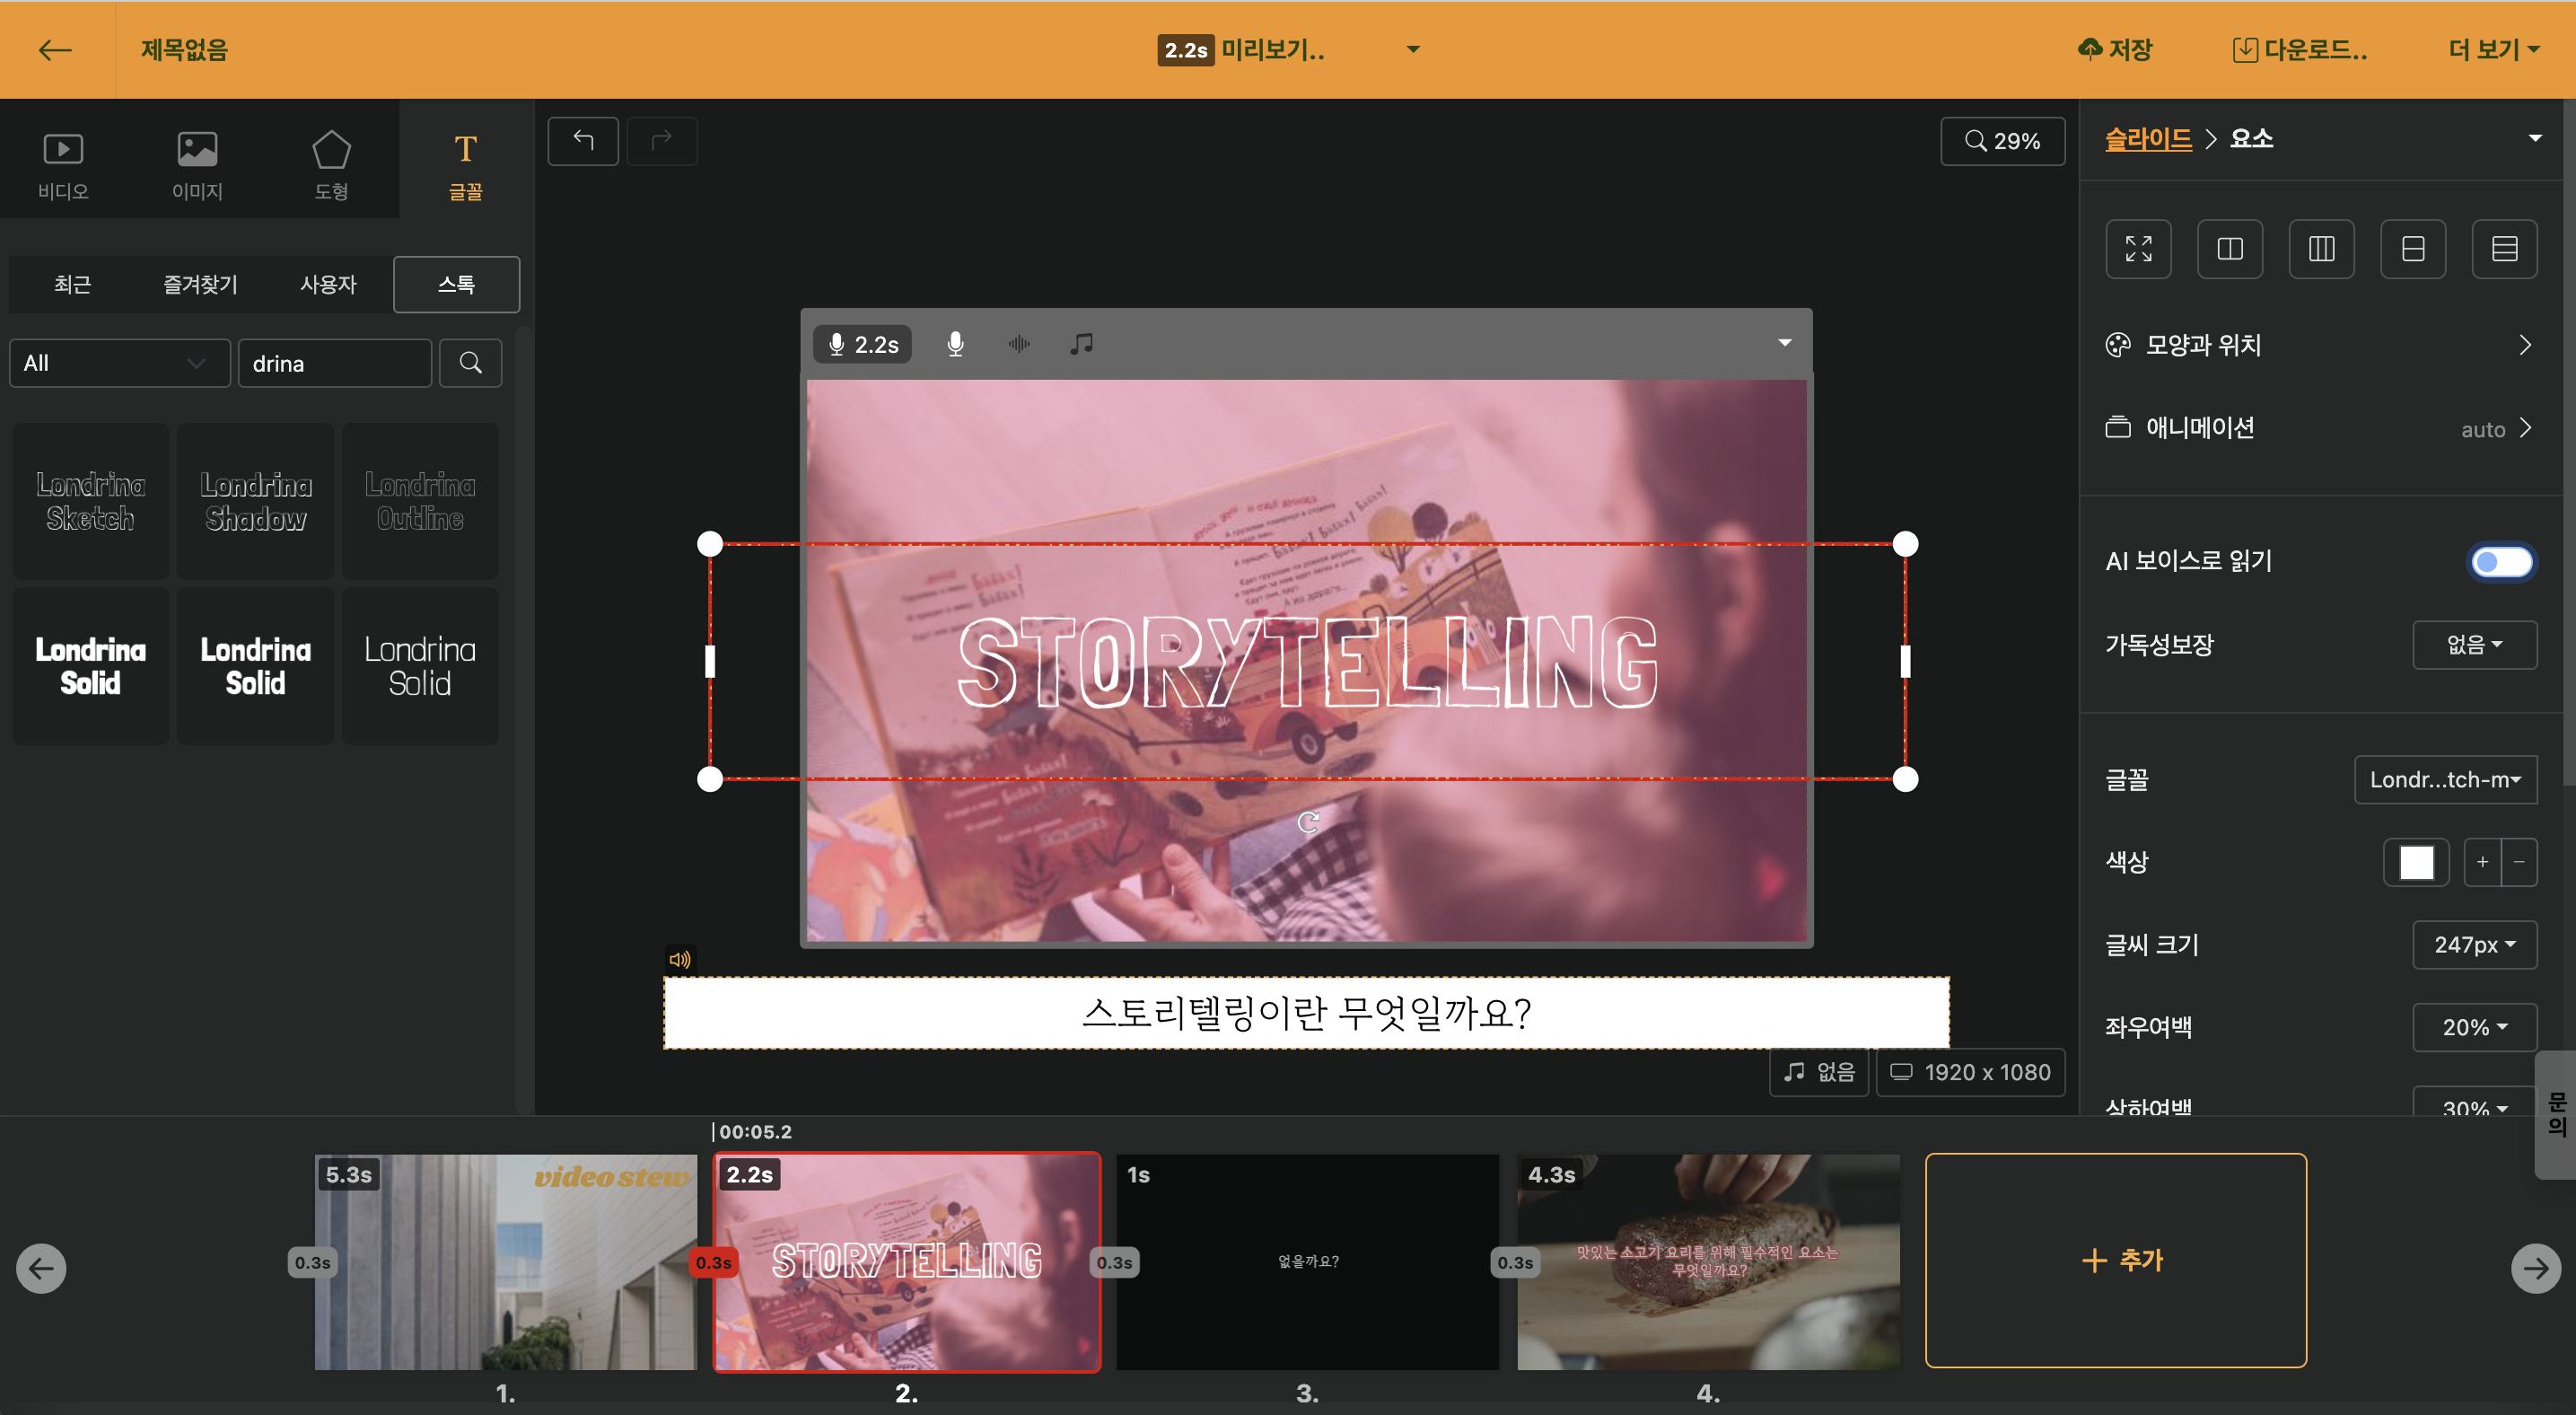
Even though several lines of text are included in the slide, only one line is displayed in the state where [text appearance effect] animation is set.
Videostew automatically adjusts the timing at which text appears, designed to sync with the voice, but occasionally the sync may be off. In such cases, you can insert special characters in the text to delay or hasten the timing of the content's appearance.
|Special Character|Description|
|--|--|
|`<<`| This character makes the line appear 0.25 seconds faster.|
|`>>`| This character makes the line appear 0.25 seconds slower.|
To manually change the speed, it is good to use the `Enter` key to separate each line. Then, by using the preview, insert the character in front of or behind the line where timing adjustment is necessary.
The example below shows how to insert the '>>' symbol after the sentence 'Today, stay healthy' appears faster than the voice and slightly delays it. If the timing is much off, you can use multiple special characters. In the case of '>>>>', it will be delayed by 0.5 seconds, right?

1. If you select any color, the color selection window will open.
2. There, select the "User" tab.
3. In the user tab, click "Add".
4. Specify the name and adjust the transparency to 0.
5. Click "Add" to confirm.
When using box-shaped text, do not apply transparency to the font color; to insert transparency only to the box, add a color with transparency applied when adding user colors.

To upload video files downloaded from Videostew to Naver Blog, you can use Naver's video upload feature.

After clicking the "Video" button on the blog editor toolbar, upload the downloaded file (mp4), and a window like the one above will appear for you to enter the basic information of the video.
If you access Videostew from a smartphone Chrome browser, you can quickly upload videos and images from the mobile device's gallery to your account.
Connect to Videostew from the Chrome browser on your smartphone. Depending on the user's login method, you can log in with social one-click login or by entering your email and password.
Click the "Select Upload File" button in the center to select files from your photo album or file manager.
.png?_=1iisbp1)
If you wish to change the workspace before uploading, please change the workspace first and then click "Select Upload File".
After the upload is complete, you can check the uploaded files on each user tab in the PC Chrome browser. If there are additional files needed during the operation, please continue to upload. New files can be confirmed soon in the library without needing to refresh.
Generally, Videostew reads the text on the screen with an AI voice. However, if you're editing a video, there might be cases where you need only narration and no subtitles on the screen.
In such cases, placing subtitles outside the slide window can easily solve the problem. If only the [Read by AI Voice](/guide/edit/basic/text/enable-tts) option is active for the respective text element, subtitles will not be displayed on the screen, and only the voice will be heard as set.
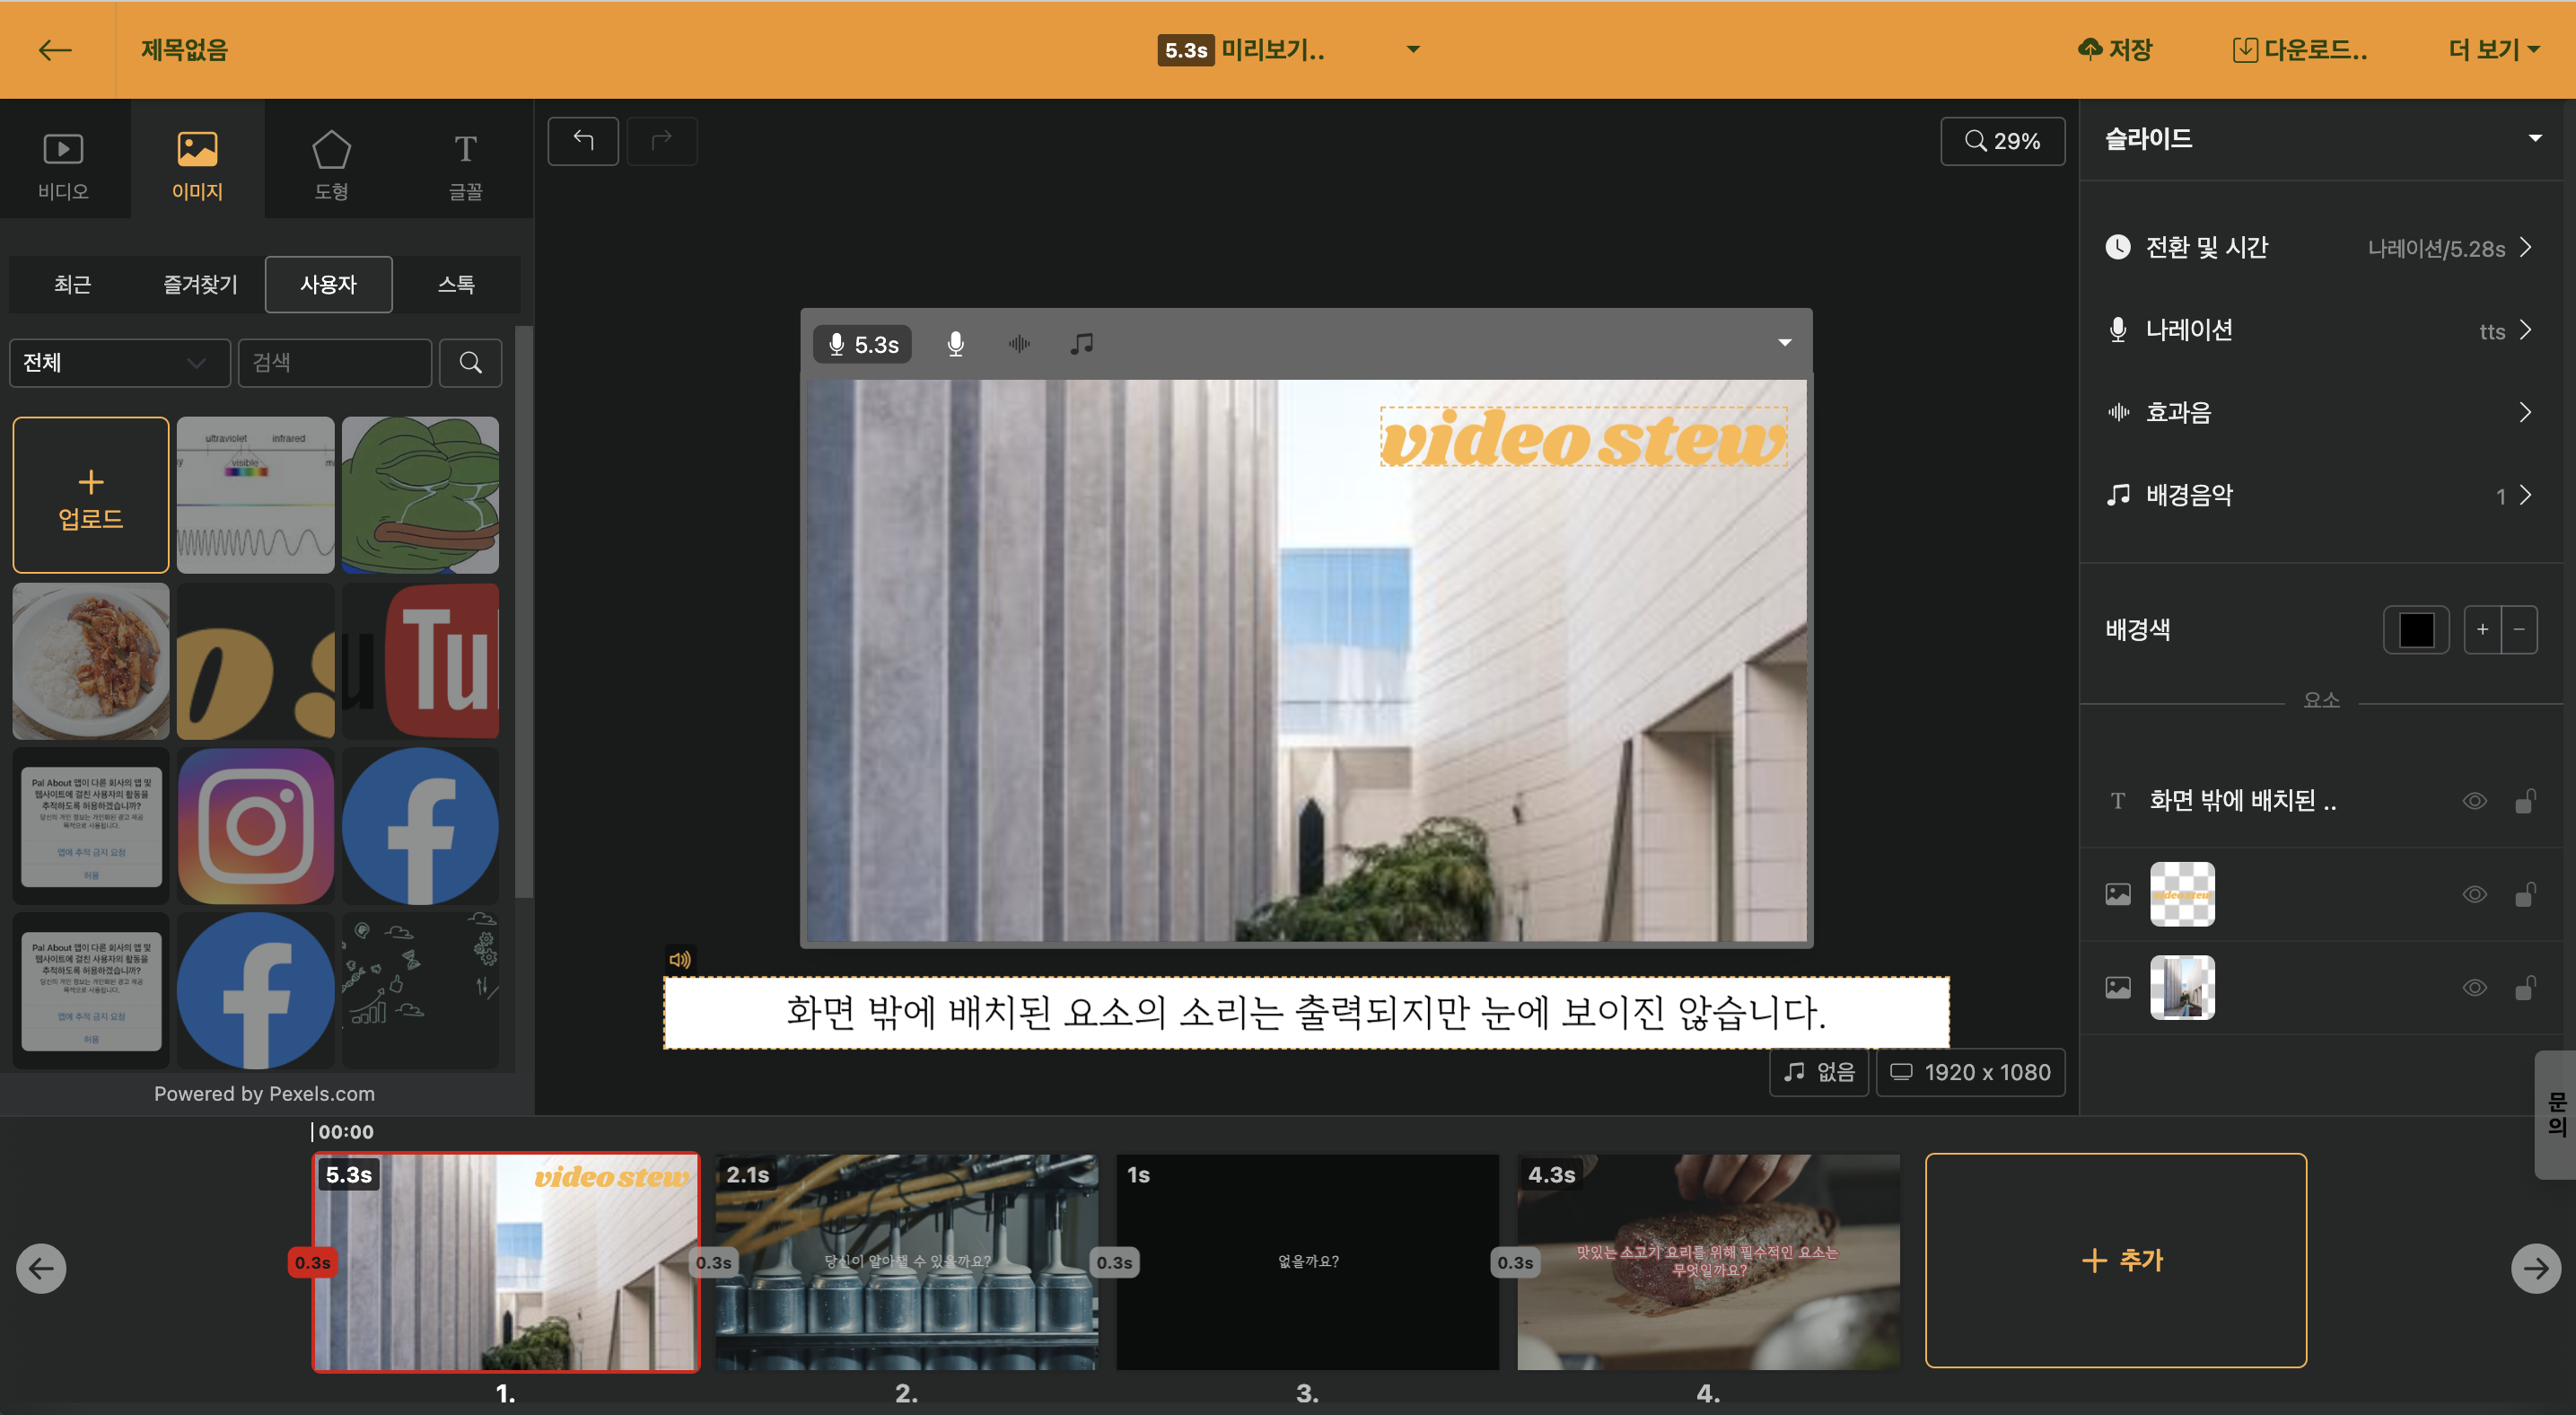
< Place the text to which the AI voice is applied outside the Editing Window slider >
Sometimes, only the keywords appear on the screen, and the explanation needs to be longer, right? In such cases, constructing a slide like below works great.
< Display only the keywords inside the slide, and place the actual reading content outside the screen >
1. Please deactivate the [Read by AI Voice](/guide/edit/basic/text/enable-tts) option in the text box within the screen.
2. Place text elements outside the screen and write the actual content to be read. The [Read by AI Voice](/guide/edit/basic/text/enable-tts) option must be activated, and the slide must have [Narration](/guide/edit/basic/narration) applied.
Videostew allows you to apply only one narration per slide. However, by using the [Auto Animation] feature, you can easily create dialogue-based content that alternates between two different [Narrations] as the scene progresses.
You can also easily create dialogue-based content through the video below.
https://www.youtube.com/watch?v=YyQX4D935oo
To create dialogue-type content, using two slides set as Auto in the [Transition Effect] allows you to create content with various voices while the screen is fixed. Below, we will explain how to simply apply two different voices to create content.
In the example, insert a picture and proceed as if the characters are having a dialogue.
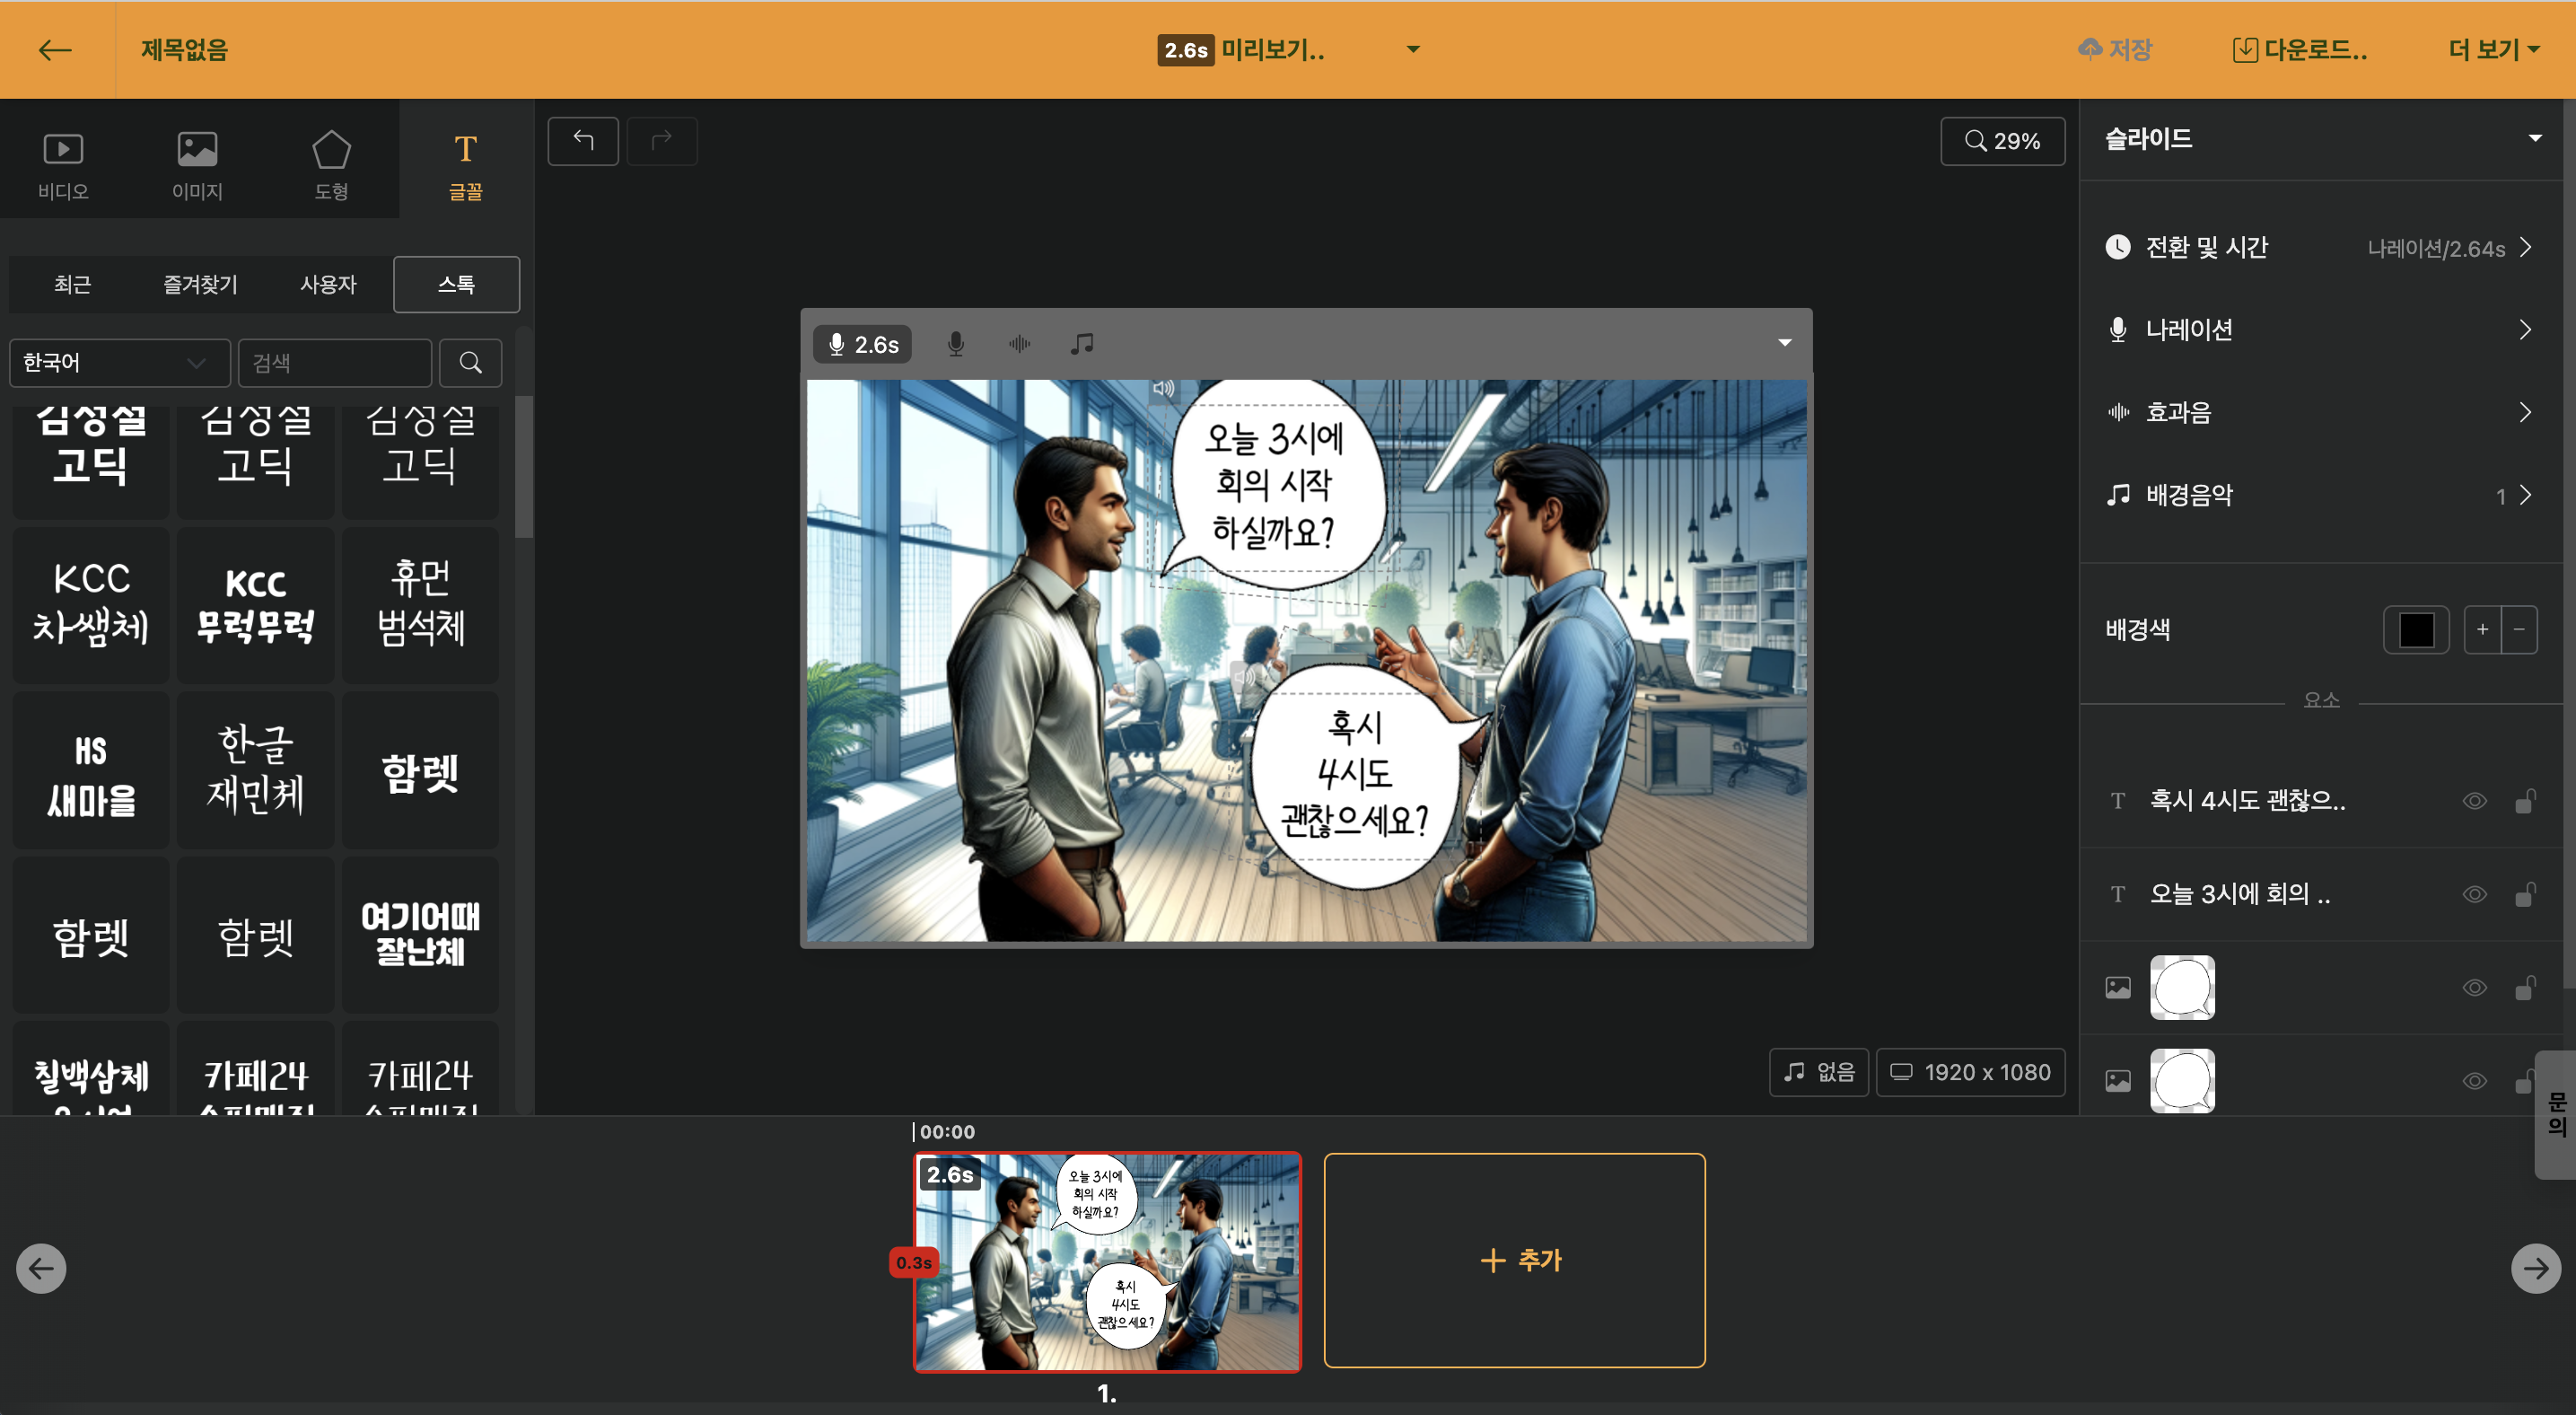
< Insert a comic image made in Clip Studio, and a speech bubble from GIPHY >
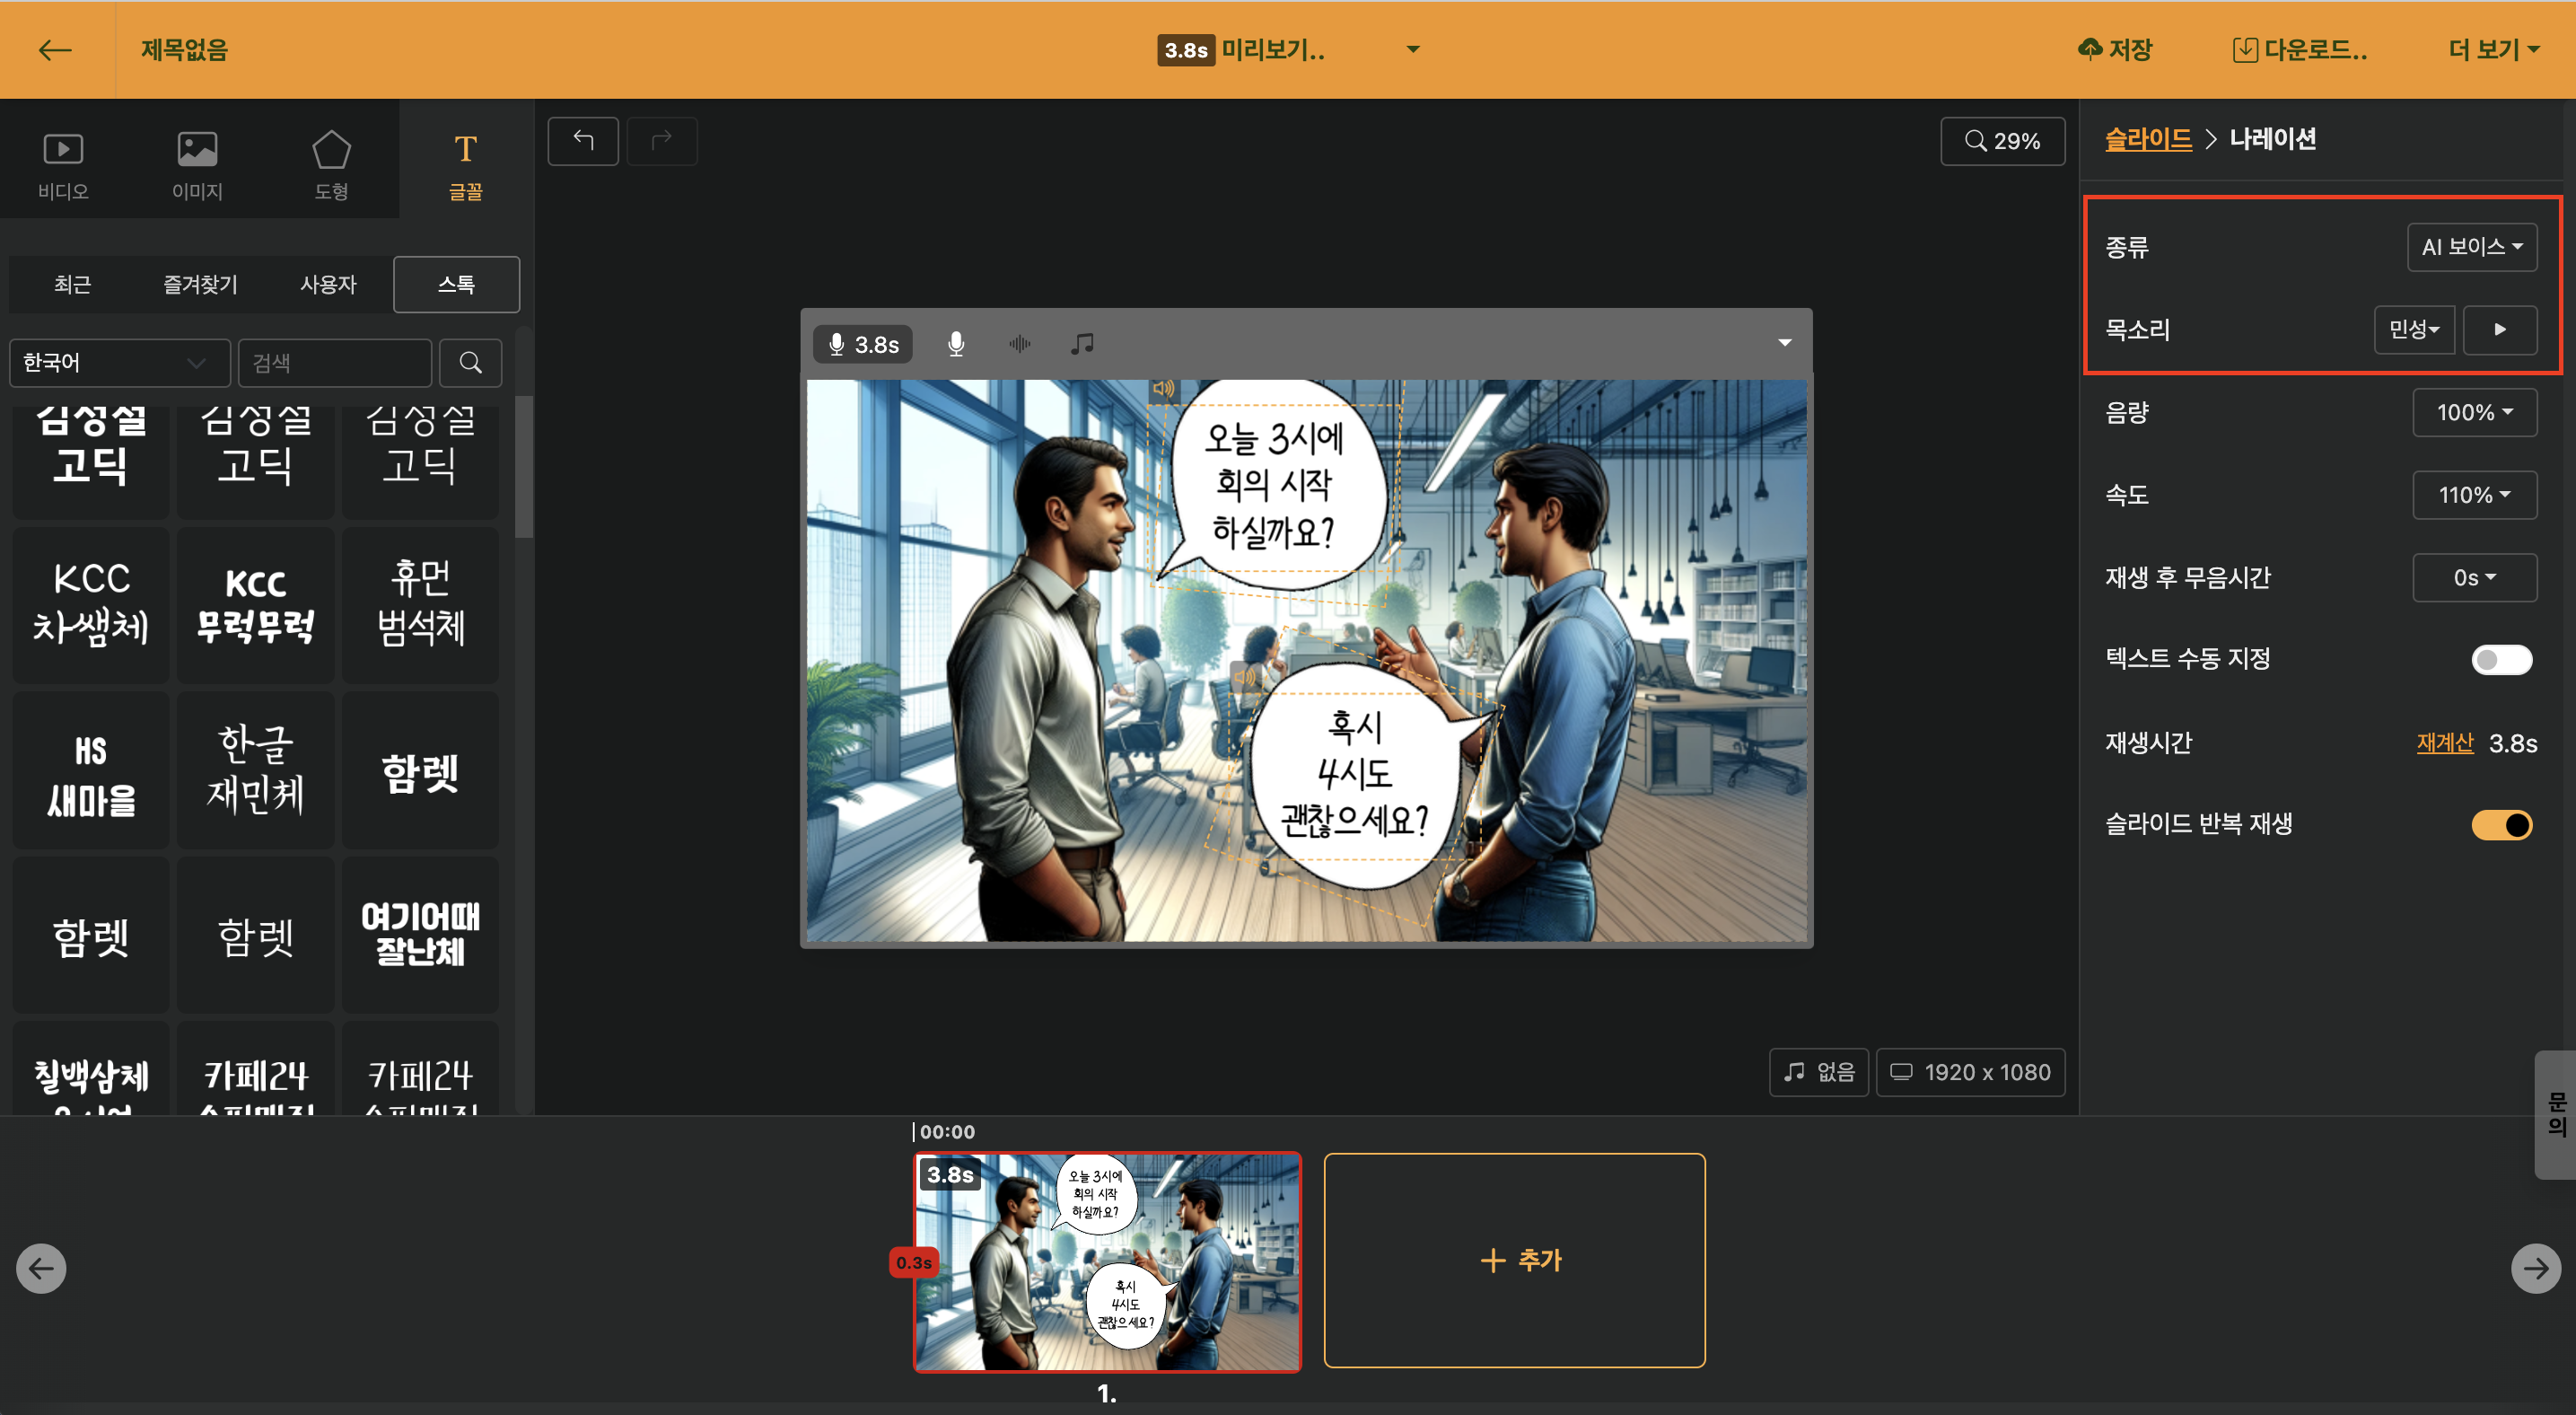
Select [AI Voice](/guide/edit/basic/narration/ai-voice) in "Slide > Narration" and insert a male voice.
Text that should not be read should have the [Read by AI Voice](/guide/edit/basic/text/enable-tts) option deactivated.
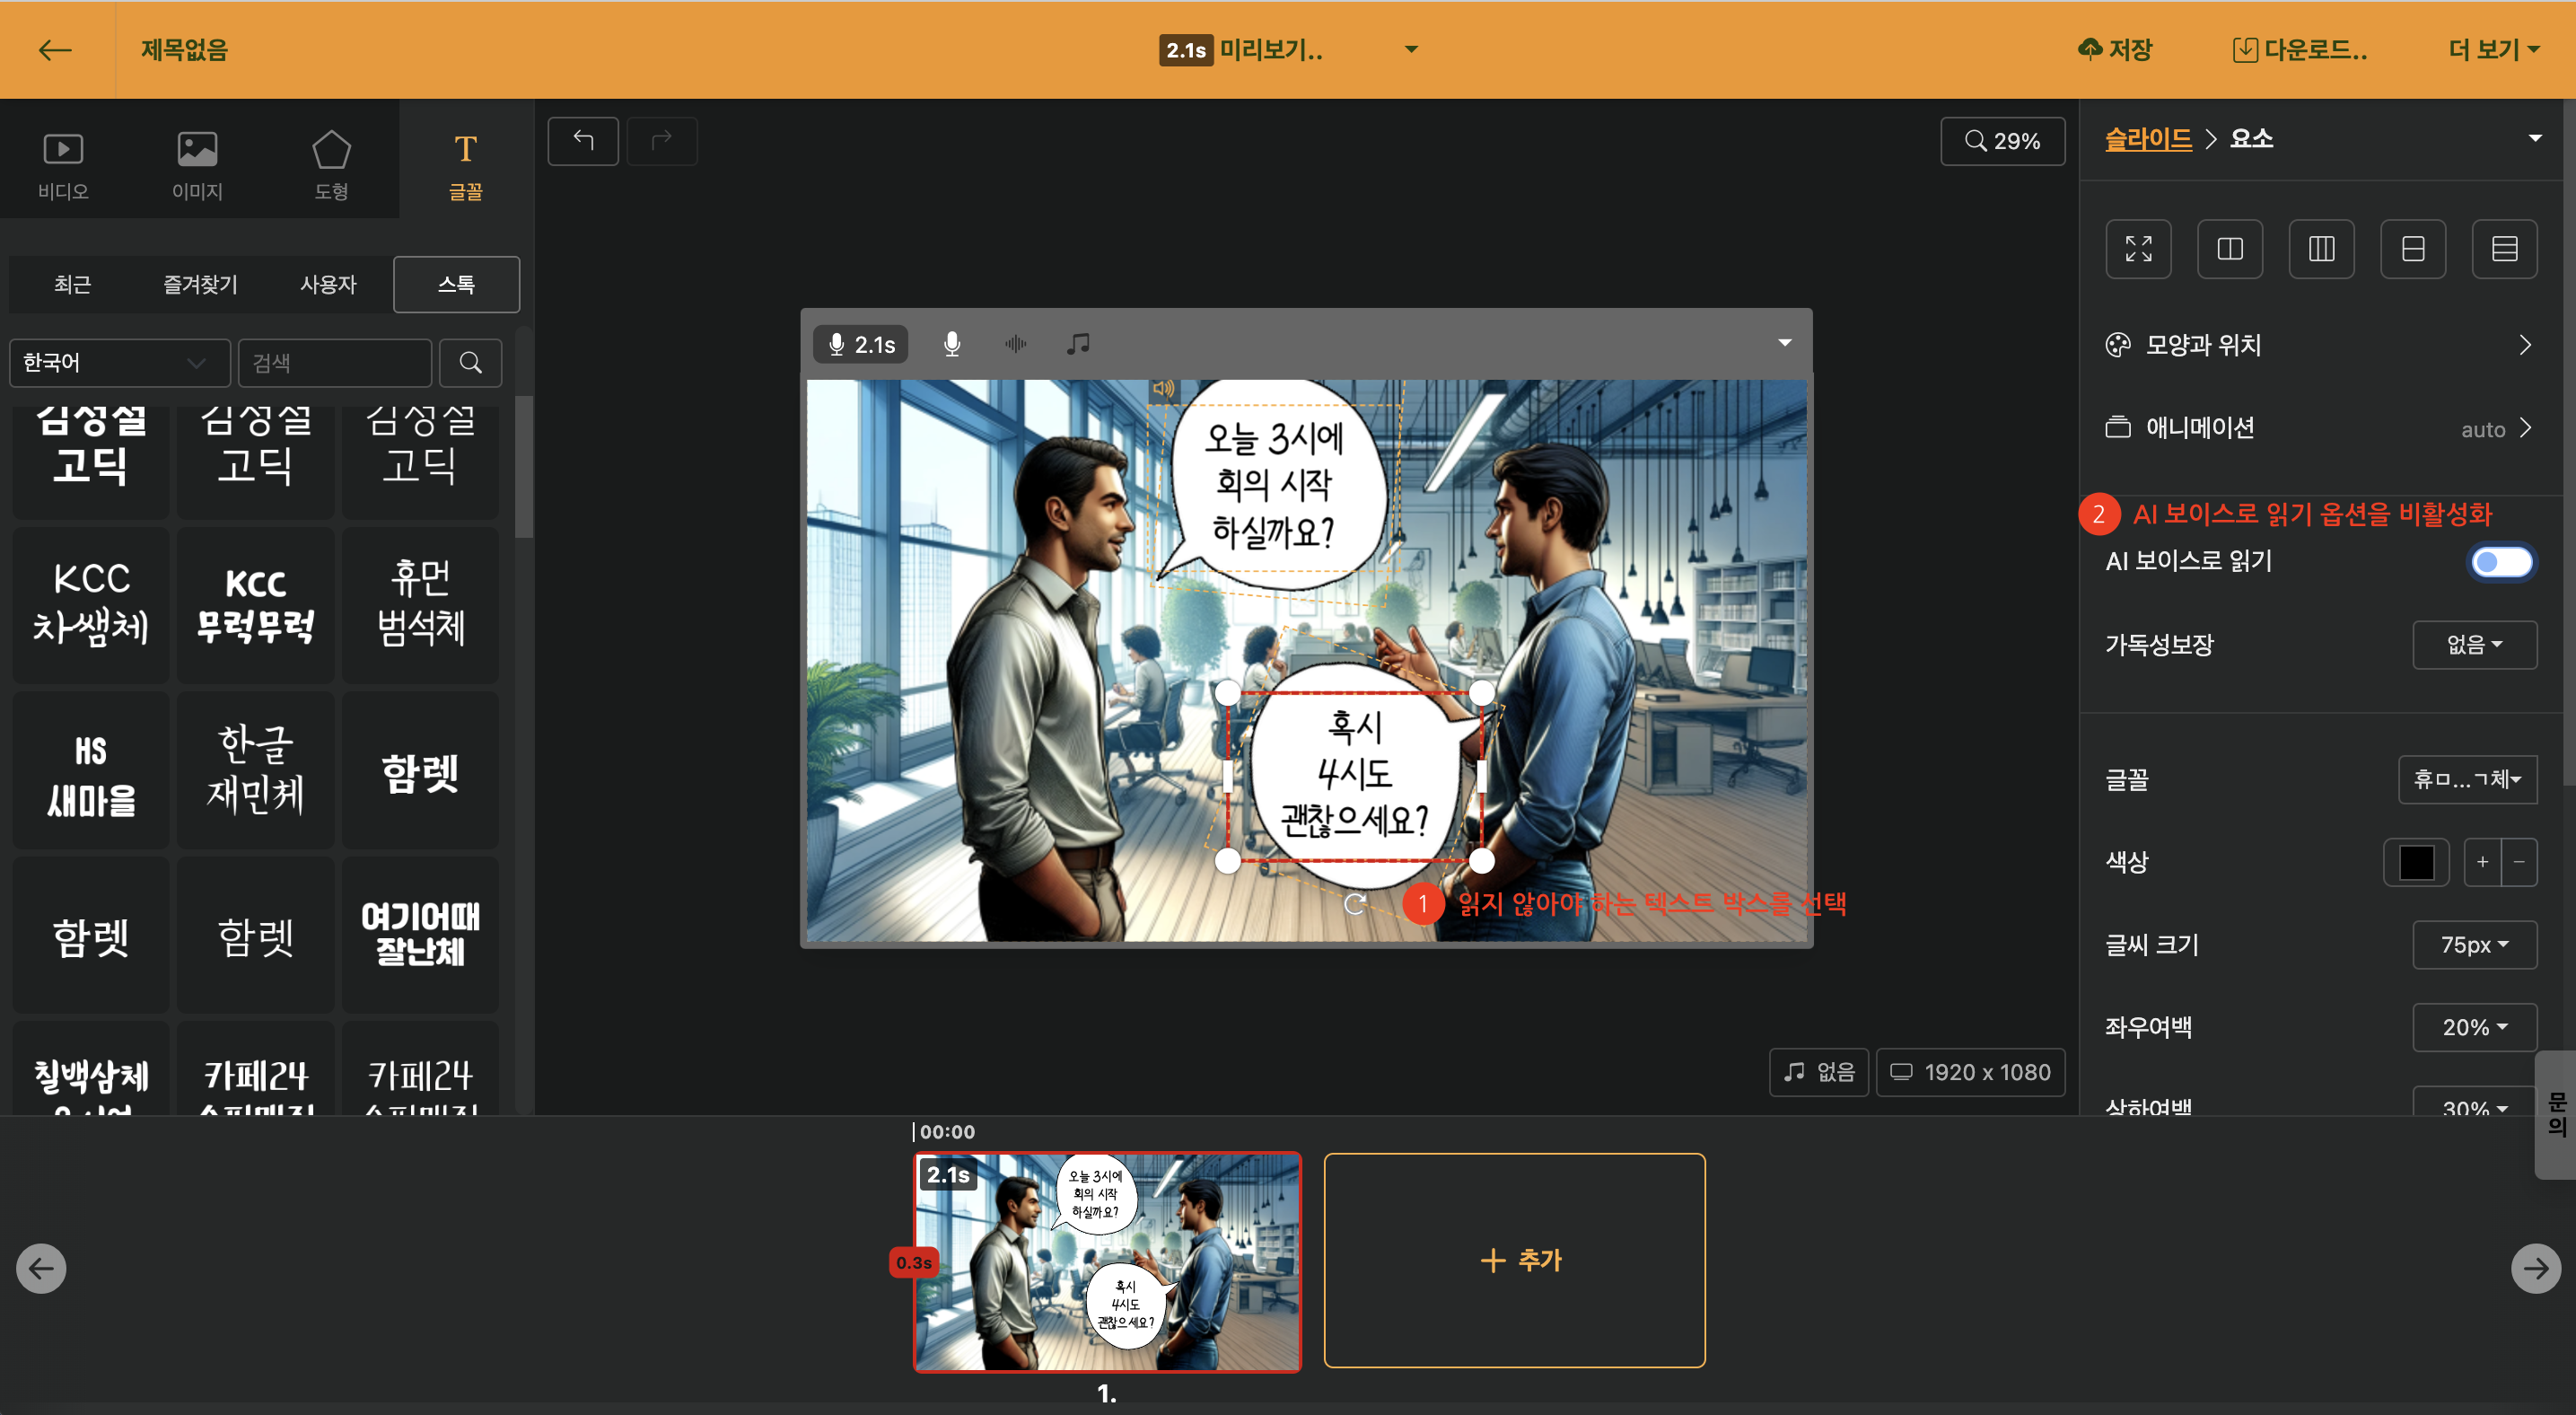
For the slide that was read in the previous slide, deactivate the [Read by AI Voice](/guide/edit/basic/text/enable-tts) option, and activate it for the text that needs to be read.

< Create conversational content and apply different voices individually >
If you are using the [School-exclusive Access Slide](https://videostew.com/school), students can use the service without any separate registration process.
Of course, teachers must register via email. In the state logged in with the teacher account, you will learn about how to add workspaces and invite students.
Typically, when you conduct classes, you will add workspaces by class. You can add workspaces in the following steps.
Click the `+` button under the default workspace to add a new workspace. You can add workspaces by class or group, and only the invited students for each workspace can view it.

You can invite students through the "Collaborators" menu right below. Since the school solution allows joining with the student ID of each school, you can copy and paste the student ID list from Excel. You can copy multiple lines at once and a single workspace can invite up to 60 people.

If you invite to only one workspace together, each personal workspace is added separately. We recommend that students submit their projects through the [Share](/guide/edit/view/top/more/sharable-url) feature.
We have collected questions that are frequently asked while using Videostew.
We generally support the majority of video formats that are commonly used. You can check the detailed codec types at [Amazon transcoder introduction slide](https://docs.aws.amazon.com/mediaconvert/latest/ug/reference-codecs-containers-input.html).
The video is added as an `mp4` file in `h264` format, and the frame rate is `30fps`.
The rendered video is already compressed. However, we have proceeded with a level of compression that maintains reasonable quality, so in cases with a lot of content, the size can become quite large. In such cases, you can use external compression tools to further reduce the size significantly (at the cost of some quality). If you search for 'online video compressor' on Google, you can find various free compression tools to try. Please click the link below!
https://www.google.com/search?q=online+video+compressor
In the current engine format, when giving a mosaic effect, it is possible; however, if the animation elements increase, a phenomenon called frame drop occurs. Therefore, until another rendering engine implementation, the feature might be difficult to provide. We are aiming to offer it in the long term.
Videostew imposes certain limits on each project and upload size, as well as AI voice settings, to provide stable service. The standards for each are as follows:
- Individual image upload size: 20MB
- Individual video upload size: 250MB
- Maximum length of a single AI voice text: 1,000 characters
- Maximum length of text input window: 10,000 characters or 200 sentences
- Maximum project length: varies by plan (for details, check the [pricing](/pricing) page)
- Maximum number of slides within a project: 400 slides
- Maximum number of elements within a slide: 100 elements
If shortcuts are not functioning, you can first suspect the browser's extensions. There is a high chance that it's related to a keyboard-involved extension. You can resolve the issue by exempting Videostew (https://videostew.com) in the settings of the respective extension or by disabling the problematic extension. If you're not sure which extension is causing the issue, you should access [Window > Extensions] from the upper side menu and disable them one by one to find the problematic extension.
Select the video or image from your computer and drag and drop it into the editing screen to add the image, which will be stored in the "User" tab.

Furthermore, when uploading multiple files at once, if you drag and drop them into the left side Library Window, they will not be added to the editing screen, but only to the library.
If you are curious about how to upload directly from a mobile device, please refer to the [Mobile Device File Upload Guide](https://videostew.com/guide/tips/mobile-upload).
There are some issues where the video file does not play in certain Chrome browsers using specific graphic drivers. In such cases, please use the Edge browser, or resolve the issue by disabling the hardware acceleration option of the Chrome browser’s graphic acceleration.
Chrome Settings > System > Use hardware acceleration when available (disable)
If the narration sounds strange, or if only the main words are shown and the actual content to be read is different, we recommend using the method of utilizing the external text area.

Enter the text that will appear on the screen and click on [Read by AI Voice](/guide/edit/basic/text/enable-tts) option; outside the screen, enter the actual content to be read.
In the case of AI Voice, we use engines from third-party services (Google/Naver, etc.). Our experience shows that engines are often upgraded through learning, but sometimes errors occur when reading certain phrases strangely. When such cases are detected, we provide feedback to the service provider, but due to the characteristics of AI implementation, it is impossible to manually correct these errors. The improvement is done through relearning over time, and thus, processing may take longer. The best solution is to temporarily avoid the problematic pronunciation by modifying the text.
If AI Voice has not read all the text on one slide and moves on, it could be a temporary network error or a miscalculation of narration timing. In such cases, you can recalibrate the duration of the narration by clicking the [Narration > Recalculate Timing] button.

You can easily manage all elements through [Favorites](/guide/edit/basic/bg-color/favorites). All elements of Videostew, including videos, images, shapes, texts, colors, music, etc., can be added to the [Favorites](/guide/edit/basic/bg-color/favorites) tab for easy reuse.

You can change the display method of the image by setting the 'Internal Display Mode'.
By default, images that you have added yourself or copied from a website are entered with 'Original Proportion' as the 'Internal Display Mode'. You can change this setting to 'Fill Screen' and then use the handles to adjust to the desired size.
Furthermore, when the 'Internal Display Mode' is set to 'Fill Screen' or 'Slowly Enlarge', you can easily fit the entire screen by using the 'Auto Fit' function on the right side panel.

! The automatic slide splitting function has been moved to the [Text Animation Effects] of the text animation. Please refer to the text animation document for detailed information.
In Videostew, a slide signifies a single scene. It would be great if you could divide your text into units thinking of it as showing along with a background video.

However, if a slide has too much text, you can use the [automatic slide division] feature to make it output in one or two lines for easier viewing. Because the sync of automatically generated text with the speech is taken care of, you don't have to worry too much; the subtitles will match the audio perfectly.
But if the timing of a particular line doesn't match, you can manually adjust the sync of the subtitles.
First, please check if the waveform is properly visible when recording with the microphone. If the waveform isn't visible, you need to verify if the microphone permissions are properly set.

If you've allowed the microphone but keep getting a message to continue allowing it, you should check the input device settings in your operating system (such as Windows). If you are a Windows user, please refer to [this document](https://support.microsoft.com/ko-kr/windows/마이크를-설정하고-테스트하는-windows-ba9a4aab-35d1-12ee-5835-cccac7ee87a4).
Most copyright claims on YouTube are due to music copyrights. To prevent this, you need to take action in advance by adding your YouTube channel URL to your workspace so that copyright infringement claims do not occur. You can check the detailed method in the link below.
https://videostew.com/guide/faq/edit/youtube-register
For videos that have already been added, please re-upload them after entering your YouTube channel information, or notify us of each video's address individually so that we can manually process your request.
After hovering over the desired workspace, go to Edit > YouTube Channel > Enter the address of the YouTube channel and confirm

You must add your YouTube channel address to receive proper music usage rights from Videostew's BGM music exemption service 'SelbyMusic'.
The images/videos displayed on the editing screen are shown in lower resolution/quality to facilitate efficient editing. When you download the actual image or video, it supports up to near-original quality (up to a maximum of 1080p standard). Therefore, you can ignore the low quality displayed during editing.
If the quality of a typically rendered video is degraded, the issue is not with the rendering itself, but rather with issues that have combined after rendering elsewhere. If there is no problem when checking the rendered video itself, you should examine the following issues.
- If you have transferred the rendered video via a messenger like KakaoTalk, the messenger will compress it once more. Messengers generally compress videos to lower quality in order to optimize for network performance. In this case, you should set the quality to 'Original' or 'High' in the messenger settings before transferring, or you should directly upload the mp4 without going through the messenger.
- If the quality is too poor when viewed on YouTube, you should check the speed of your network. YouTube may automatically stream a lower quality version if the user's network is slow. You can forcibly change the quality to a higher setting in the YouTube player, or try checking the quality by opening it where a stable network is ensured.
In Videostew, you can upload video files directly for use. During the upload process, Videostew server will re-encode the video once more.
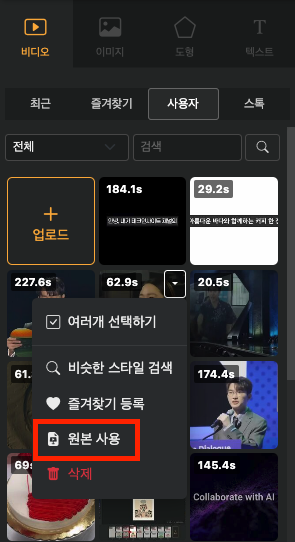
In this case, some videos may have lower quality than the original. In such cases, you can use the [Use Original] function to use the file without re-encoding.
Most files will be recreated without problems, but in some special encoding cases, the video may not be recreated normally even after using [Use Original].

Extensions in the Chrome browser may cause the download button to not work properly. In this case, you can go to 'Home > Environment Settings > General' and change the download method to 'Classic mode' and then try again.
Videostew generally provides support for standard mp4 video files. It is not possible to embed links in these standard videos. Links on videos from platforms like YouTube or TikTok are added by uploading options provided by the platform, and link overlays are added to the video on the user's screen. In other words, depending on the platform, it is a feature provided by the platform, so when you upload the video rendered from Videostew, please proceed according to the settings of the platform.
All AI images that you add to Videostew are added to a public library that other users can search for and reuse. Therefore, anyone who includes the added images in Videostew can claim ownership rights.
Additionally, any added images that are reported or deemed inappropriate can be deleted from the library at any time without prior notice.
If you would like to know more about the AI image addition feature, you can find more details through the [Add AI Images] slide.
Slides with a checkered background in the slide navigation screen are set to be excluded from the preview.
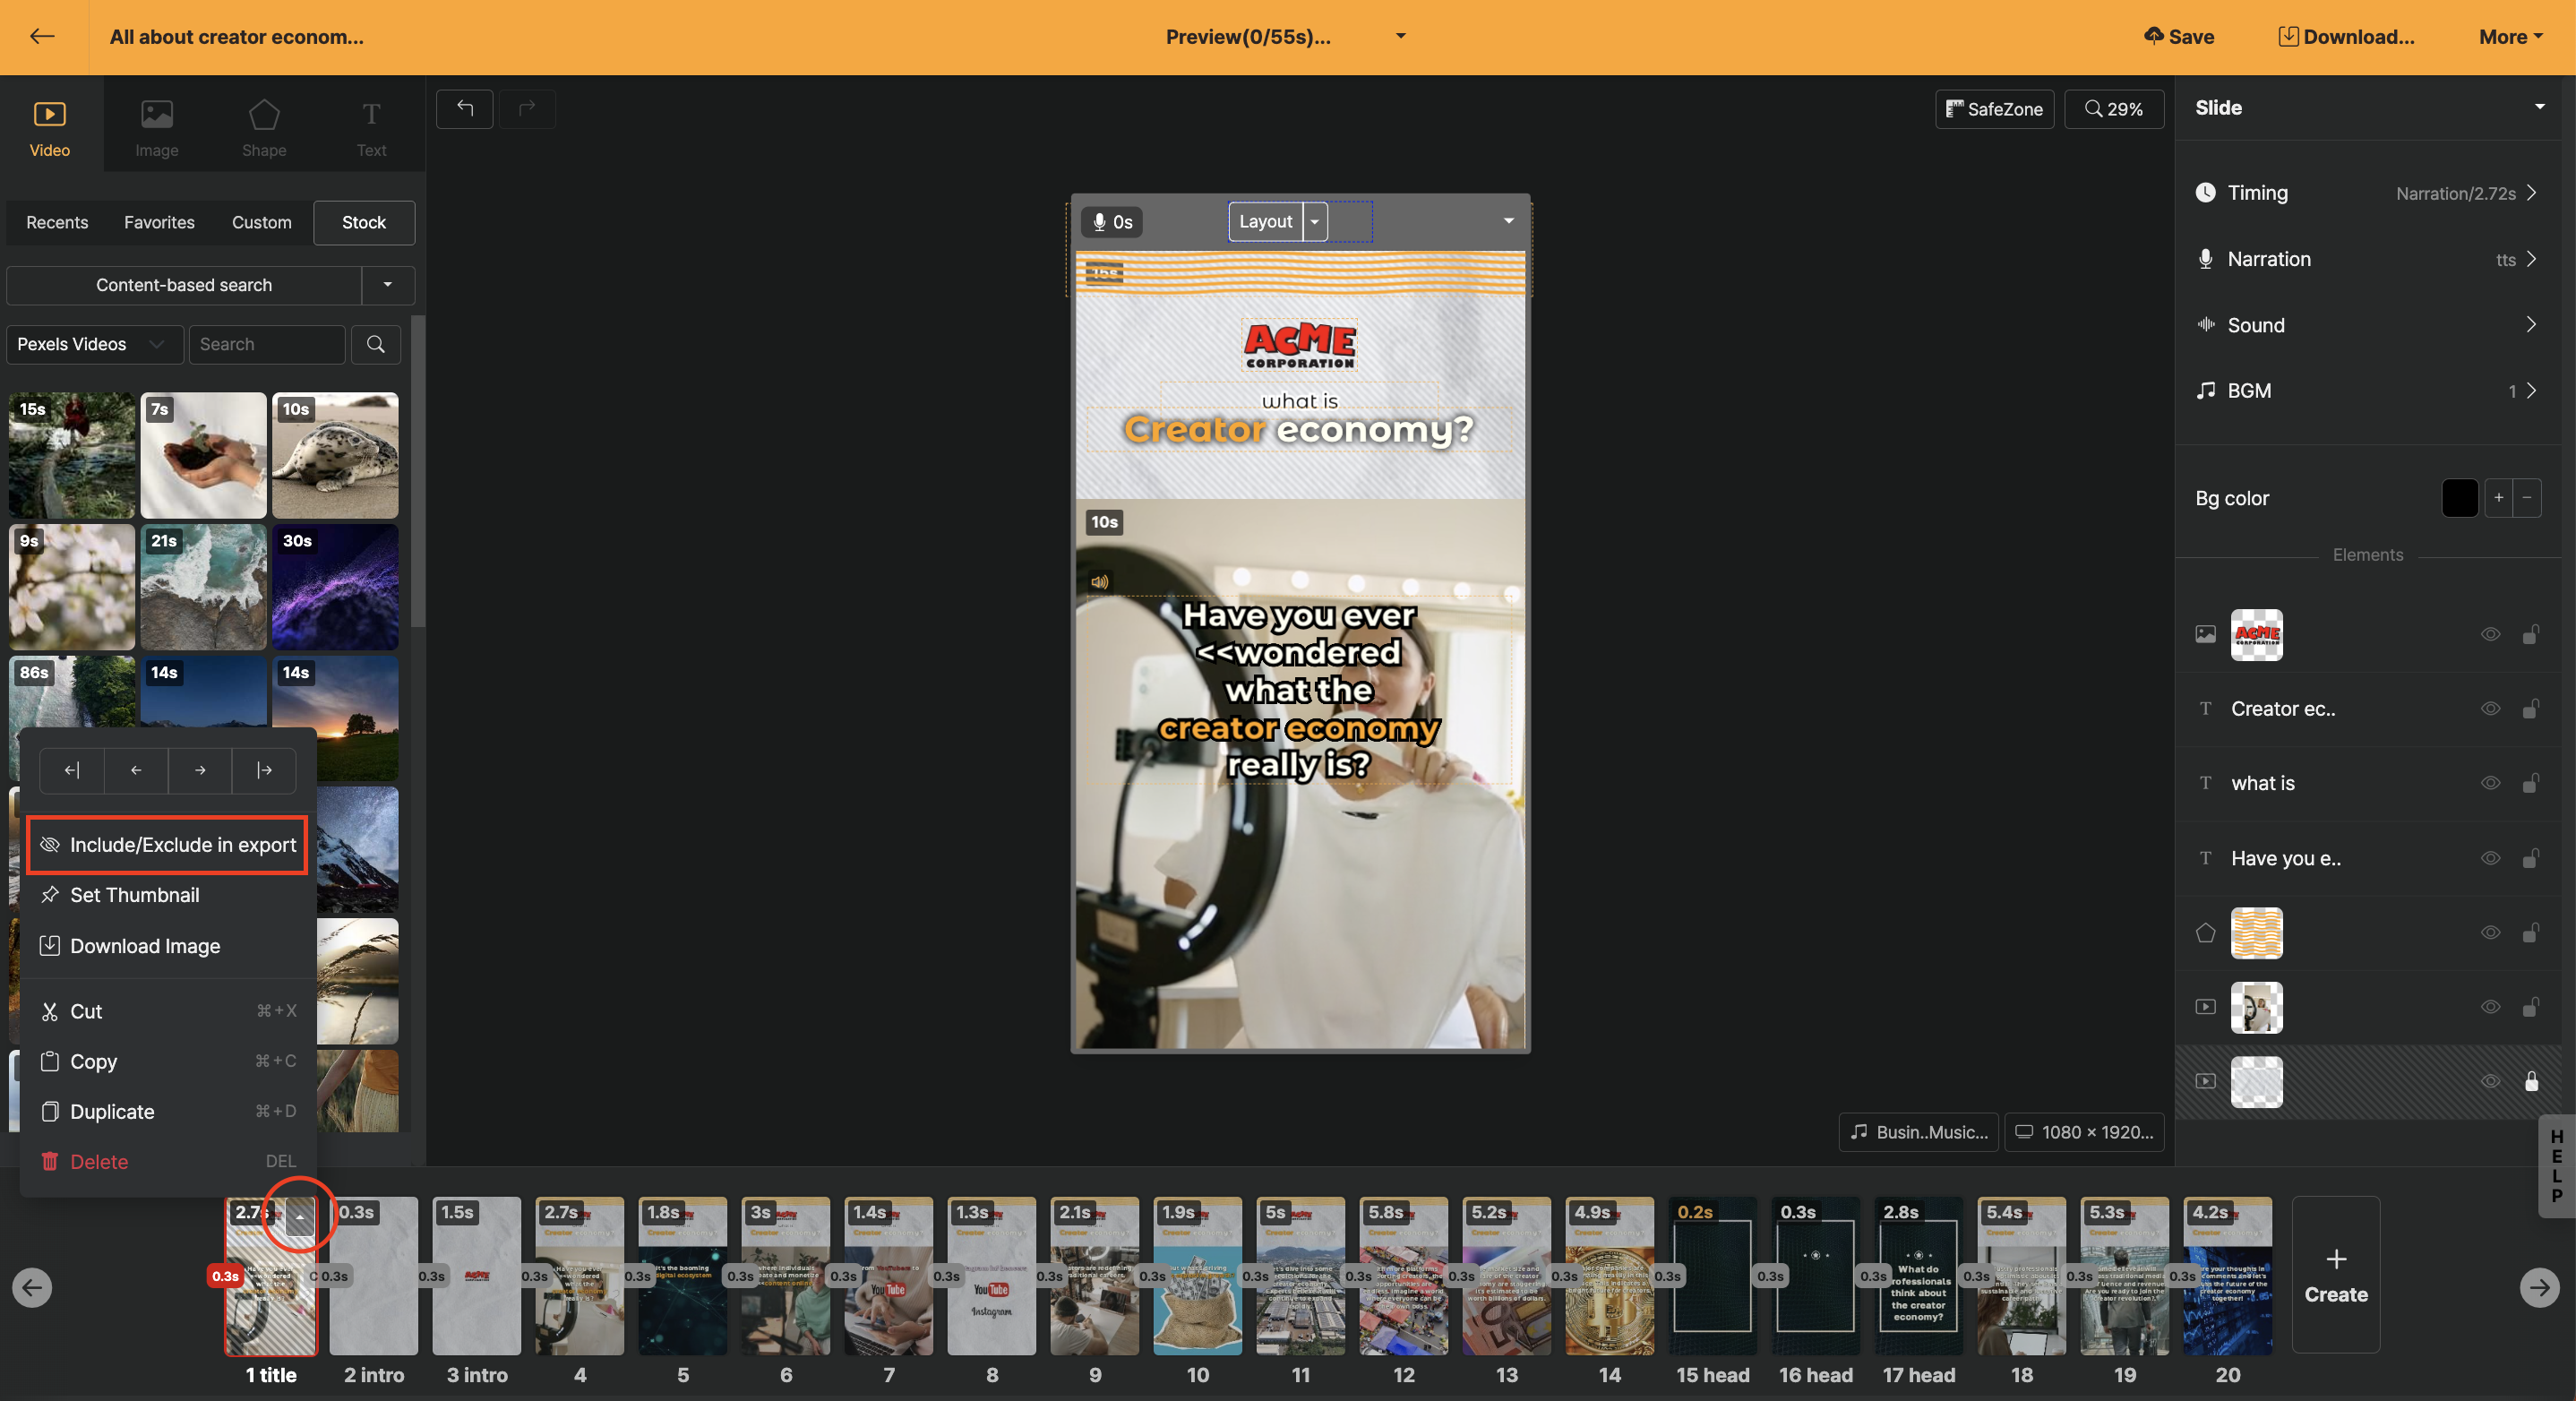
If you click the settings button that appears when you hover the mouse over the slide, there is a "Include/Exclude" button. You can toggle this button to include or exclude from rendering.
Generally, the first slide of the templates provided by Videostew is the `title` slide, and it is used for the thumbnail image except in videos. You can click the settings button to download only this slide as an image.
In addition to the `title` slide, refer to the [Create My Template] guide to easily create and reuse branded templates.
Of course. When you sign up for Videostew, you can experience it for free for 14 days. Additionally, by participating in our [Online Classes](http://bit.ly/vs-weekly-webinar), you can learn how to use Videostew, and of course, we provide a 1-month usage right (Personal Plan).
Furthermore, content produced in the trial version can be freely distributed on the channel of your choice, according to the terms of Videostew.
Yes, you can. In the case of a proposal, you can directly specify the plan and period at the [online proposal](https://videostew.com/pricing/estimate) and receive it.
You can also download the [service introduction](https://drive.google.com/file/d/14IHkfXx2nHx7pf-DKuGBoxHCHFcq4gdF/view?usp=drive_link) by clicking here.
Yes! For brand plan customers, we analyze the customer's situation and support the creation of the necessary template through [1:1 online meetings](https://bit.ly/calendly_vs_ko). Once a template is created, you can continue to produce videos with a similar feel using just basic input.
If you have received a coupon (voucher), you can add it via the [Account and Payment > Coupon](https://videostew.com/account/coupon) menu. Coupons are applicable only once per new account.

When logging in with a Naver ID, a mail is sent to the 'contact email' instead of the Naver email address. Therefore, if you update your 'contact email', you can request the verification email again. For more detailed information, please check the link at [Naver Customer Center](https://help.naver.com/service/5640/contents/18809?lang=ko).
1. Log in to Naver.
2. Click on the NaverID button in the login area.
3. In the profile area, click on the button to edit the verification email on the right.

To unsubscribe, please proceed by going to Home Screen > Upper Right Account Profile > Account and Payment > Unsubscribe. The direct link is as follows.
https://videostew.com/account
Yes! We offer specially priced educational plans based on the usage purpose and the number of required accounts. Please inquire through [Contact Us](/contact-us).
All payments are processed online through card payment transactions as the default payment method. It is possible to receive a cost breakdown and handle tax matters via card statements. However, if you specifically need a tax invoice, please request it separately, and the payment will be processed through account transfer.
If you are in the middle of a monthly automatic payment and wish to cancel the subscription at any time, you can do so, and no further repetitive charges will be made after the period has ended. Videostew calculates refunds for the unused period in credits if you cancel, since it operates on a period usage right payment method (however, if the payment point is within 7 days, a full refund is processed).
Home screen > Account Click (Top right corner) > Account and Payment > Payment tab

Click the [Stop Automatic Payment] button and then the [Request Refund] button!
Pricing information is provided at [Pricing](/pricing), where you can compare the features of each plan in detail through a feature comparison chart.
How can I check how much rendering time I've used?
You can check the remaining rendering time by clicking on the nickname in the download window and the top right corner of the home screen.
Check rendering time in the video download menu

VideoStew updates rendering times monthly, based on the period from the 1st to the end of the month; information on the total available rendering time for this month is provided. Reaching 100% means no more rendering time is available, and you can check how much of the total time has been used on the priority panel.
Click on the nickname to check the rendering time in account information

By clicking on the nickname on the home screen, you can check the current status of the rendering time usage.
Once the work is complete, cloud server rendering proceeds to create the video file. Each plan includes a monthly allocation of rendering time; for example, if you render a one-minute video, one minute of rendering time will be deducted. The rendering deduction is indifferent to content and is only related to the amount of time used.
Rendering usage is initialized periodically on the 1st of every month. Regardless of the payment time, it's based on the 1st of the month, which makes the management of usage more straightforward. This policy is slightly more advantageous to users because they can use both the maximum usage of the month when subscribing and the maximum usage of the month when canceling.
For a more integrated experience, we are operating a monthly policy. For example, if there is unused time from the previous month, you can use it as additional rendering time after reducing all usage for this month. The monthly policy can only be applied to unused minutes of the previous month and cannot exceed the maximum time of the current plan. (If the plan is downgraded after the month changes, the time exceeding the maximum time of the plan will not be carried over.)
```
Example) Personal Plan (10 / 60 + 25)
You used 10 minutes out of 60 this month, and you can use an additional 25 minutes that were not used last month.
```
To check your rendering usage, you can confirm it by clicking the profile button at the top right of the home screen. Also, rendering usage is always displayed at the top of the editing screen.
Videostew allows free plan upgrades and downgrades. For example, if you use up all the rendering time of the plan while subscribing to the Lite plan, you can upgrade to a higher plan from the payment menu.
In this case, the remaining amount will be deducted based on the next subscription renewal date of the Lite plan, and only a portion of the higher plan's amount will be additionally charged.
```
If the subscription date is the 1st of every month, and the upgrade is made on the 15th, 50% of the previous plan will be deducted and only 50% of the upper plan will be charged
```
During the subscription, a downgrade to a lower plan is also possible. In this case, the remaining period of the new plan will be charged, and the amount for the remaining period of the existing plan will be refunded.
Storage capacity is permanently accumulated per account. If you exceed the limit of your plan, you need to upgrade your plan or regularly clean up unused storage.
To check your storage capacity, you can confirm it by going to Home > Top right corner > Profile button > Account and Payment > Usage tab.
Videostew is running a promotion where you can get 1 month of personal plan usage rights for free. Please check the details for the current promotions below.
If you leave a review content containing your feedback on Videostew on SNS, you can receive a one-month free usage right. The review post must be written in detail and directly by you; automatically generated review posts using GPT, etc., cannot participate in the event. (Well-written review posts or review posts posted on your own domain are provided with a two-month usage right through internal screening.)
If you have a link to content you created directly, please include screenshots of the editing screen, etc.
Next are the instructions for participating in the review event.
1. [Subscribe to the Videostew YouTube channel](https://www.youtube.com/@videostewapp)
2. [Videostew 온라인 클래스 강의 영상](https://onlineclass.videostew.com/) 시청하기
3. Leave a review of using Videostew on your blog or other owned channels (include lecture video address and Videostew site address): No need for text posting; you can post on all SNS such as YouTube or Facebook. However, if you post review content on a domain you own, we will provide an additional one month usage right.
4. Leave the URL containing the review at [Inquiry](https://videostew.com/cs) of Videostew, and receive one month usage right
All libraries provided by Videostew, including image/video libraries, can be used for personal and commercial distribution purposes without copyright concerns. However, if you wish to add a video using BGM to your YouTube channel, your YouTube channel address must be registered with the workspace. The method for registering your YouTube channel address can be found [here](account/youtube-register).
However, in the case of Tenor (움짤), we only provide search and input for the convenience of users, and Tenor only allows personal use. Therefore, the Tenor list is only allowed for users who agree to this. Please do not use the part that is used incorrectly.
Furthermore, we provide resources with limited copyright issues; however, the user must ensure that the content they upload is not infringing. The user must filter and use only those things that have no licensing issues.
There can be several reasons for problems on the website. Below are the common causes and solutions.
In places where security is important, such as companies, it is possible to block connections to certain websites. To check if you are blocked, try accessing https://connection.videostew.com. If there is no problem when connecting with a mobile phone in LTE mode, and issues only arise when connecting with a computer, it is likely that this is the problem. Please contact your network administrator to request access permission to Videostew.com.
Videostew often updates several times even within a single day. If new code has mixed with old code, script errors can occasionally occur. In this case, you can solve most problems simply by refreshing. If the problem persists, perform [Clear Cache](https://support.google.com/accounts/answer/32050?hl=ko&co=GENIE.Platform=Desktop) in your browser settings.
Many Chrome extensions modify the code and behavior of web slides by injecting themselves into web slides. If a feature that was working suddenly stops, it is likely that this issue is related to these extensions. The simplest way to diagnose is to try accessing in Incognito Mode.
If the script mode operates normally, disable the problematic extension programs. Recently installed extension programs or those related to ad blockers, VPNs, proxies, or security are likely to be the culprits. If not such cases, disable extensions by 510 each in the extension slide and check to find the problematic extension program. If you are using a well-functioning extension, you can add Videostew site to the exception list in the settings of that extension.
After rendering a video in Videostew, you can upload it to YouTube with just one click. Typically, after you press the upload button, it uploads within a few minutes to YouTube Studio.
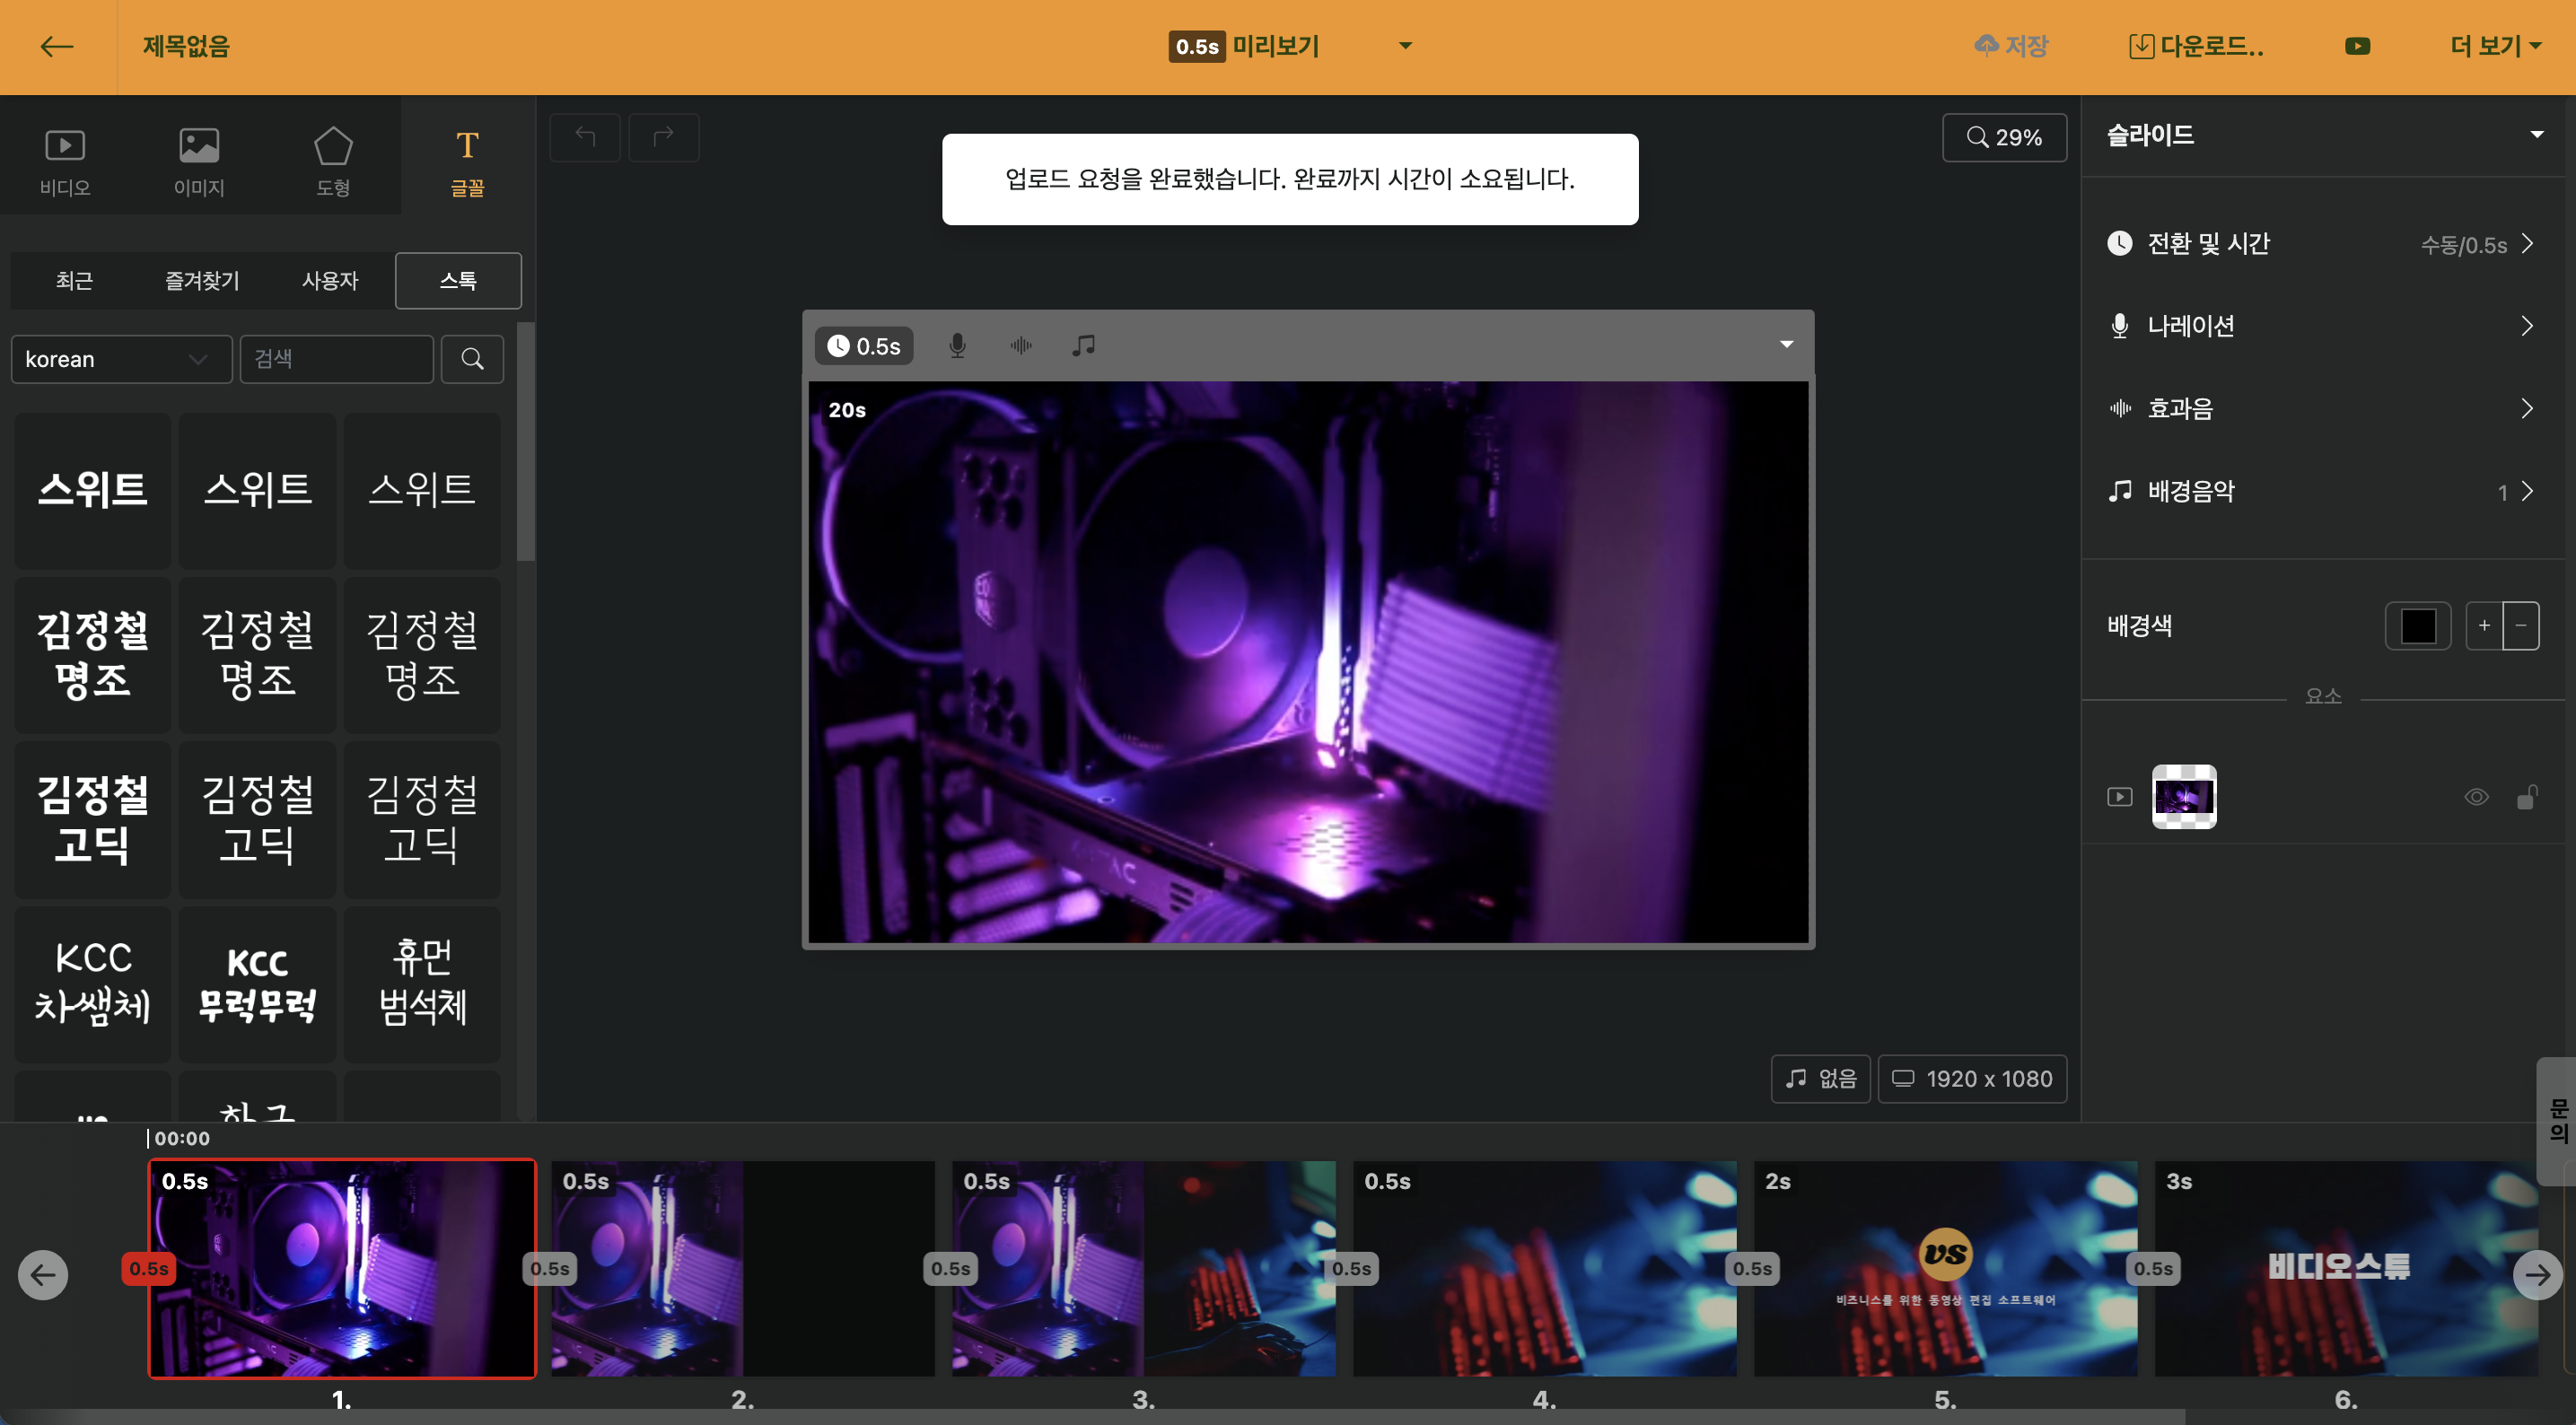
< Message indicating that the upload has started >
However, there might be issues with network conditions or account connectivity that can prevent a proper upload. In such cases, you can try to delete Videostew's access from Google account management and attempt the upload again. Please refer to the following steps.
Clicking the account icon in the upper right corner of the Chrome browser will take you to the Google account environment settings menu.
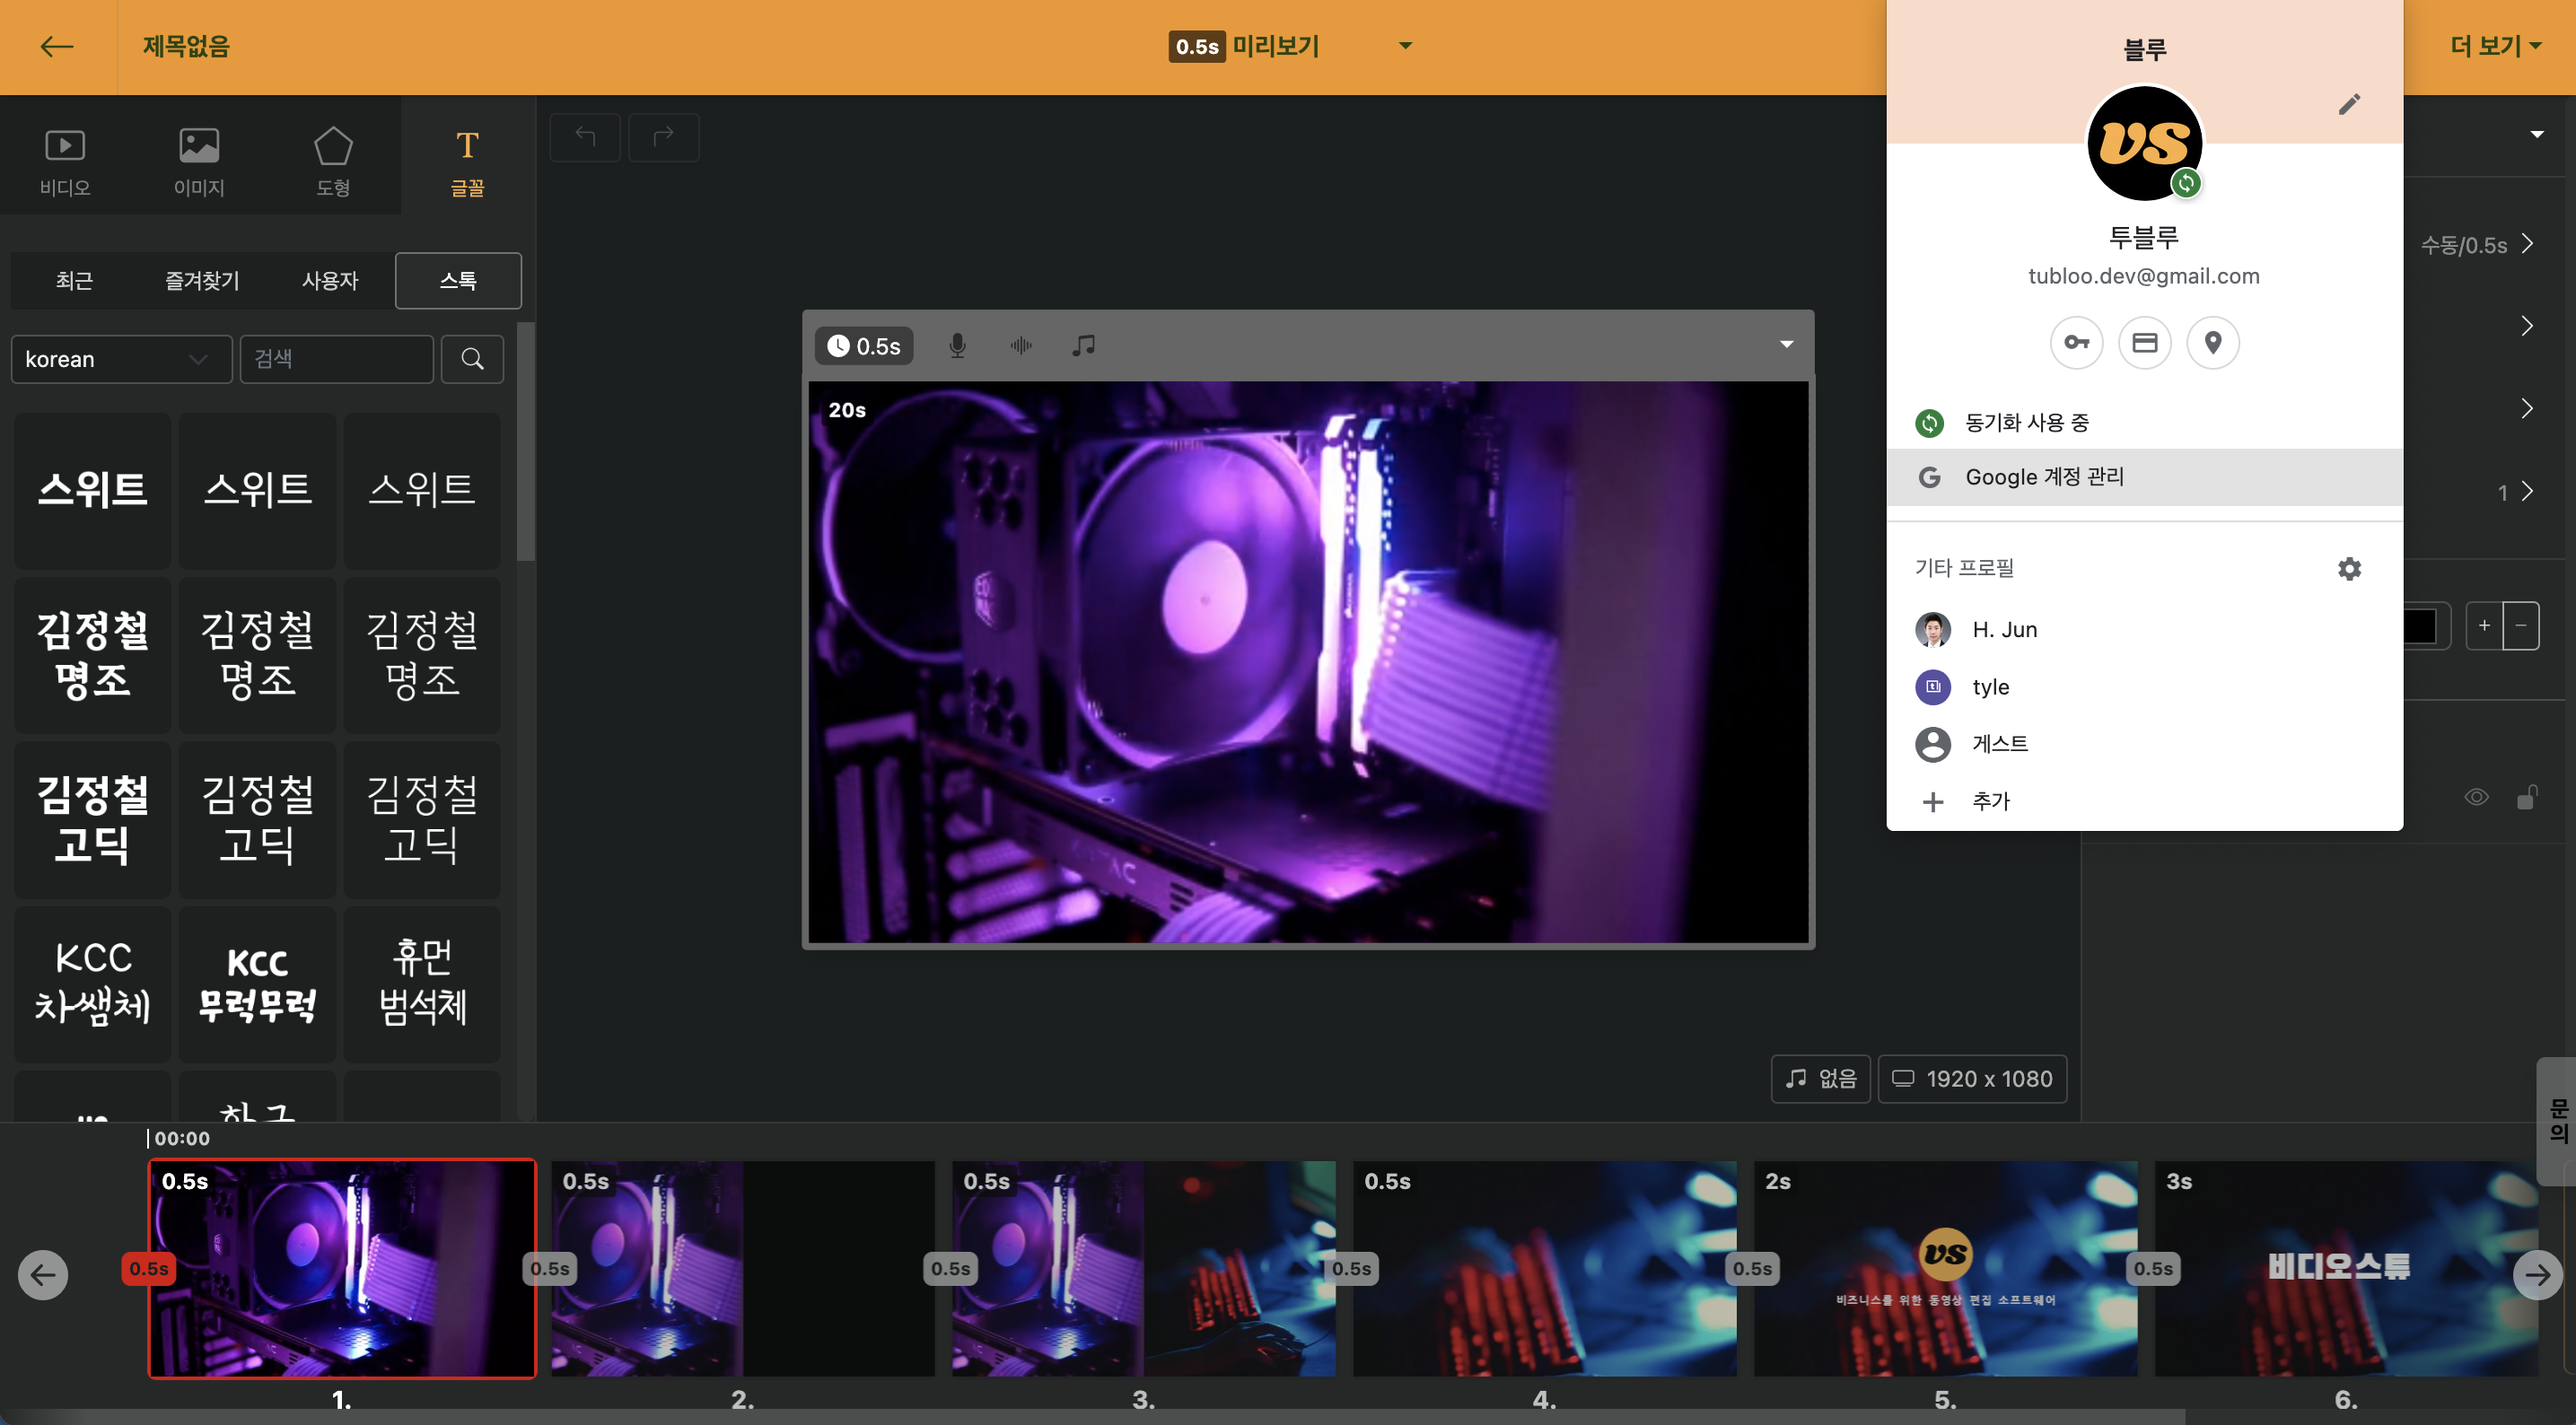
< Move to Google Account Management Menu >
Here, please select the "Data and Personal Information Protection" menu on the left side.

Scroll down to find the "Data of the Apps and Services in Use" menu, and here all services that have been granted access permissions are listed.

Find Videostew and select it. Then, by clicking on "Delete All Connections to Videostew," you can reset the account linkage.

Now, by pressing the YouTube upload button again, you can re-establish a new YouTube account connection. Please re-select the channel you wish to upload to and proceed with the video upload! If it doesn't work, there's a high chance of a temporary network error. In such cases, please let us know through [Videostew Support](/cs) and we will check it for you.
Videostew is a web-based service with some [limitations](https://heung.videostew.com/guide/faq/edit/limits).
If the files you upload directly are images and sound/music files, they can be up to 20MB, and videos up to 250MB. If the original video size is larger than this and cannot be uploaded, you can use the [Online Free Trimming Tool](https://online-video-cutter.com/ko/) to split the file and upload it.
.