Guide
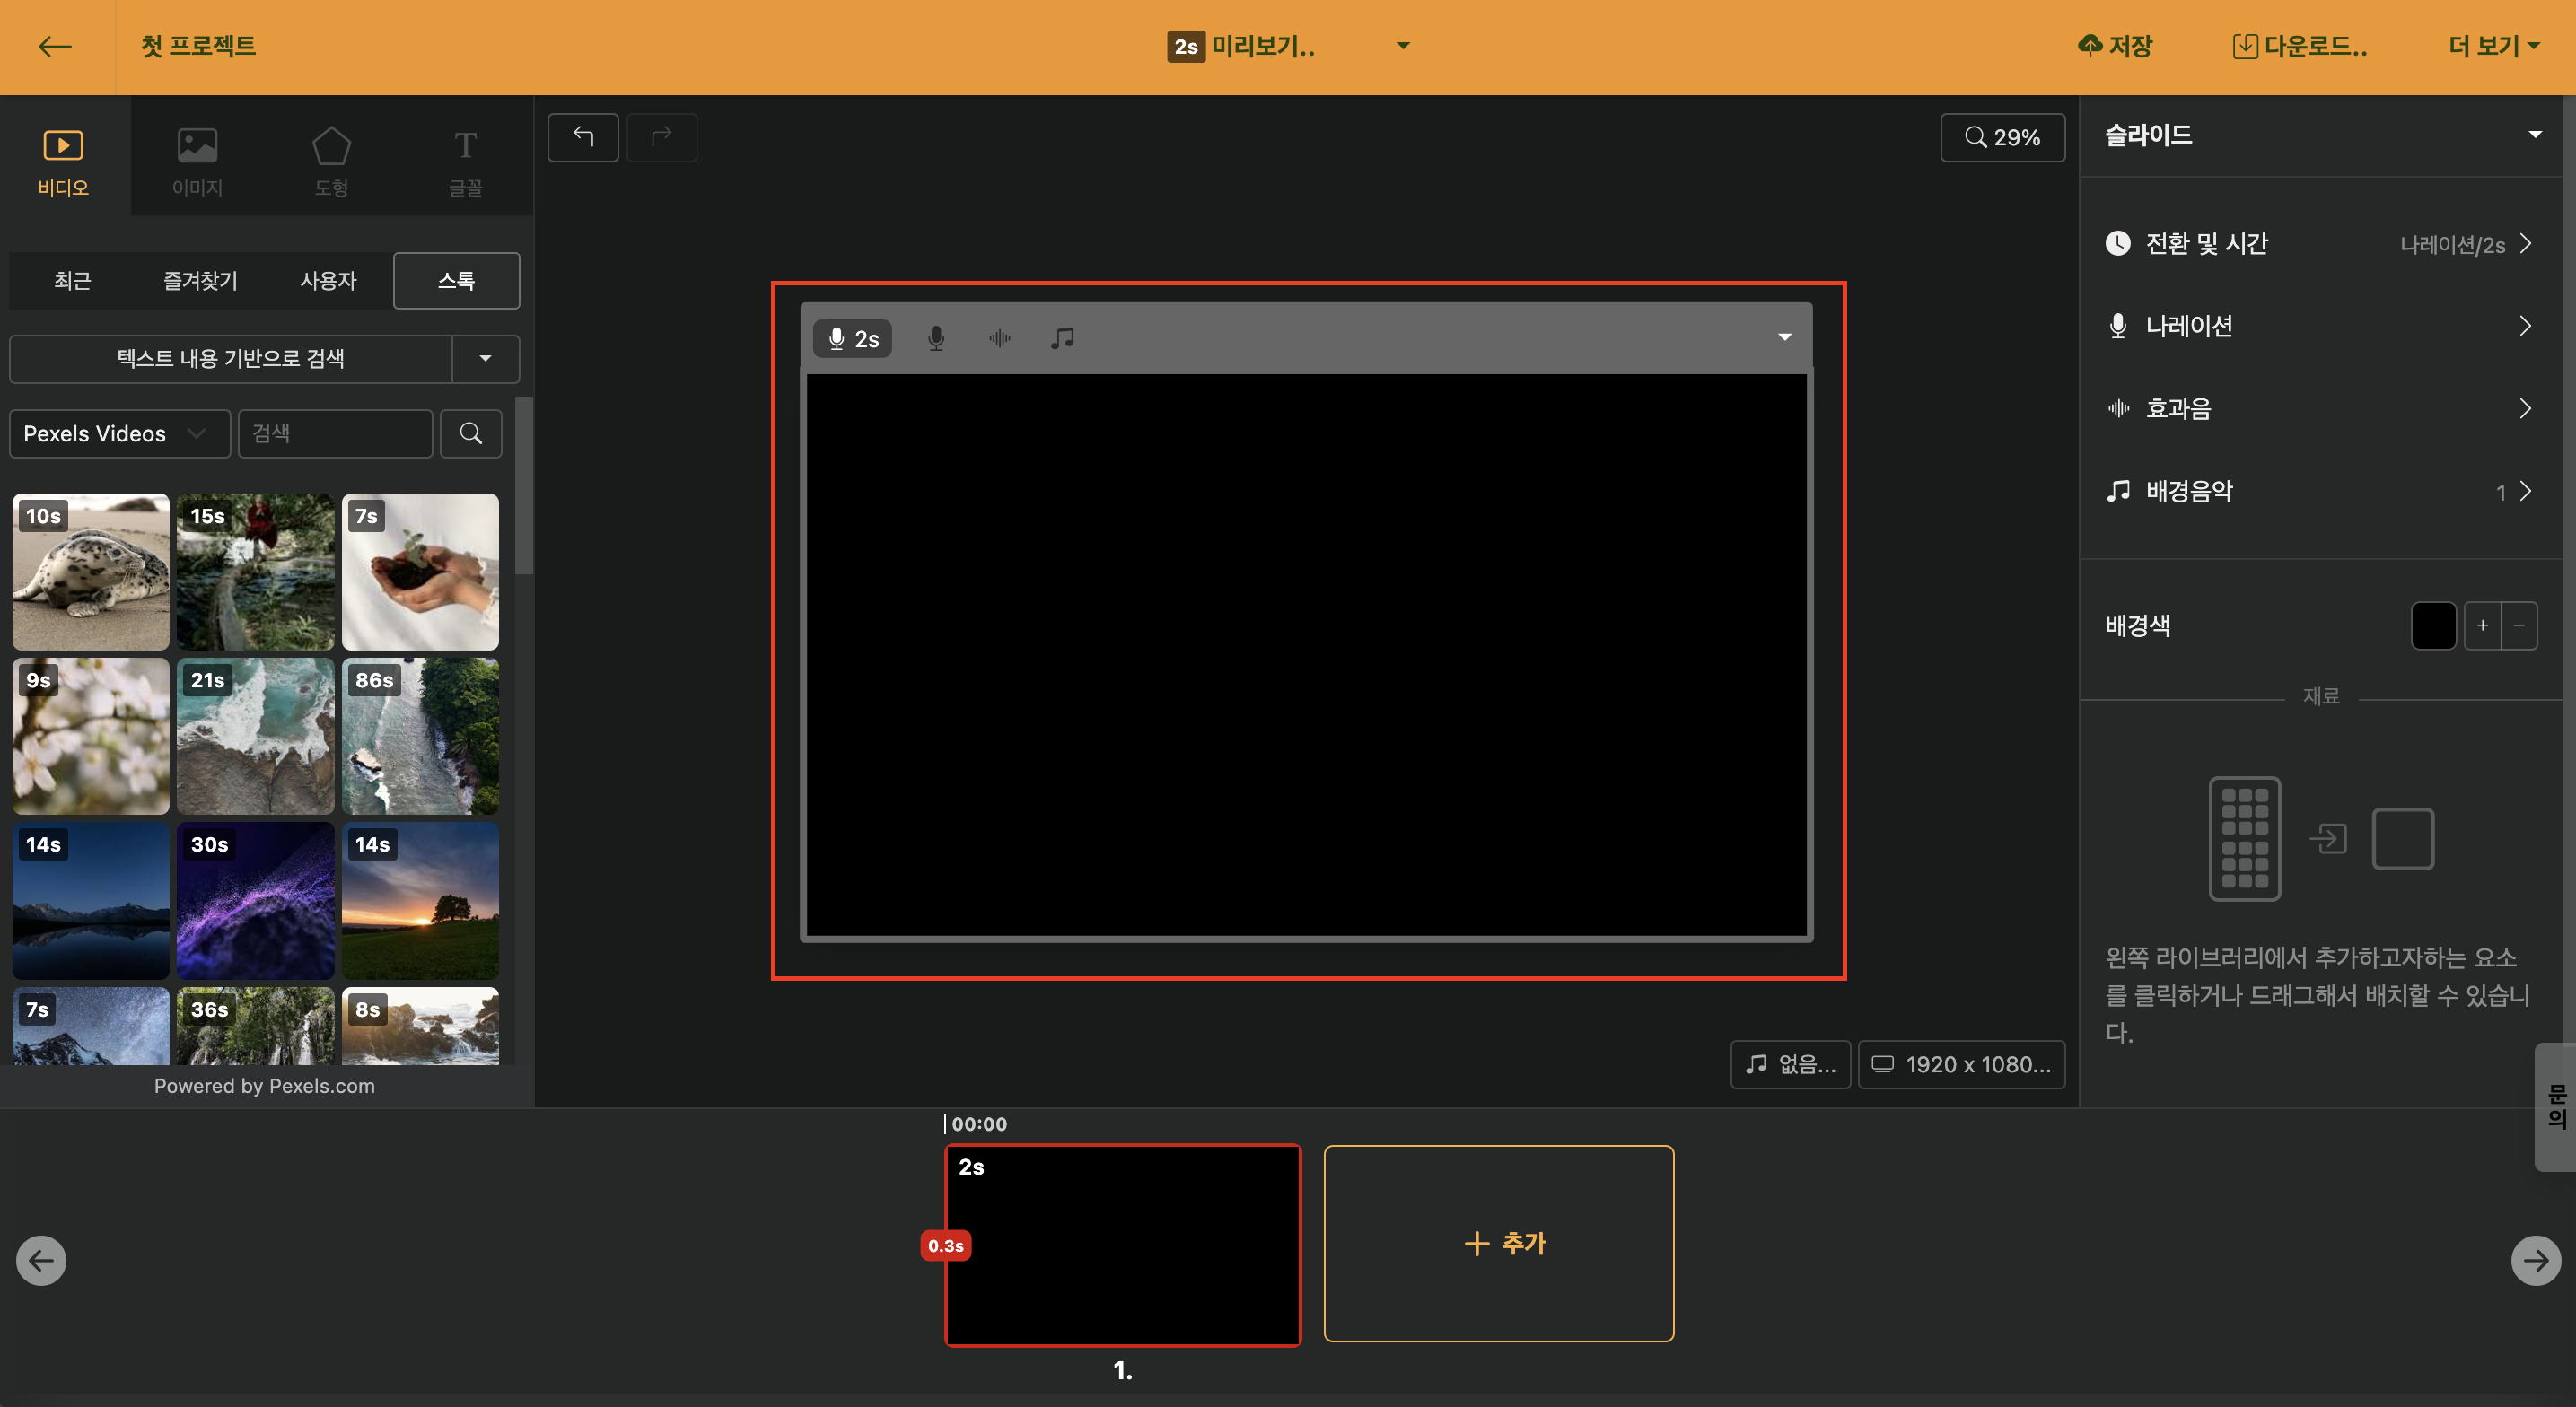
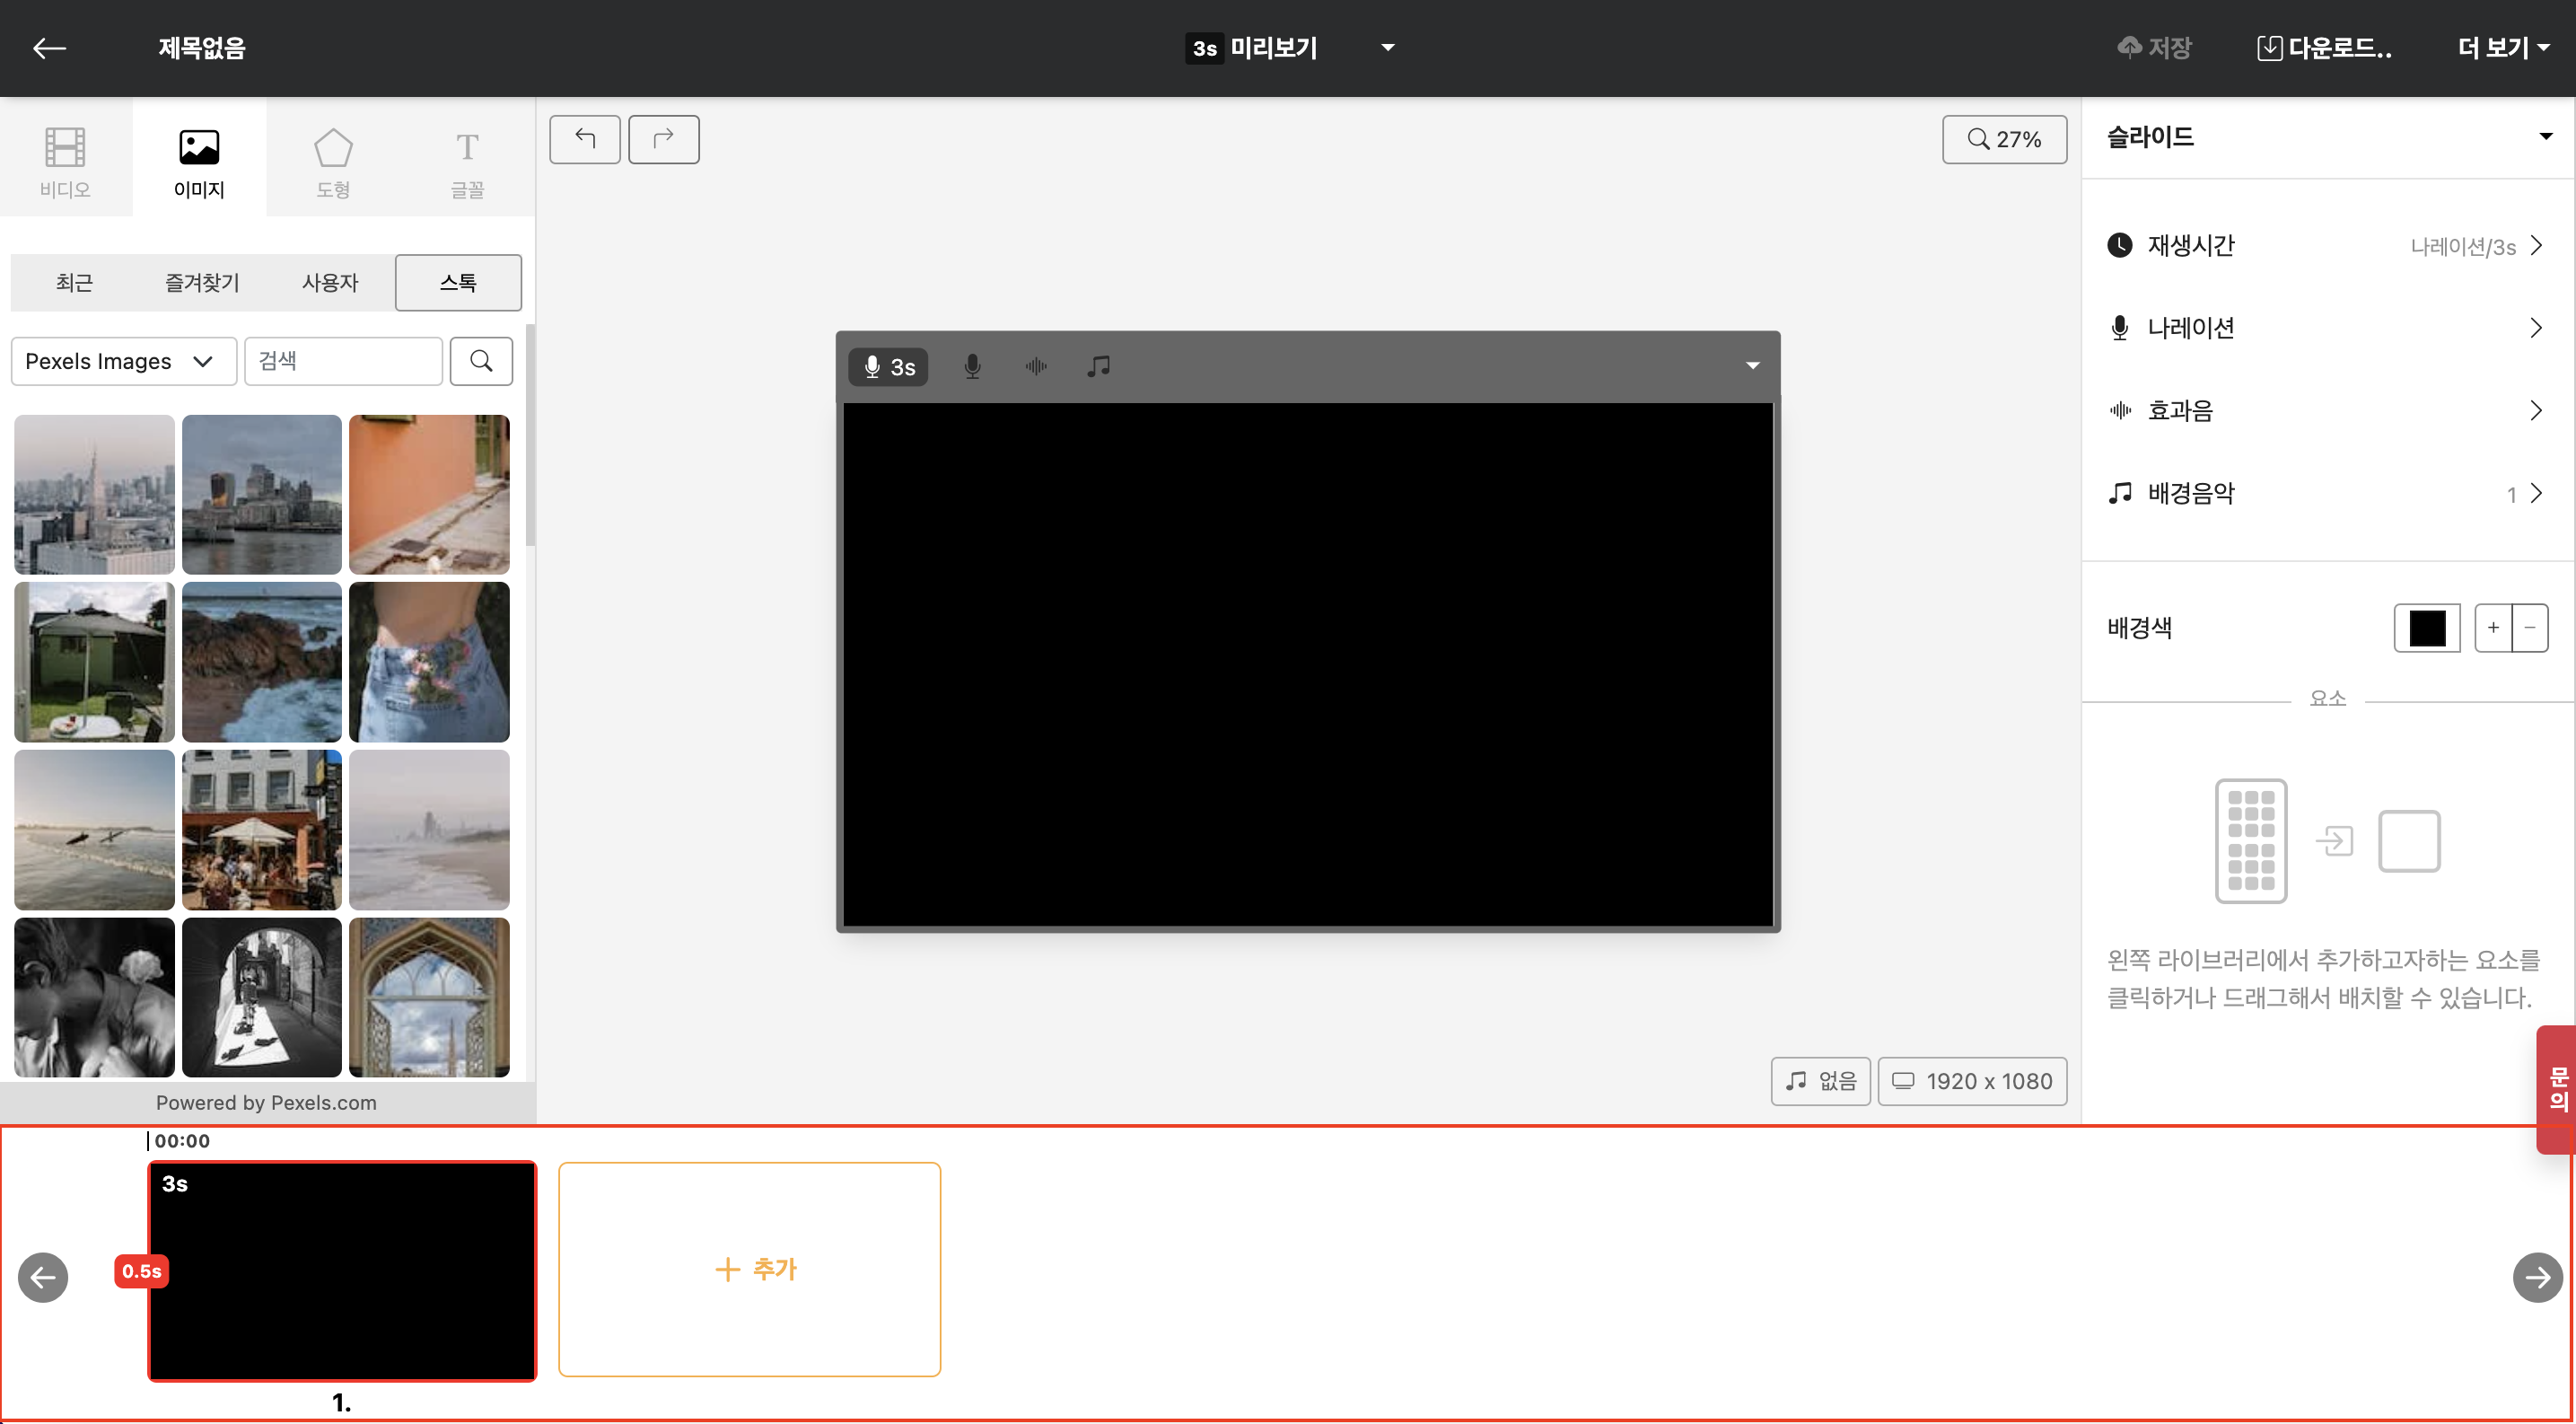
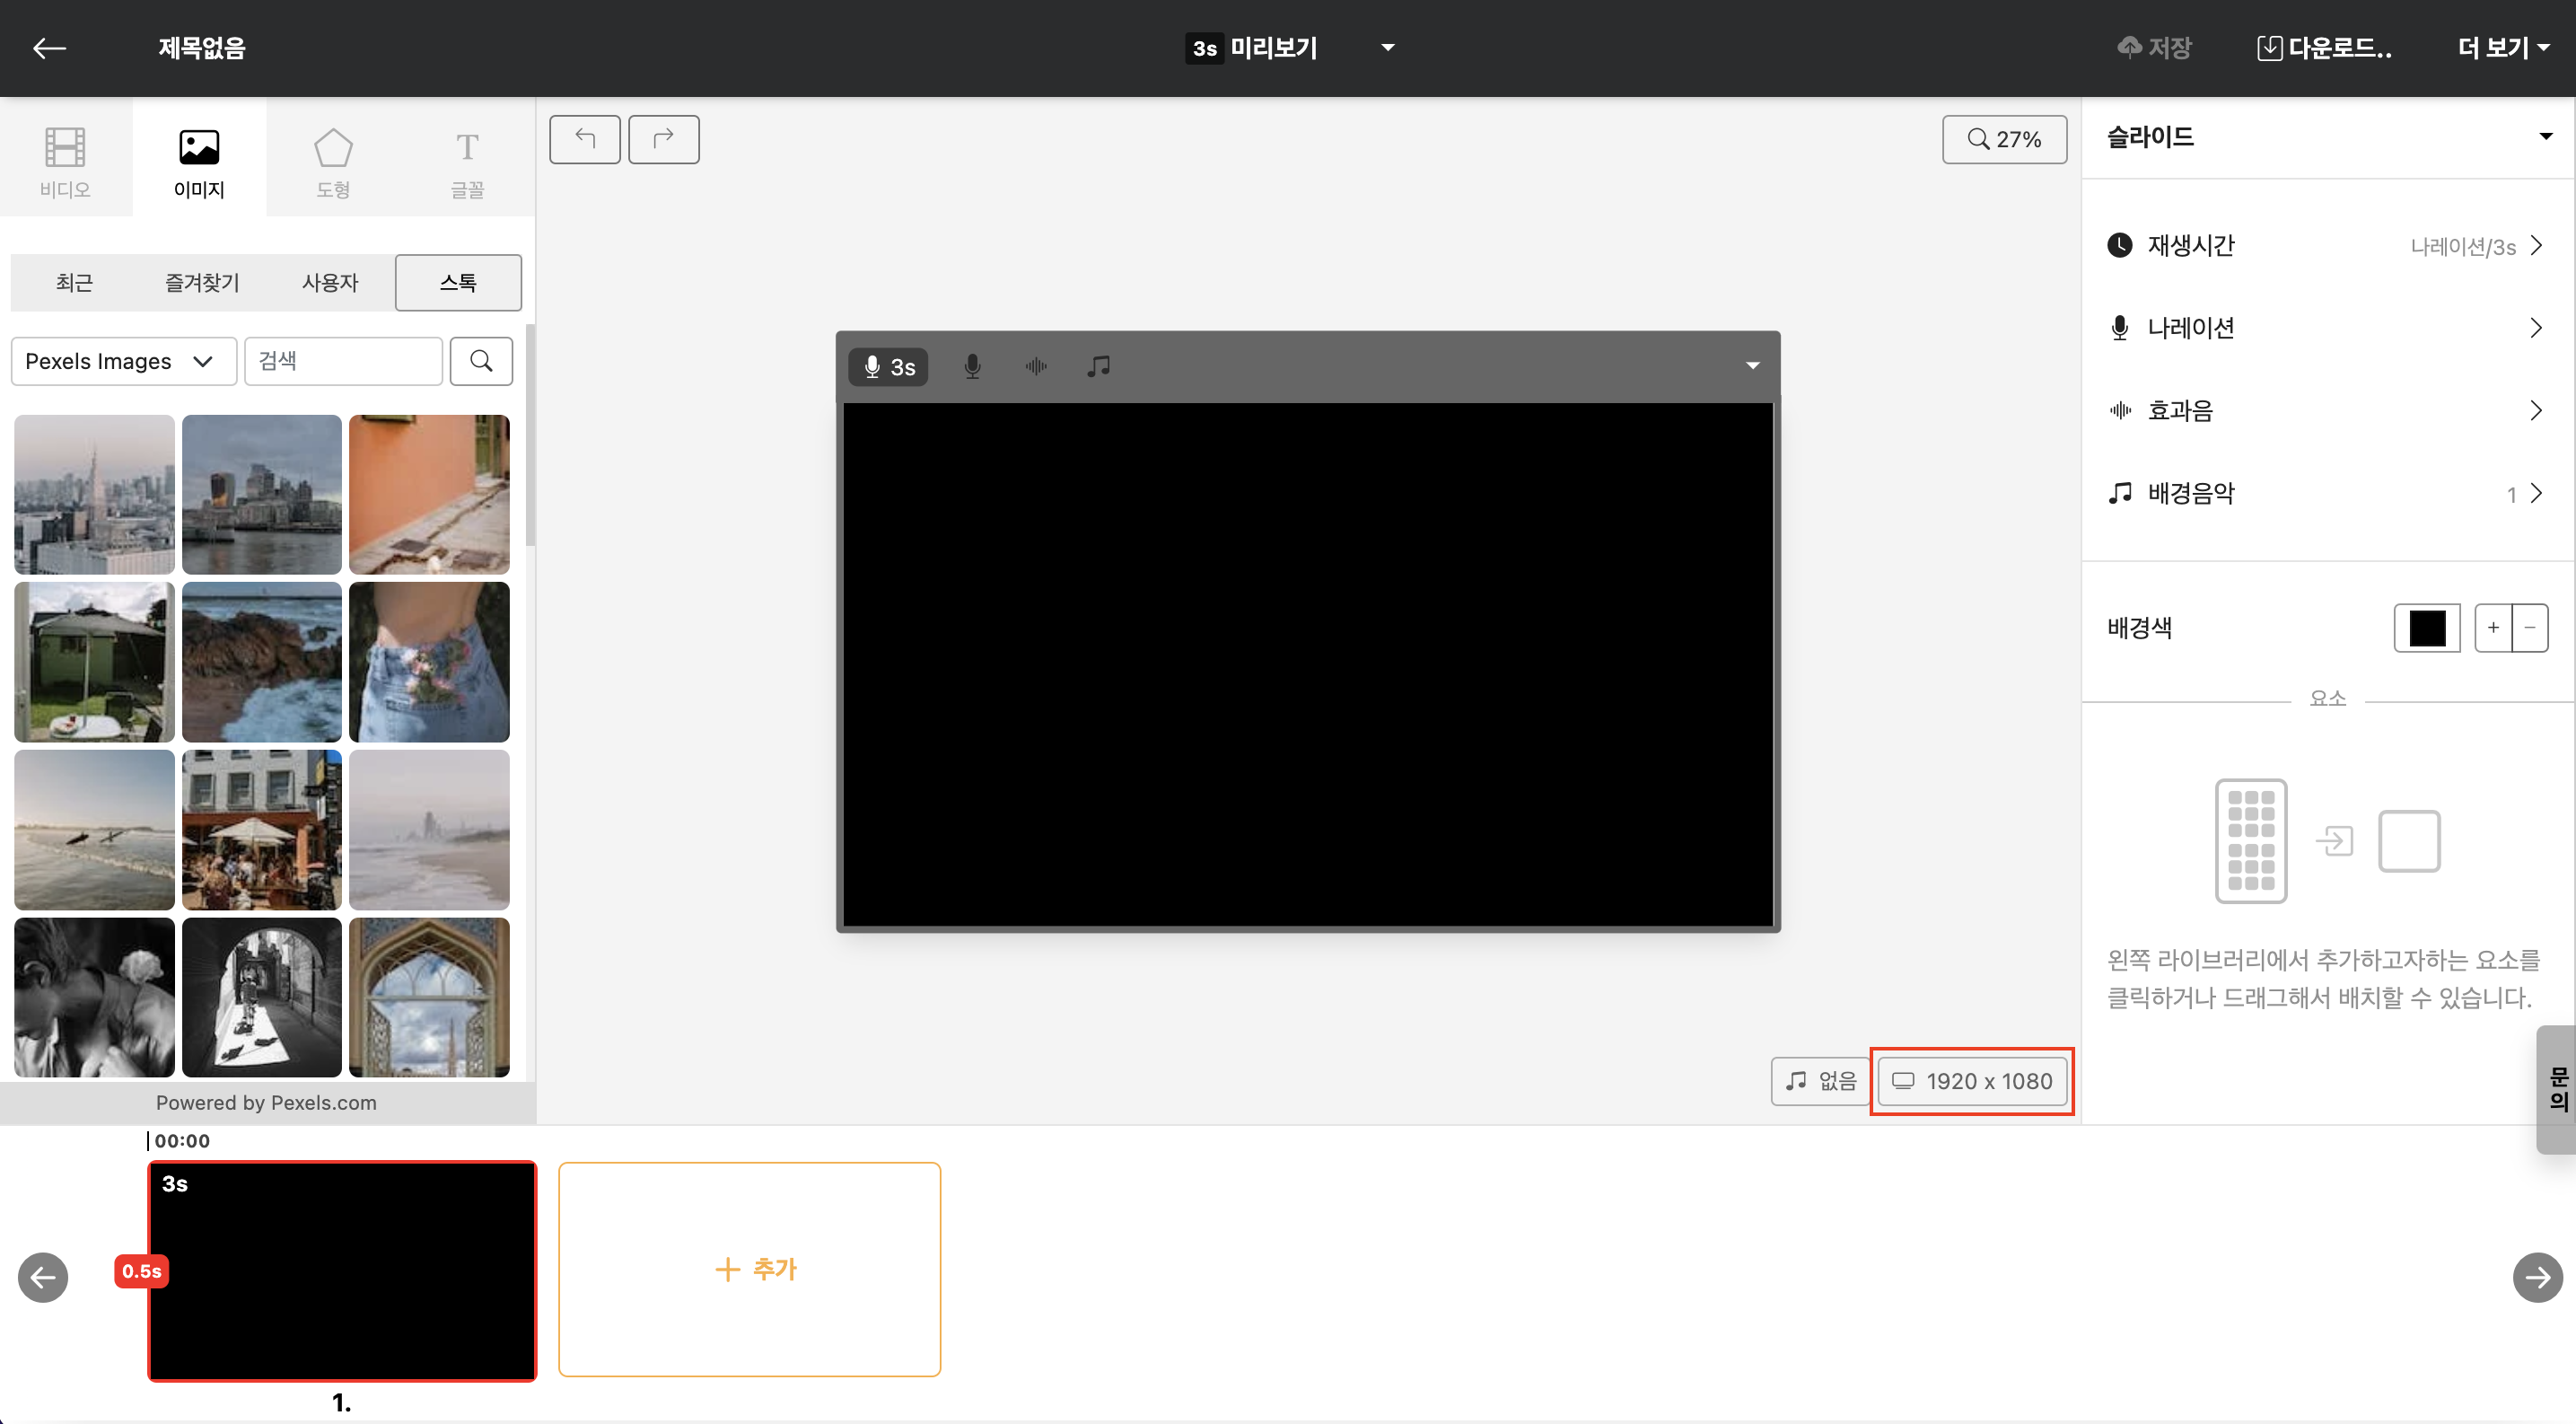
Editing Screen
All detailed settings and content configurations related to the project are carried out on this editing screen.
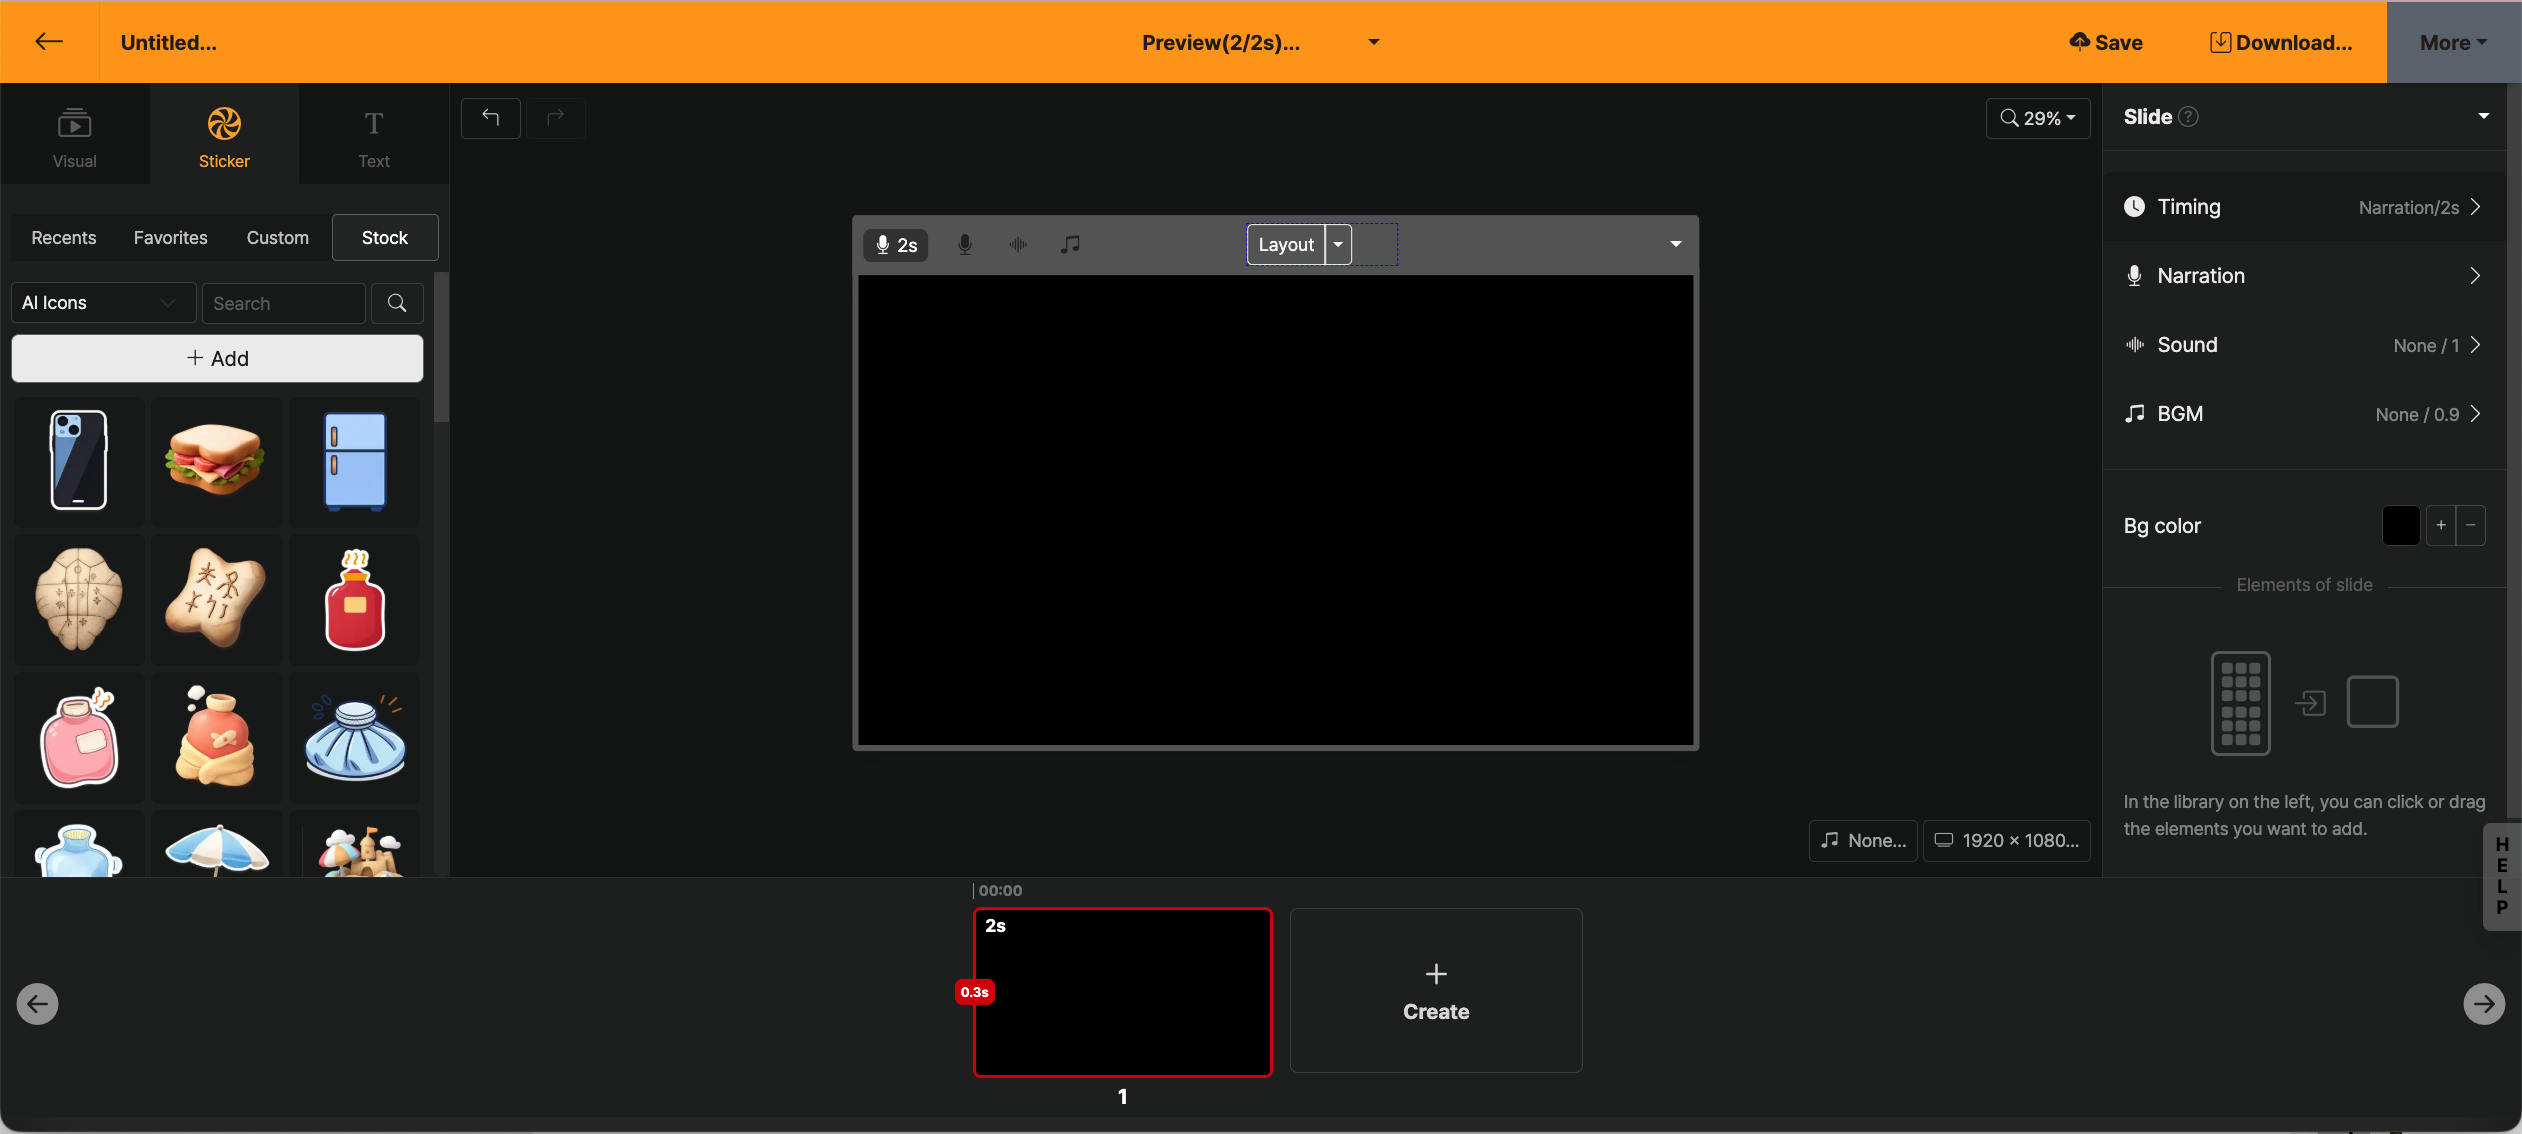
< Videostew's editing screen >
Slides and Elements
Before getting to know the screen's layout, take a look at the detailed structure of the project in Videostew. The editing screen exists to easily create and modify the content you want.
By default, a project consists of multiple slides, and each slide contains several elements.
Project
A project is the basic unit of work in Videostew. From the home screen, press [+ New project] to start a project, or from the template list press Start with this template to begin.
Slide
Slides are the smallest unit for editing each scene in the editing screen. As you edit each slide in the style you want, Videostew is converted into a video that plays naturally and continuously. You can also select and edit several slides at once, or edit each slide individually as you like.
Element
All sounds and visuals placed inside a slide are elements. Elements such as video/image are attached to elements via text, etc.
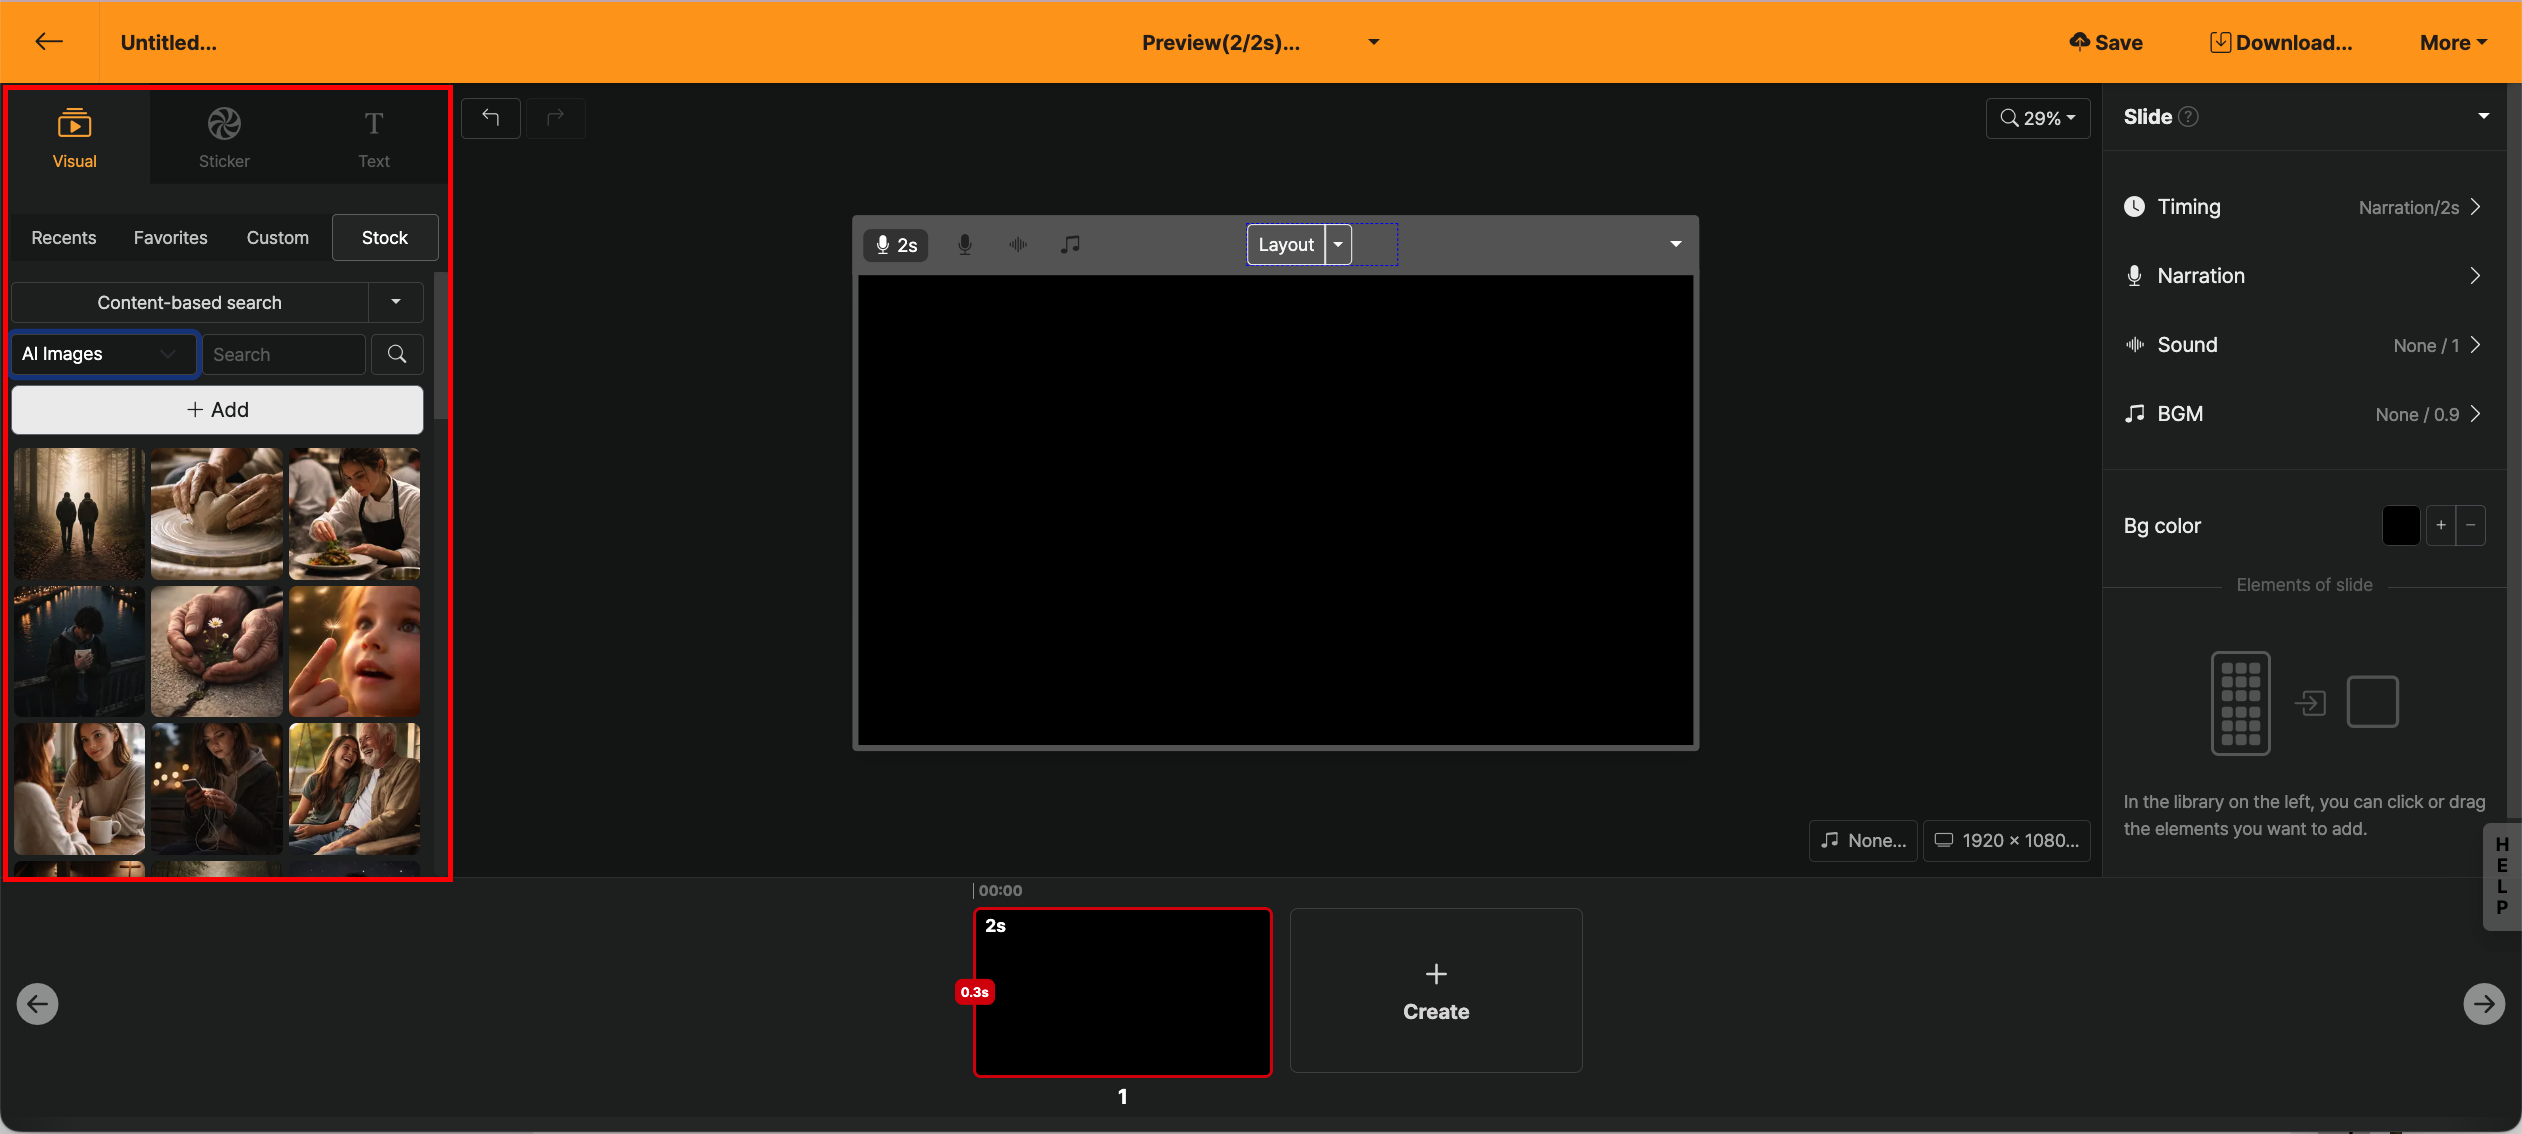
Screen Composition
The editing screen is structured with functions necessary for managing projects, such as previews and features for managing slides/elements to construct content.
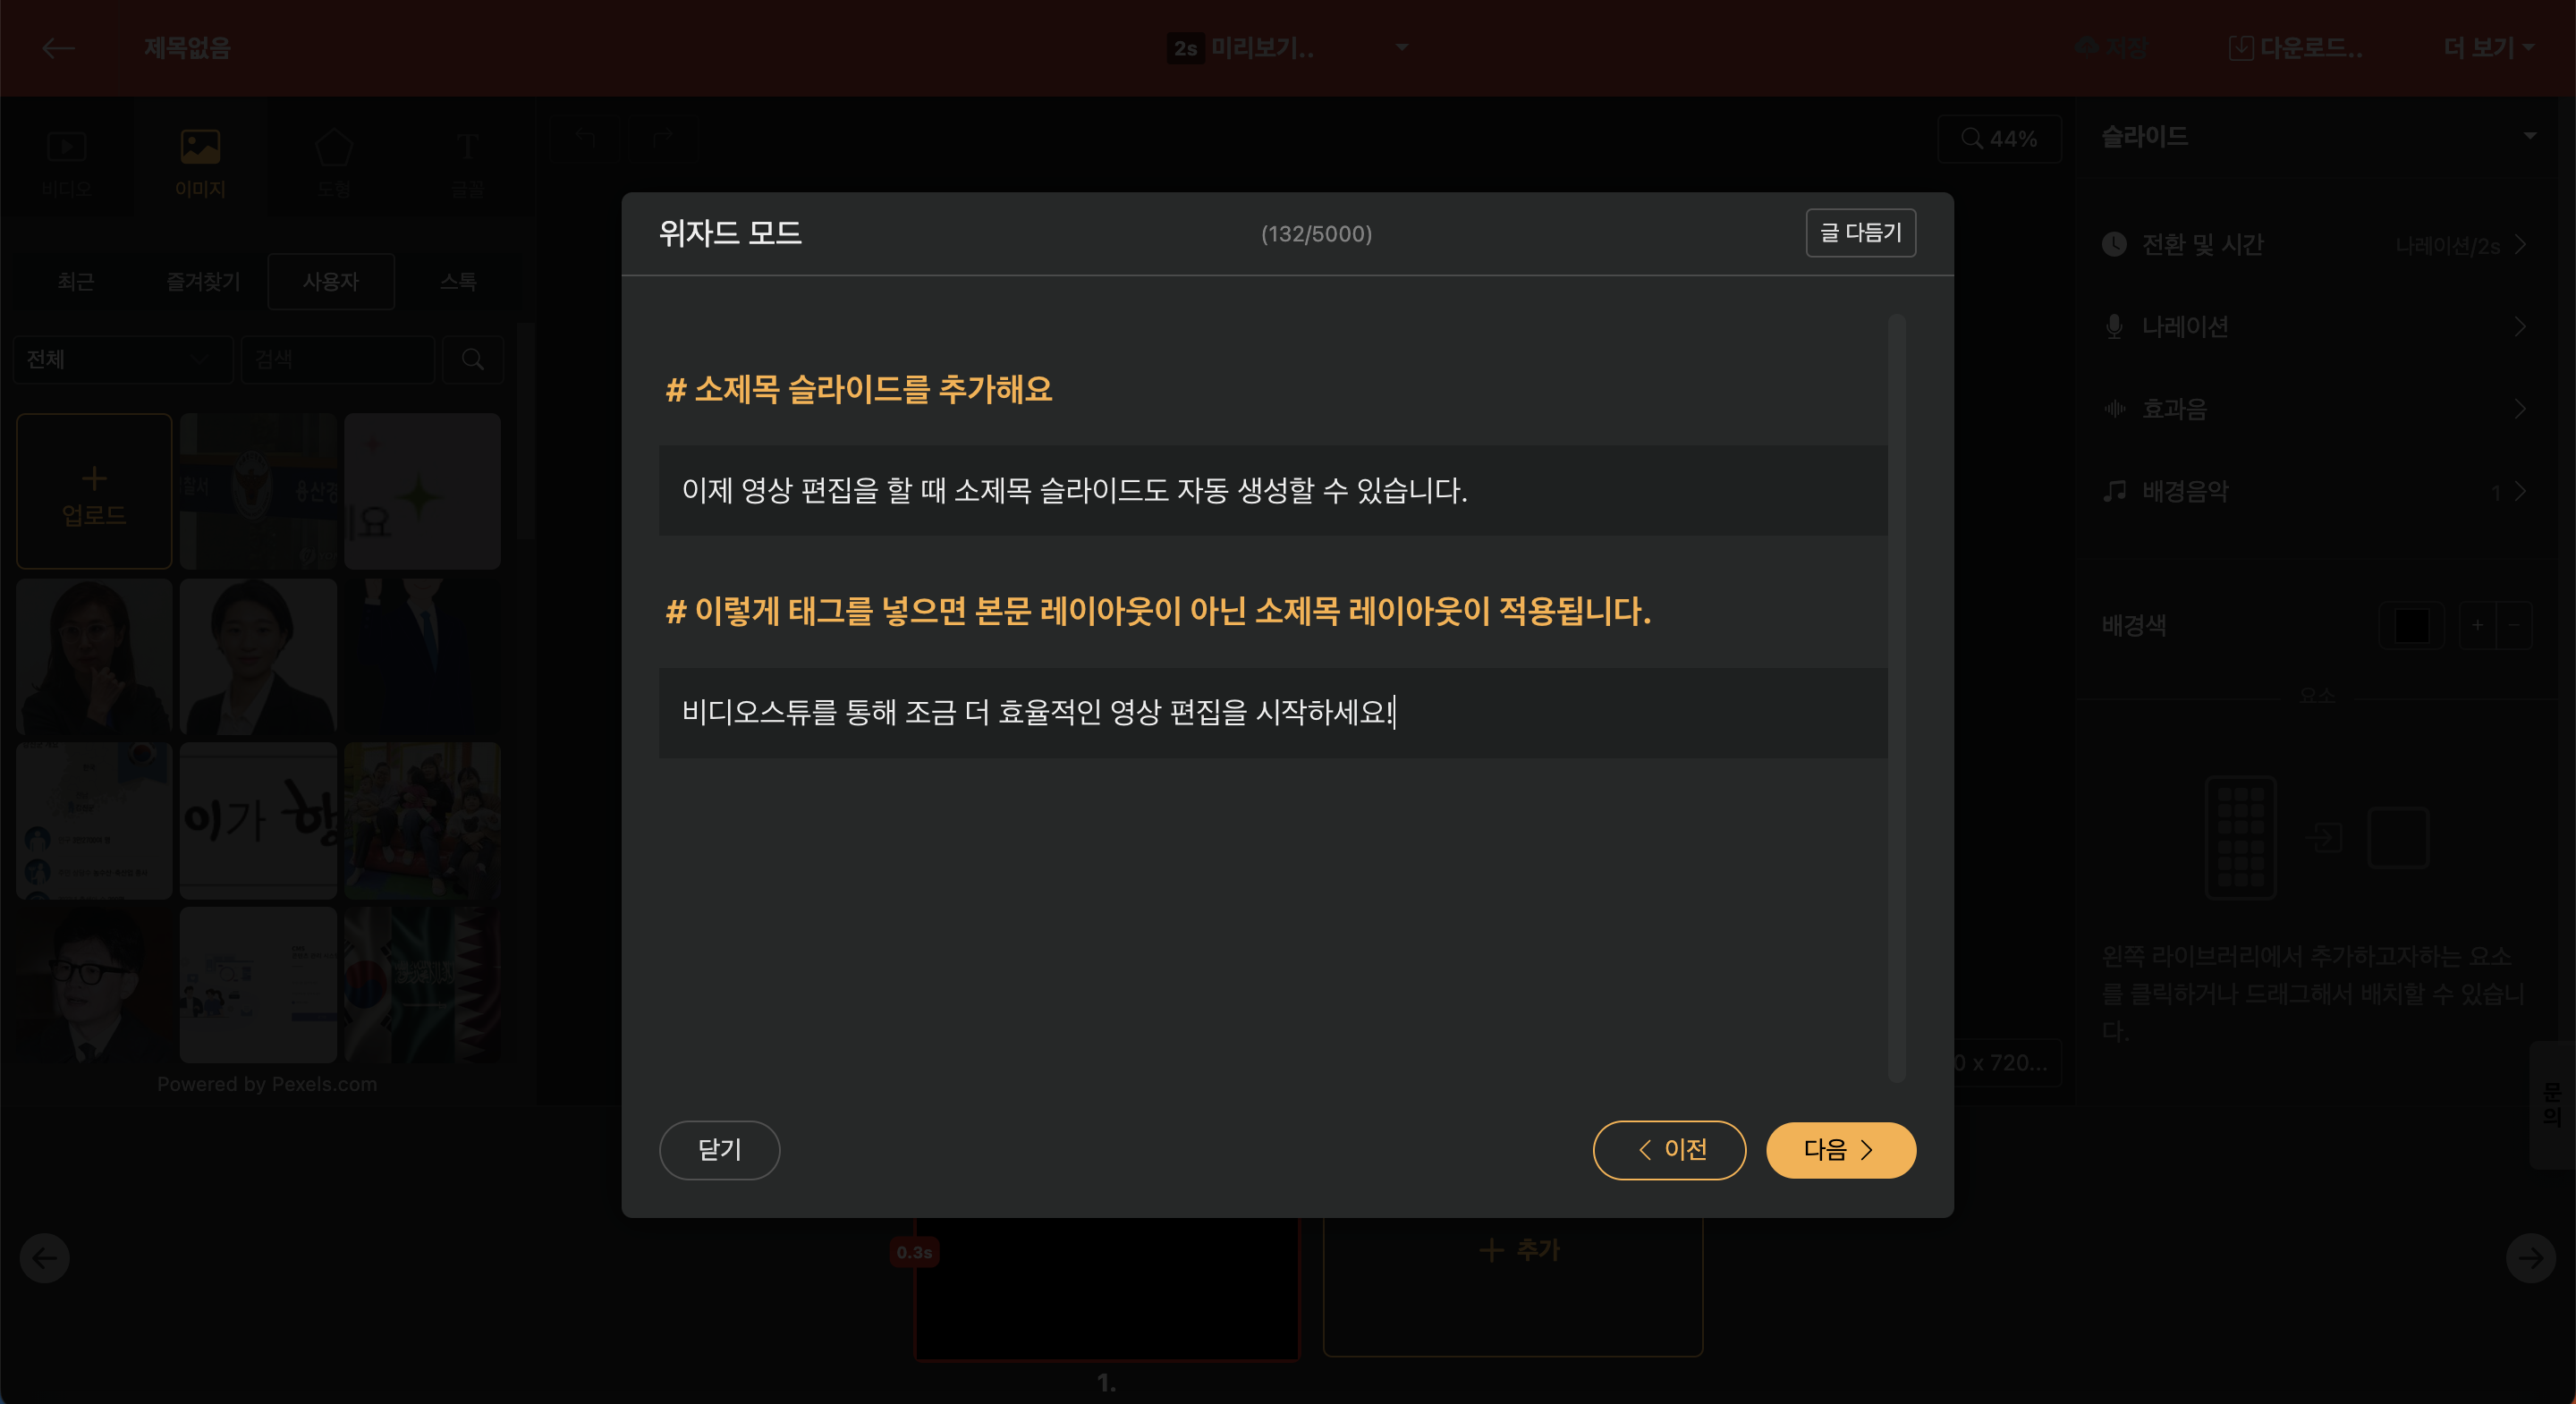
Wizard Mode
As soon as a new project starts, you enter the Edit Screen where the wizard window pops up immediately. Here, you can set the title by default, and if you continue by clicking "Next", you can start creating content more easily. For detailed explanation about the wizard, refer to [Getting Started with Wizard Mode].
When entering text directly, you can include up to 10,000 characters. You can also paste up to 20,000 characters by copying and pasting external text or starting from a blog URL.
After that, if you use the "Add Text" function, AI will regenerate the text according to the desired video format.
The software reconstructs the text to fit a maximum length of 60 seconds. However, the content entered can exceed 60 seconds to preserve the naturalness and completeness of the input.
Title Settings
When using the merge feature, you can automatically add relevant content to the title.
When entering the original text directly into the text editor, using the "#" tag will automatically convert it into a subtitle slide. (Make sure to leave a space after "#".)
Editor Screen Top Navigator
The editing top panel contains tools for general management of the project.
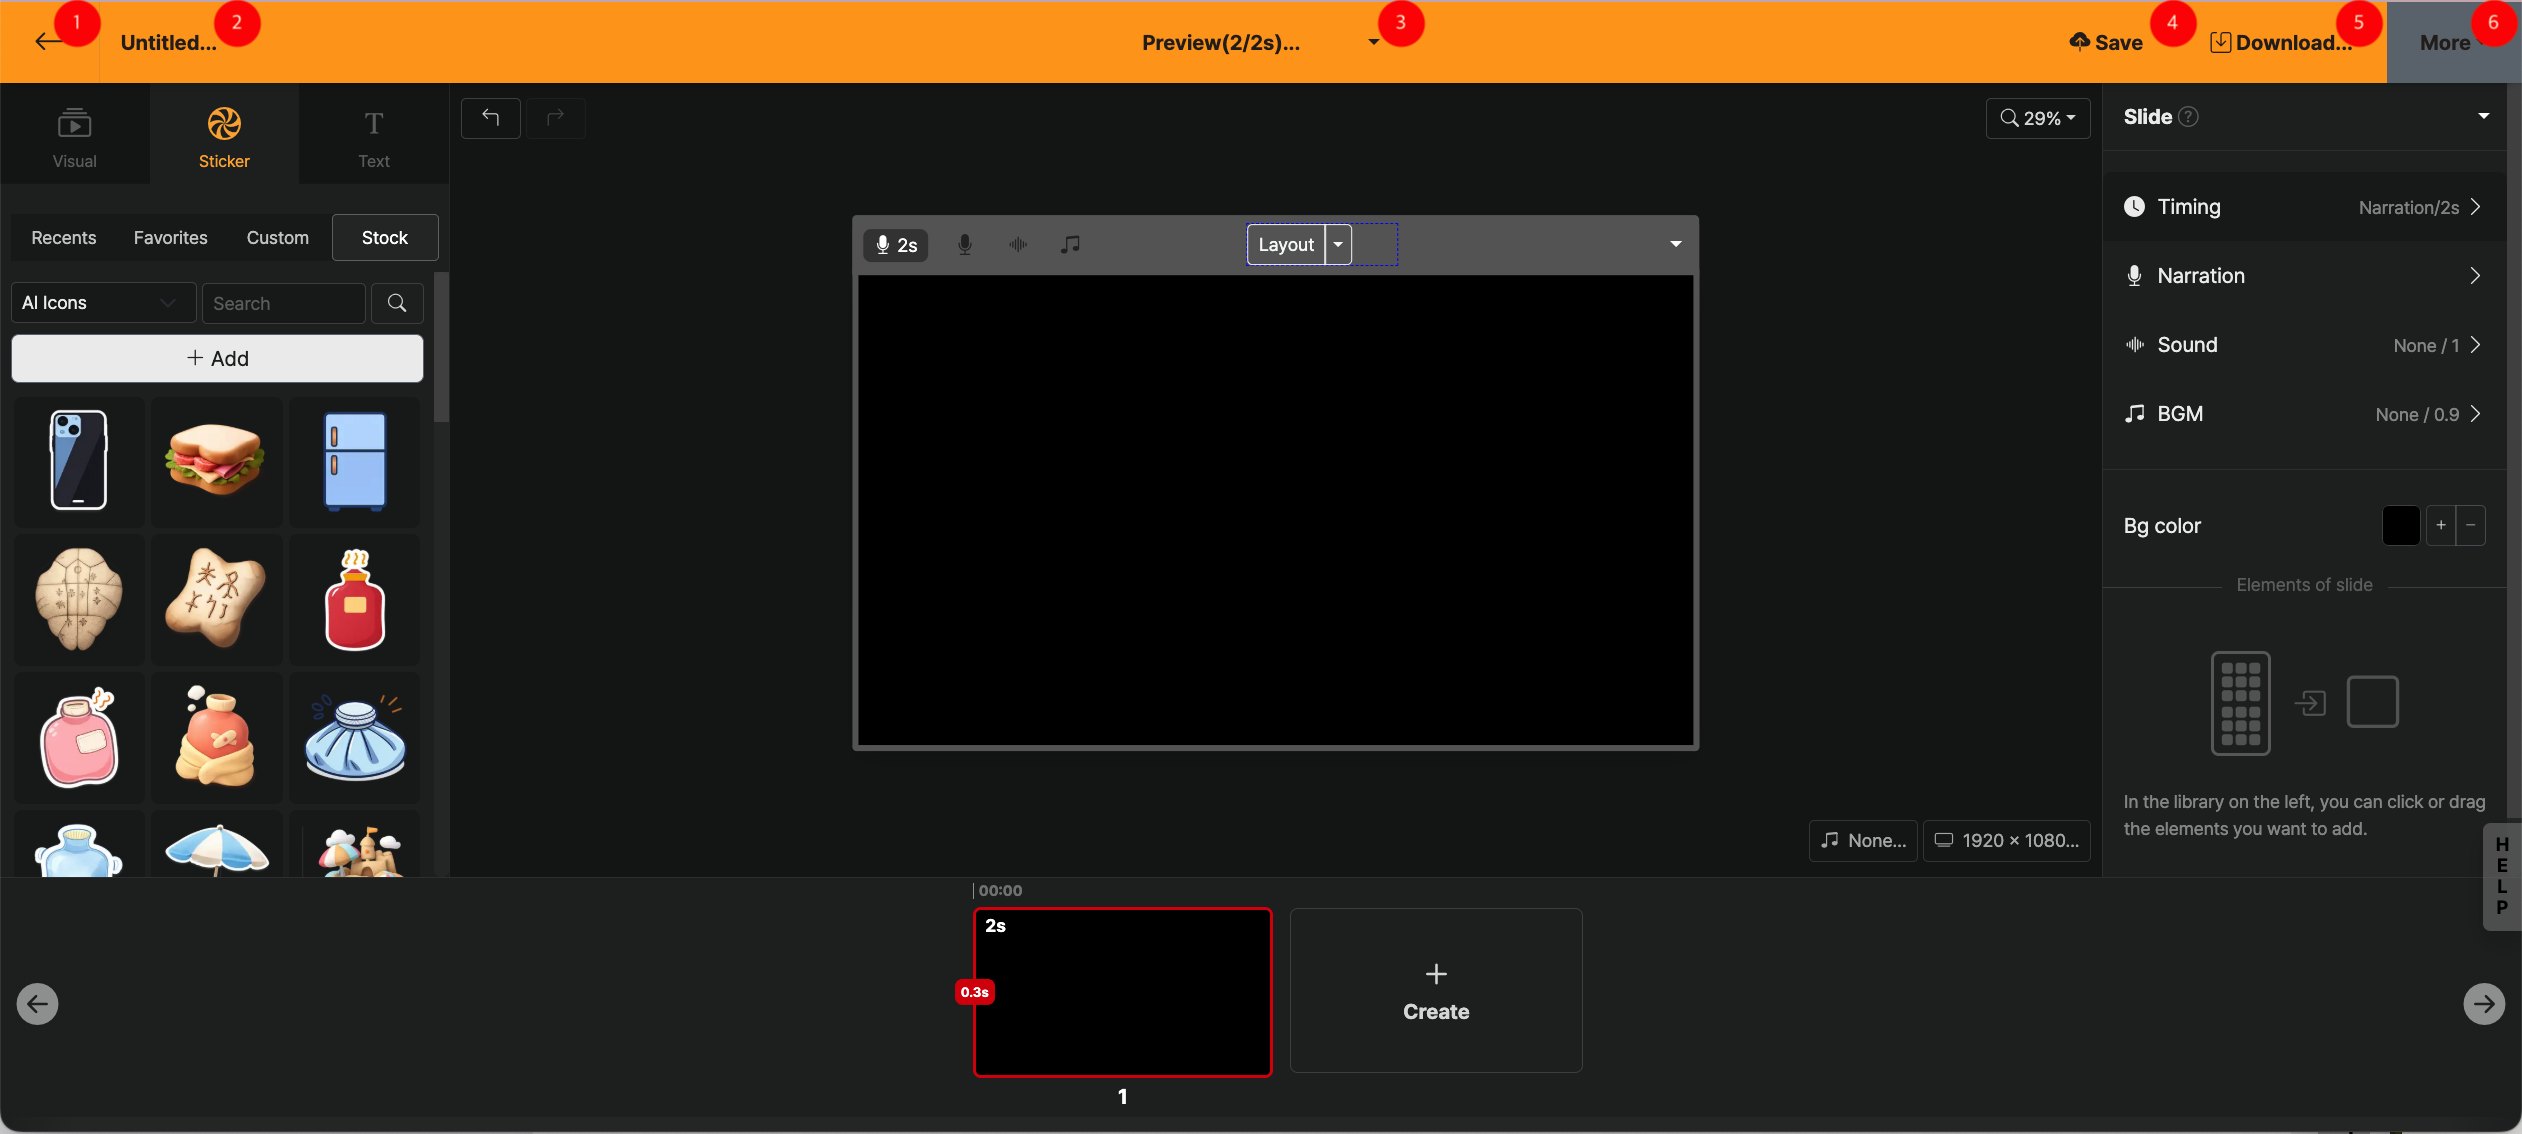
Return to Home Screen (←)
Pauses the work and returns to the home screen. If there is unsaved content, a warning window appears. In such cases, click [Cancel] then Save to save all work progress to the server.
Changing the Title (No Title)
You can set the project title and description. If you insert a URL into the description field, it can be used as a link in the Share screen. Also, the title and description fields are automatically generated according to the content of the created project.
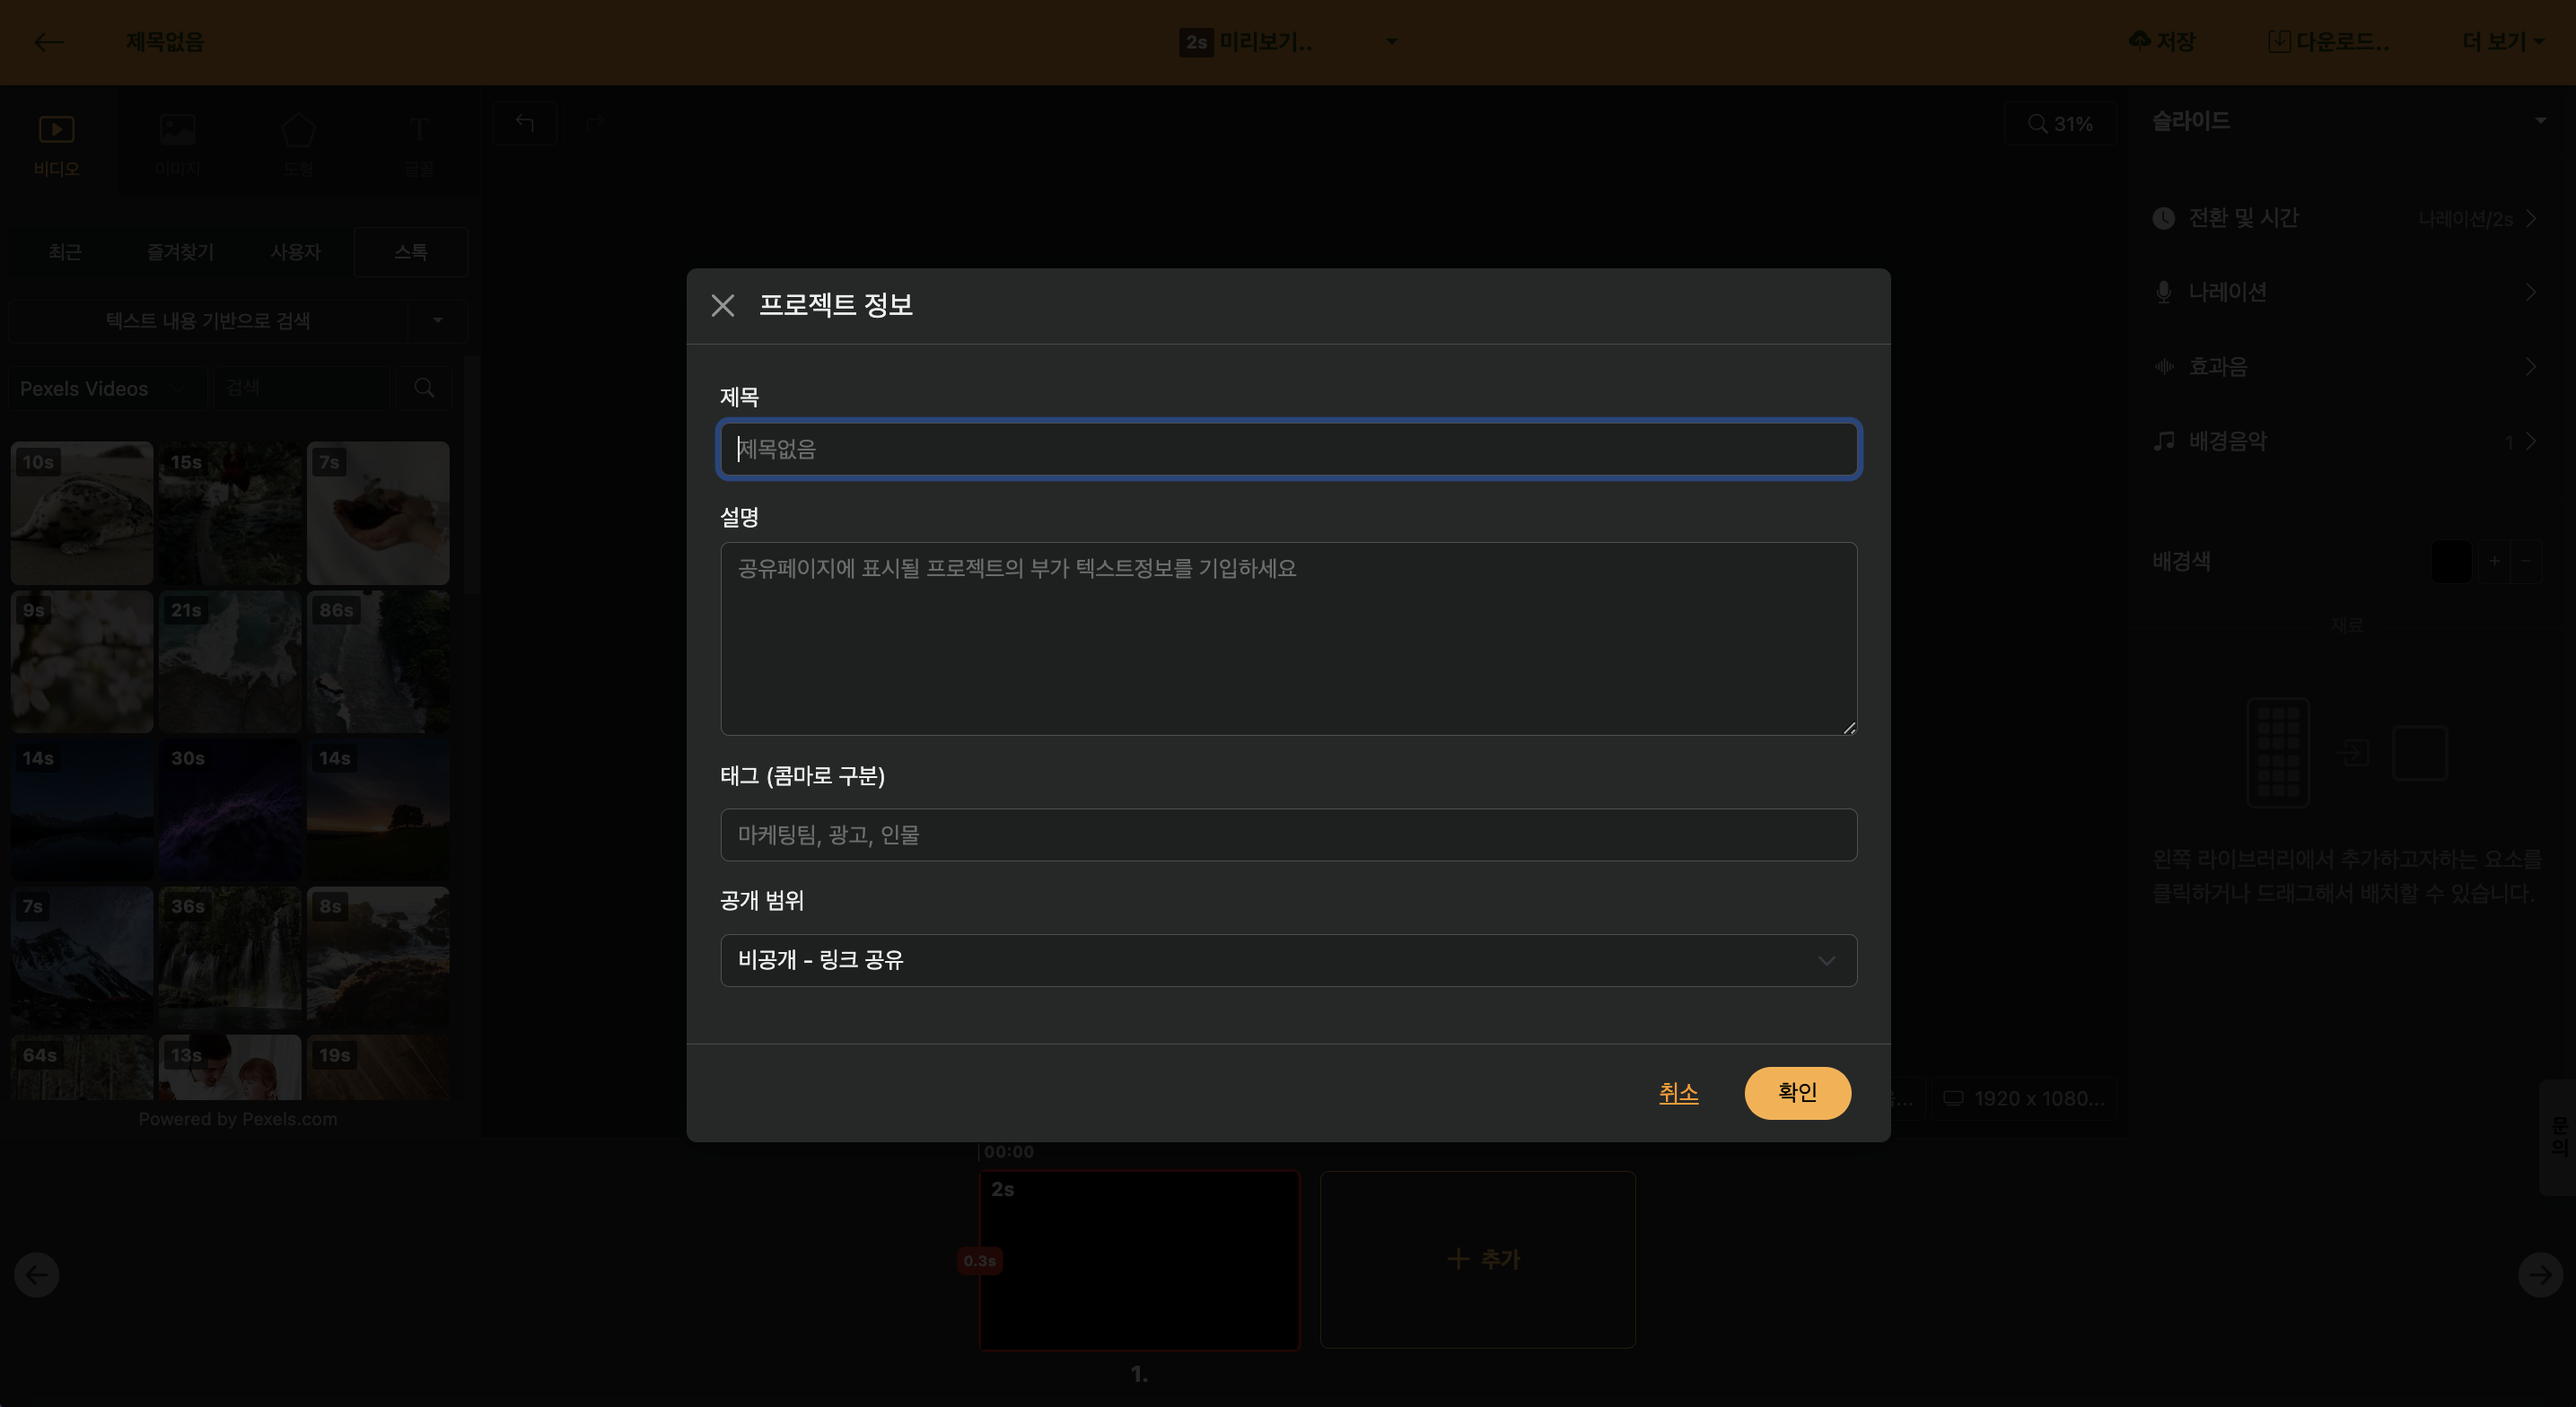
< Edit Project Information >
Description
Editing screen > Click project info in header
You can add a brief summary of the project content; when the project is published on the web, this information will appear on the website.
Time Information Included
Editing screen > Click project info in header
When you upload a slide-based script, the slide’s duration is automatically added to the description. If you embed it on a replay platform like YouTube, you can click the time to change the replay point, and the functions are linked.
Tag
Editing screen > Project info in header
When you enter tag information separated by commas, you can use it conveniently by tag when searching on the home screen.
Publish Scope
Editing screen > Project info in header
All projects are created in a private state by default, where they can only be accessed if the address is known. When this setting is changed, it can be configured to appear in web search results.
To use it as "My Own Template", you must set it to the "Published" status; for instructions on creating a template, please refer to the [Create My Own Template] guide.
Preview
Editing screen > Preview in header
You can preview the currently selected slide. When you select multiple slides, only that section will regenerate. Click the play settings (▼) button to preview the entire video.
Save
Editing screen > Save in header
Saves the content of the project that is in progress to the server. Even if the user does not manually press it during the work, if a modification is made, it will be automatically saved to the server. For those who do not feel comfortable not pressing save manually, we also provide the option to manually save.
Shortcut key: Ctrl + S
Download
Editing screen > Download in header
You can render the completed project into a file.
Video File (MP4)
Editing screen > Download in header > Download video after rendering request
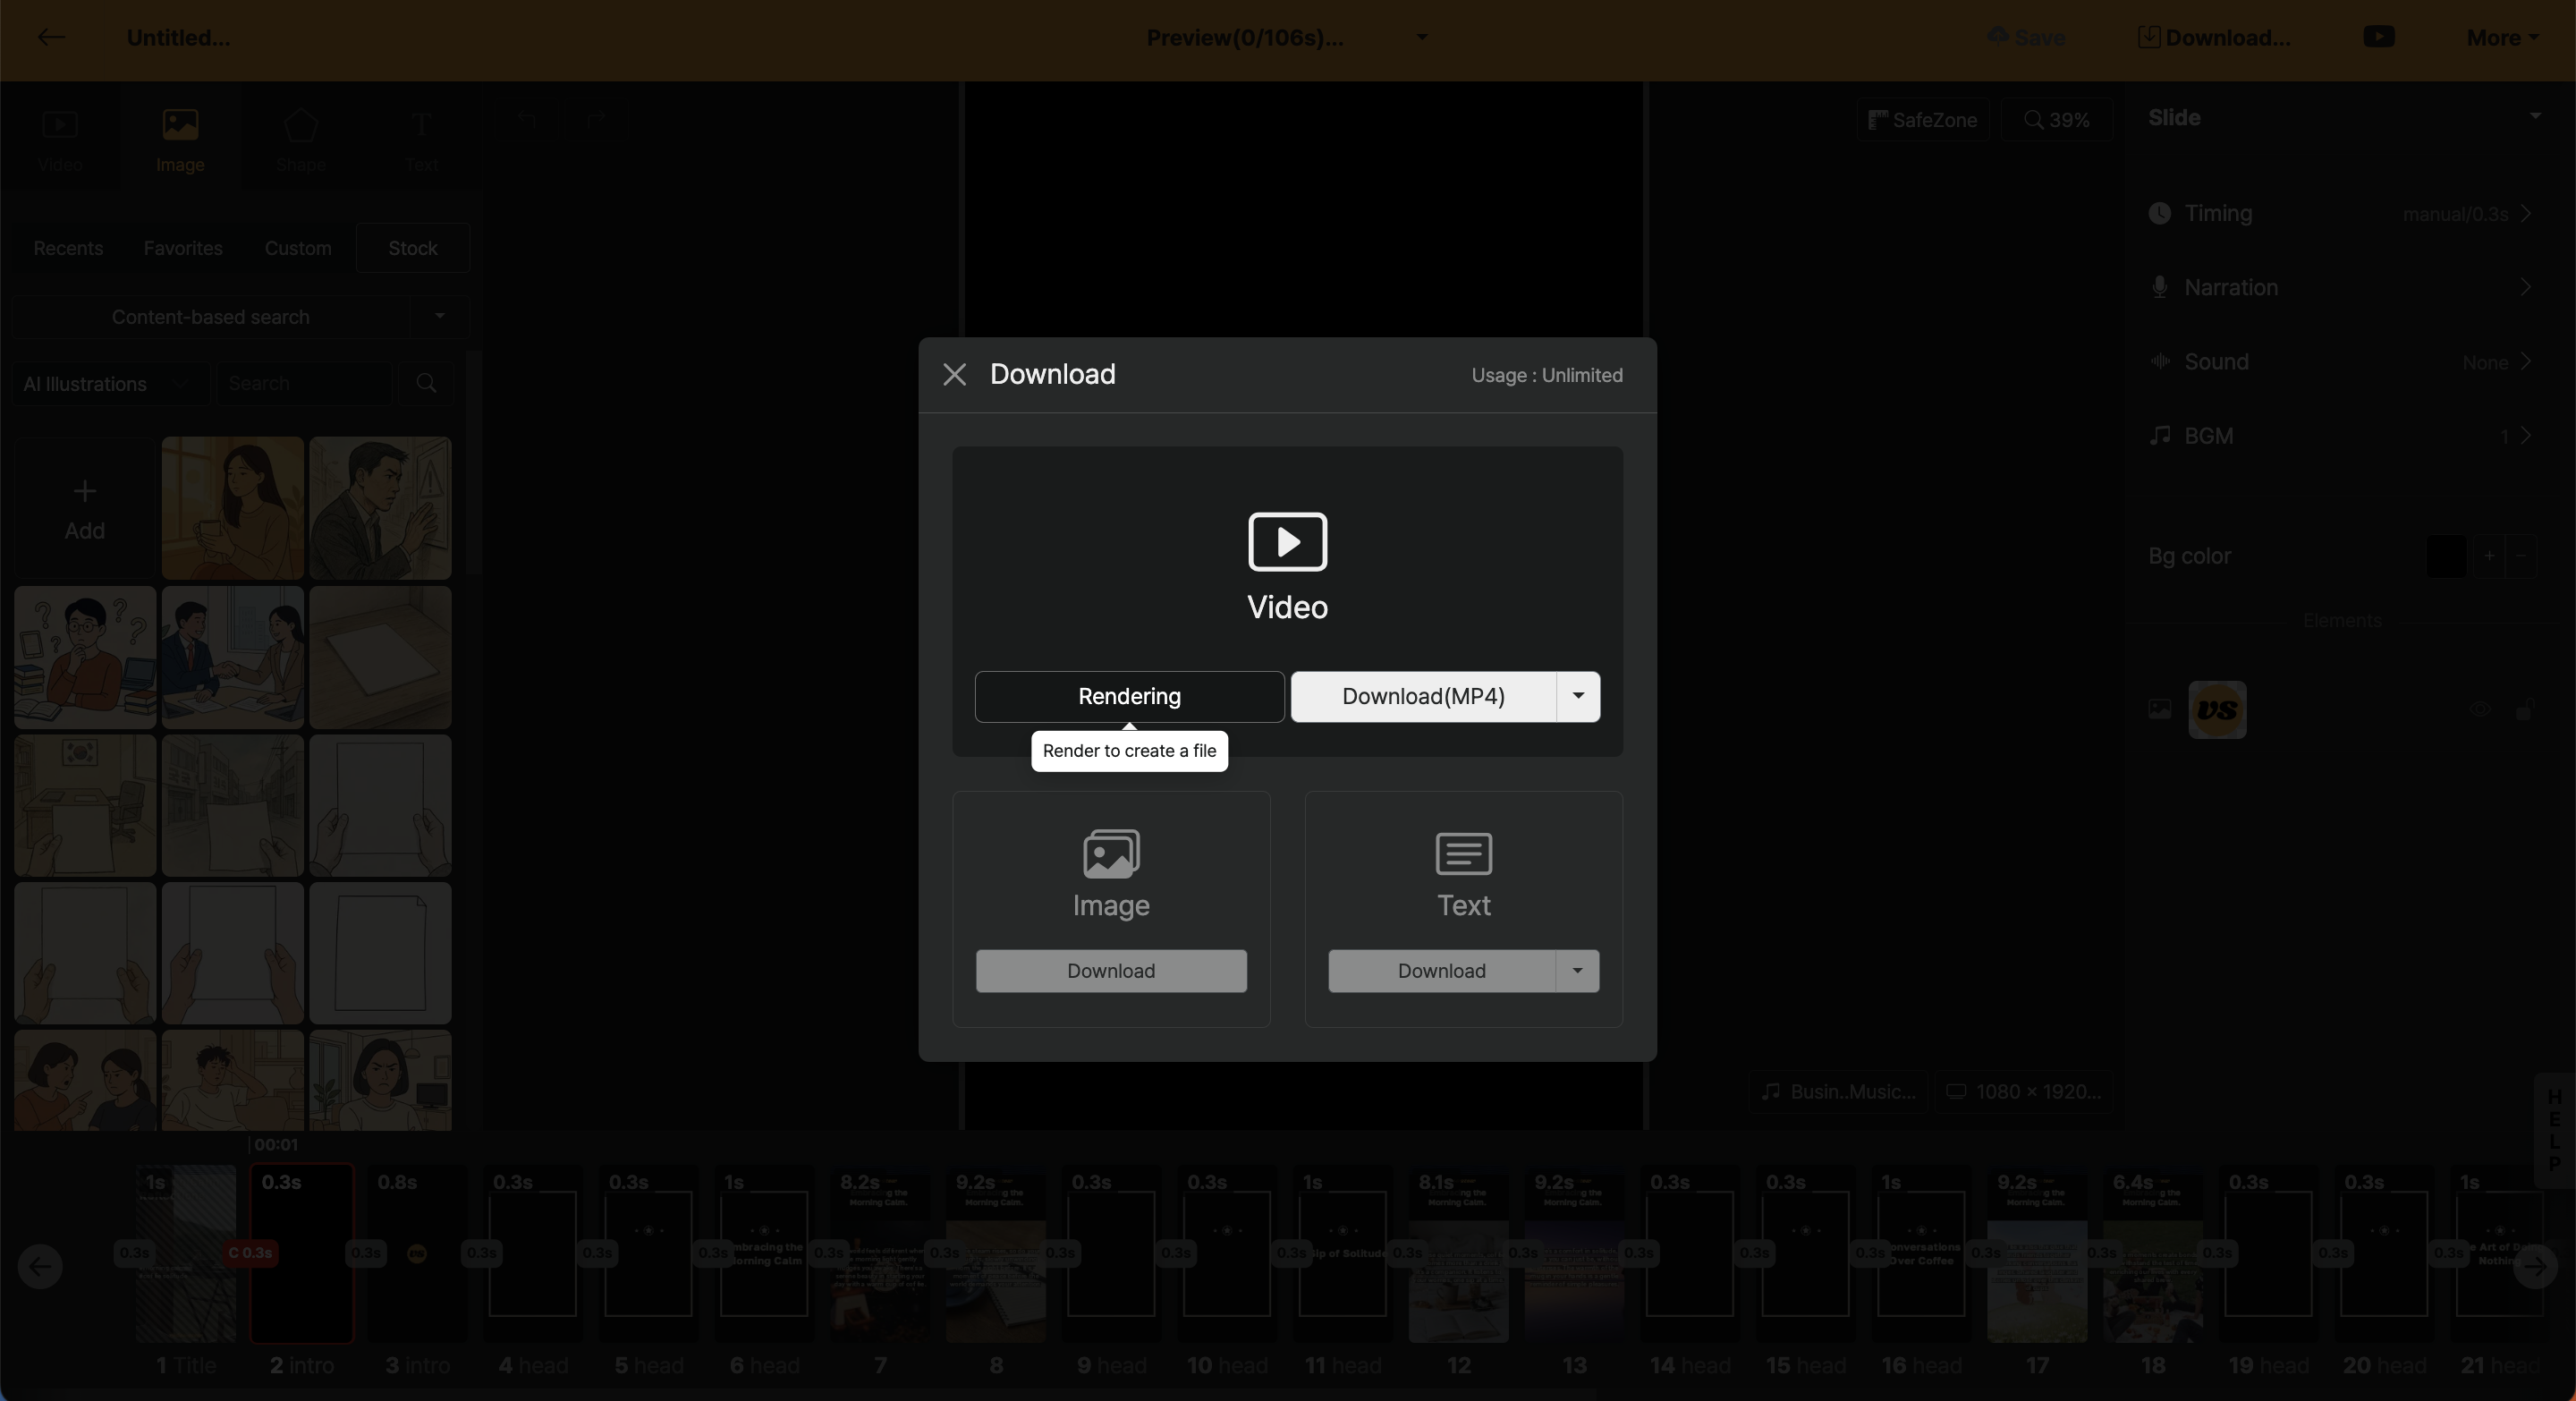
First, press the "Rendering" button, then a rendering request is submitted. Rendering request means converting the project you made into a video file. After a while, once the file is added, the Download button becomes active, and by clicking the button, you can download the MP4 file to your computer.
Audio File (MP3)
Editing screen > Download in header > Download audio after rendering request
You can click the drop-down (▼) button at the top of the download button to download as an MP3 file. All sounds included in the video are included as is.
Image File (PNG)
Editing screen > Download in header > Download image
Saves every slide as individual image files. You can use this to download results in a card news style that are not videos.
Text File (TXT)
Editing screen > Download in header > Download text
You can download all texts used in the project as a document format. It is useful to save as a text format again when the content has changed a lot during the work.
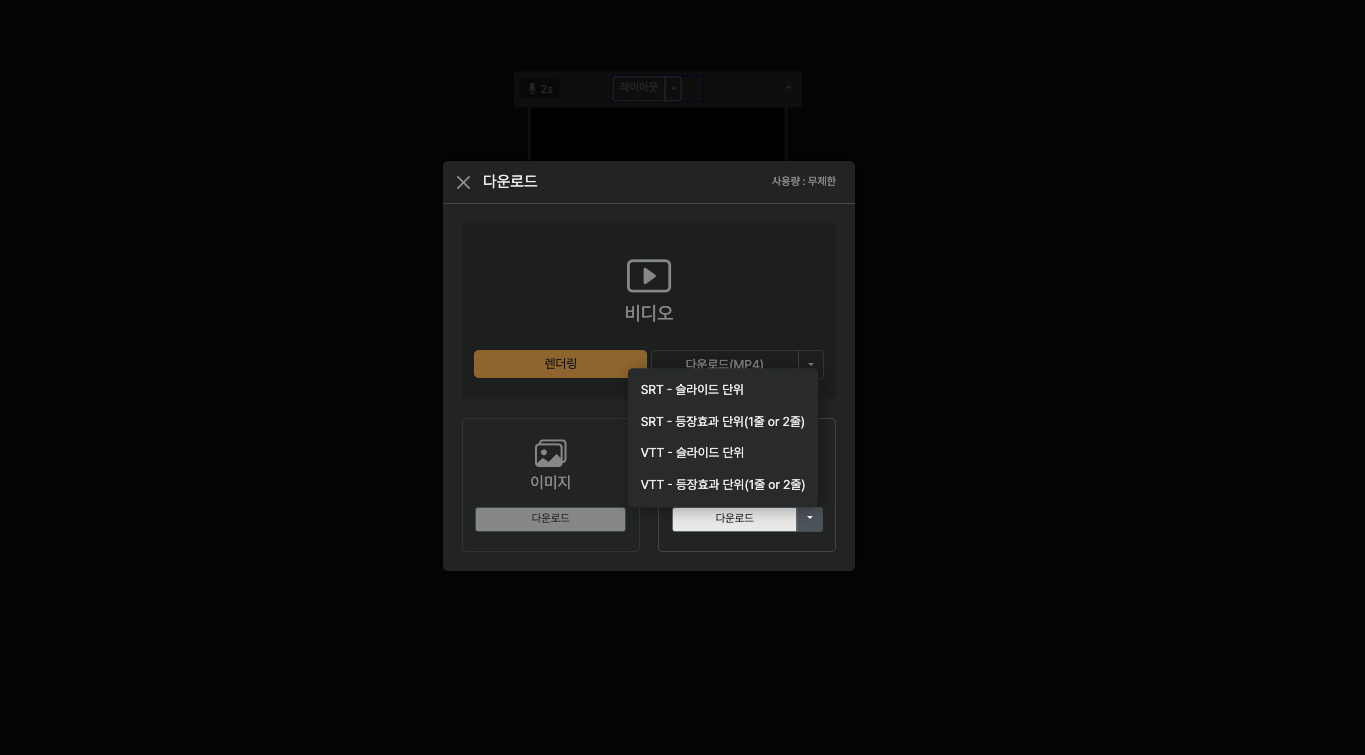
Additionally, by clicking the settings (▼) button, you can download subtitles in SRT and webVTT file formats.
| Section | Detailed Description |
|---|---|
| Slide Unit | Add subtitle files based on all text within a slide in the project |
| Application Unit | Add subtitle files including timeline information when line breaks are applied within slide text |
More
Share
Editing screen > More in header > Share
You can share the rendered project on the web. You can copy the address and paste it into messengers such as KakaoTalk, and you can check the rendered video by [Open in new tab].
If you've inserted a link in the project description field, you can click on the link address to utilize it as a Call To Action (CTA) button.
The sharing feature is valid for one month after video rendering, and the saved video will be deleted after one month. Therefore, please be sure to download the rendered video file within the period from Videostew.
Start with this template
Editing screen > More in header > Start with this template
Delete the selected project as a template, then create a new project with fresh content. By reusing the layout of the intro and outro, etc., according to the project settings, you can build a new-content project.
To create a template that keeps the same tone and manner and reuse it easily, please refer to the [Create My Own Template] guide.
Restore
Editing screen > More in header > Restore
You can revert the project to a previous point. Refer to 'Save view' and 'Slide number' in the list and use 'Restore' to call up the project from a past point.
Copy
Editing screen > More in header > Duplicate
The current project you are working on is copied exactly as it is in the current workspace.
Send to Trash (Delete)
Editing screen > More in header > Send to trash
Deletes the current project. Projects moved to the trash can are not completely deleted until you empty the trash can.
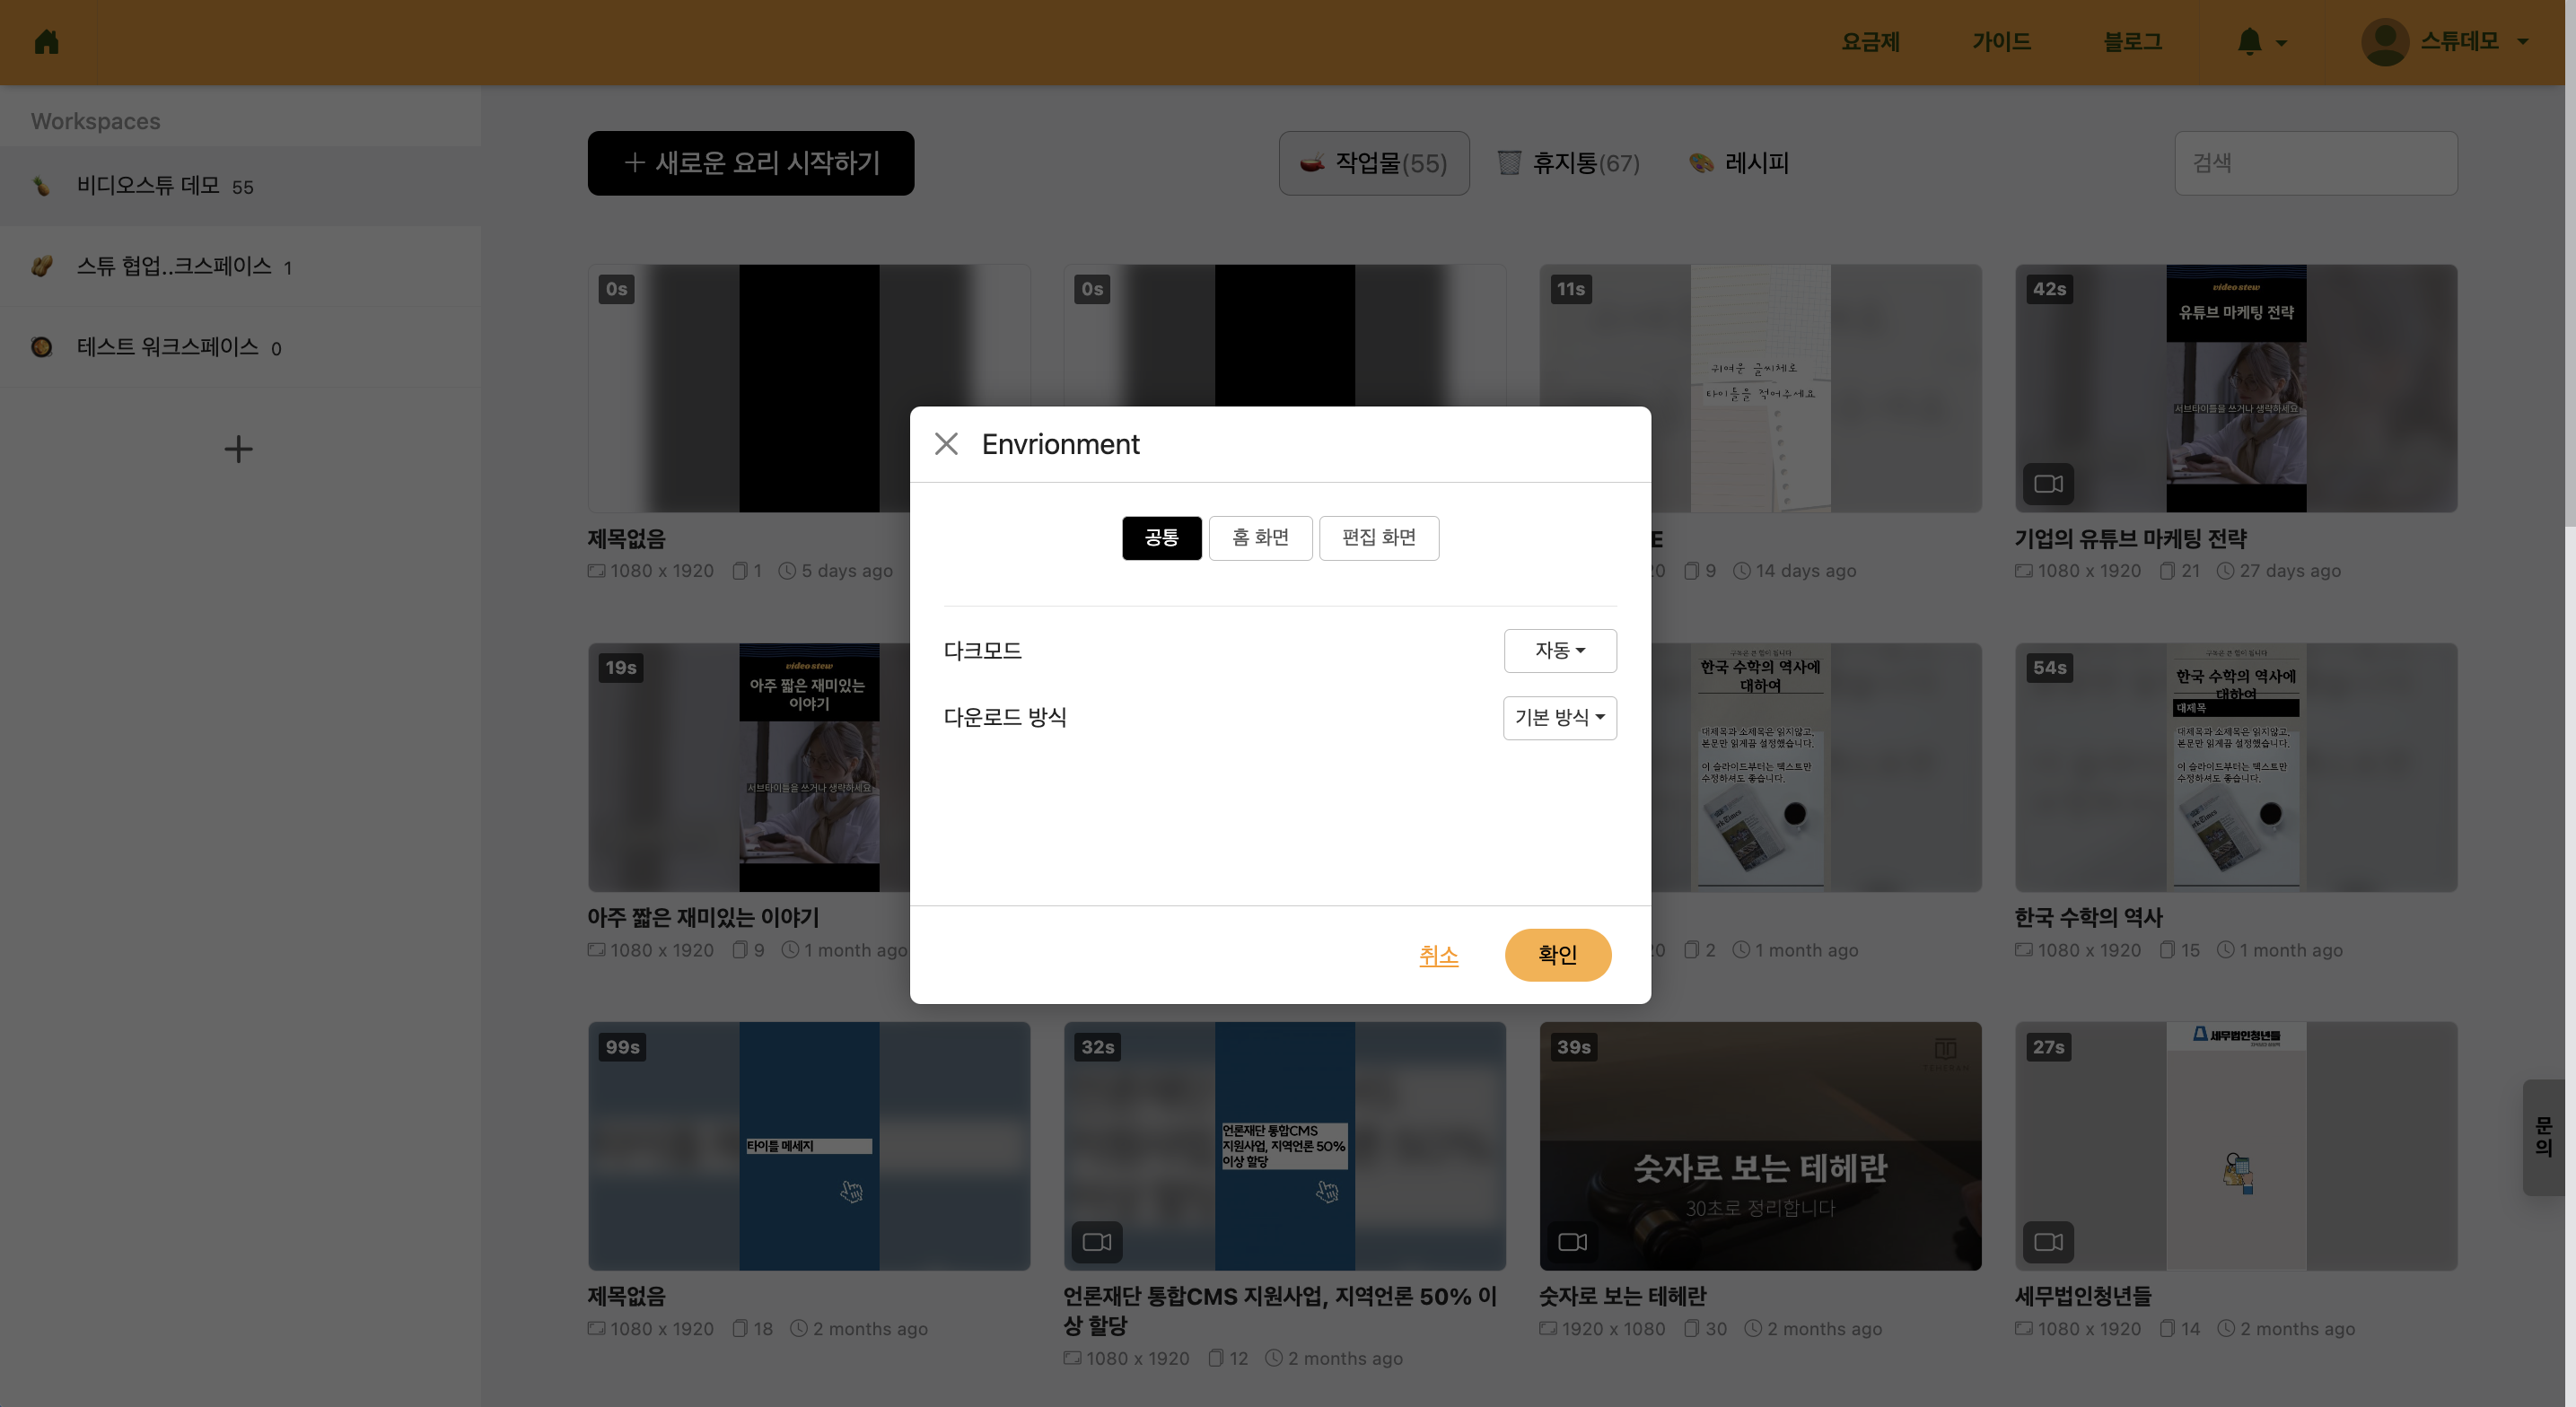
Environment Settings
Editing screen > More in header > Environment settings
You can change settings for dark mode and the style of thumbnails, as well as the wizard mode.
General
Editing screen > More in header > Environment settings > Common tab
< Environment Setting Common Menu >
Dark Mode
Editing screen > More in header > Environment settings > Common tab
You can change the dark mode settings. 'Auto' changes the screen to dark at night and to light during the day automatically. You can always set it to 'Light' or 'Dark' as well.
Download Method
Editing screen > More in header > Environment settings > Common tab
Change the method when downloading the rendered video. If the default method does not work, you can switch to the legacy method.
Home Screen
Editing screen > More in header > Environment settings > Common tab
You can change the style of thumbnails that appear on the home screen. You can choose among 'Horizontal', 'Square', and 'Vertical', and if you often make portrait videos, 'Vertical' is recommended.
Edit Screen
Editing screen > More in header > Environment settings > Common tab
You can change whether to activate Wizard Mode when creating 'New'.
Upload via YouTube

When video rendering is complete, the YouTube upload button becomes active.
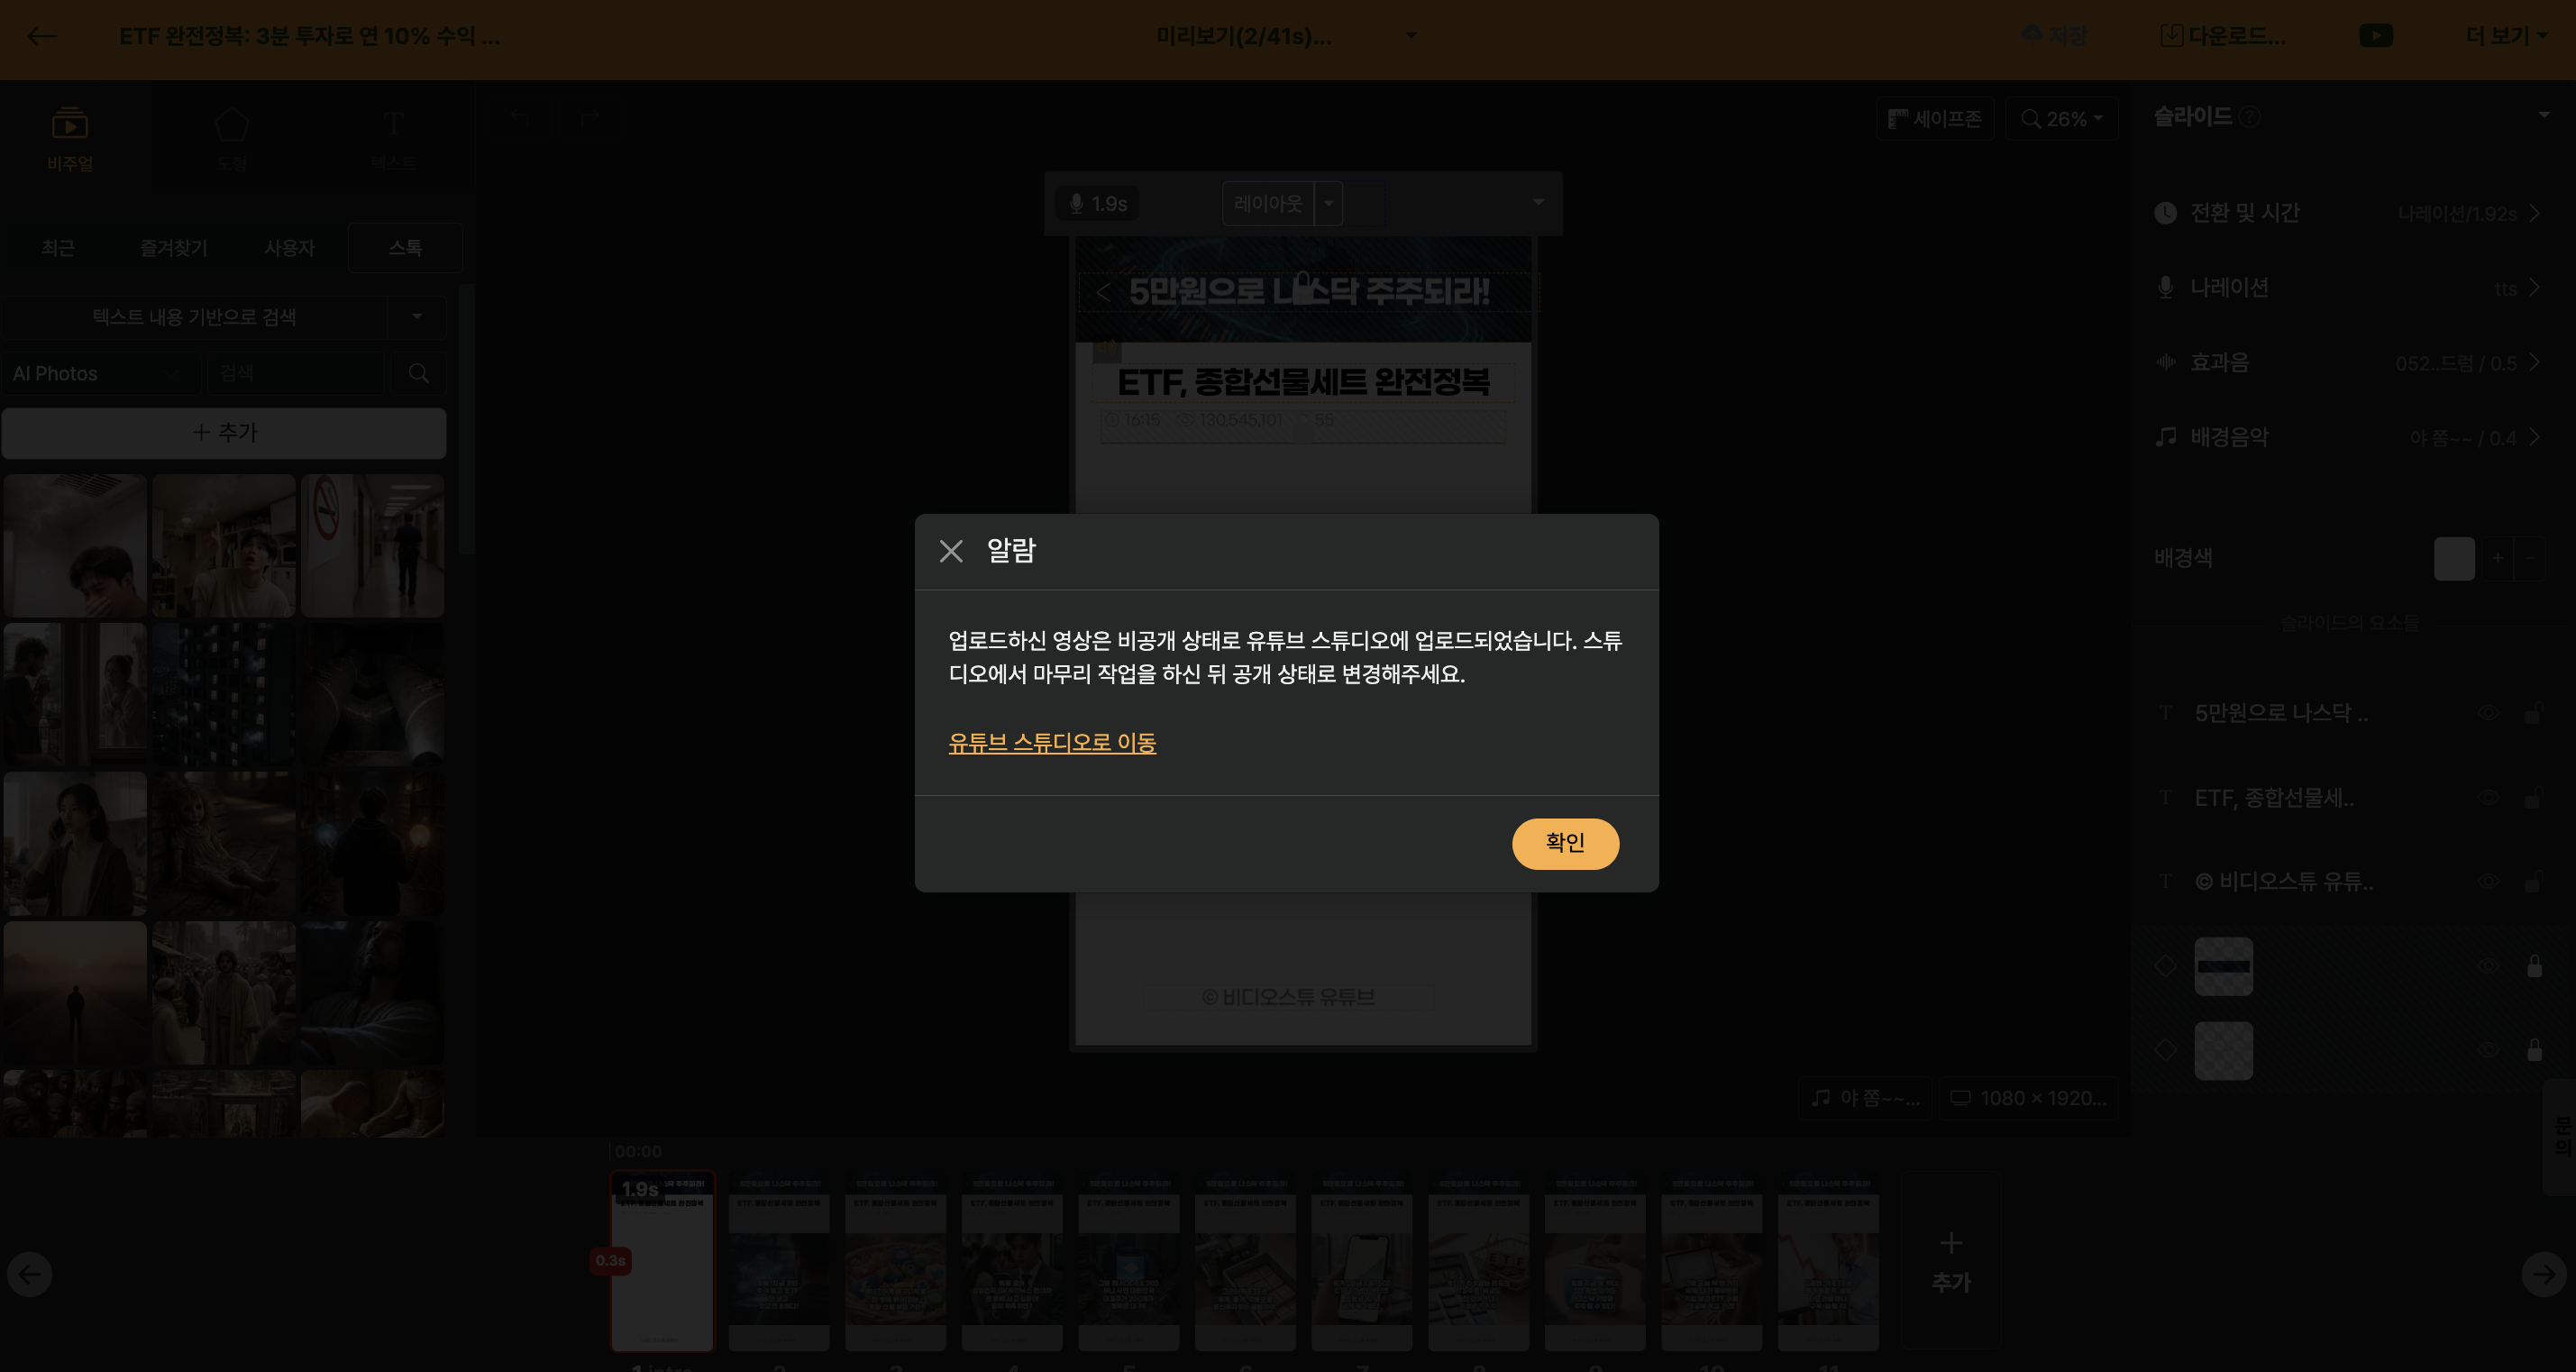
Click the button and select a YouTube channel, and the video will be uploaded as an unlisted status. If the video is uploaded successfully, a notification message appears that allows you to move to the YouTube Studio.
Library Window
Editing screen > Left sidebar library
In the Live Browser panel, you can generate AI images and AI sticker icons or search for stock videos, images, etc. provided in Videostew and load them onto the stage. It consists of media (images and videos), stickers, and fonts, and all elements are divided into tabs: "Recently", "Favorites", "My", and "Stock".
Recent
Editing screen > Left sidebar library > Recent tab
Here is a list of elements you've used recently.
Favorites
Editing screen > Left sidebar library > Search tab
Frequently used elements can be saved to Favorites, and added to the Favorites list. After hovering the mouse over an element, click the settings (▼) button to add it to Favorites.
User
Editing screen > Left sidebar library > My uploads tab
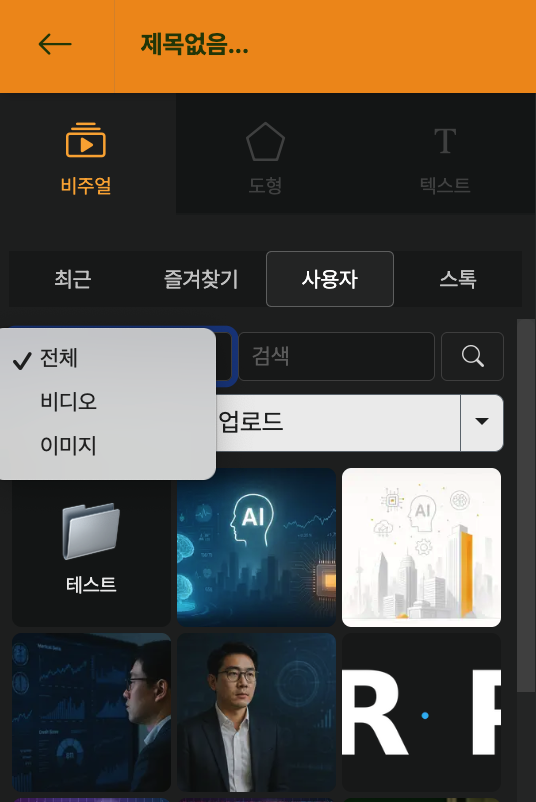
This is the live library of elements uploaded directly by the user. You can add images or video files by dragging them onto the screen from the explorer or by clicking the Upload button. (If you drag and drop files into the live Library Window, they are not entered on the stage but only added to the list.)
Users can also find recently uploaded resources more easily through category filtering. If the uploaded list does not appear after upload, please check whether this category setting has been applied by default.
| Category | Description |
|---|---|
| All | Shows all resources uploaded by users |
| Video | Shows only video files among uploaded files |
| Image | Shows only image files among uploaded files |
Organize by Library Folder
Edit Screen > Library Window on the left > User Tab
The library folder is a place to organize "assets" such as logo·intro/outro·B-roll·background music.
In the User tab of the library, you can group all the resources you uploaded by folder.
- In the edit screen, open the [Library] window on the left and select the User tab.
- After adding a new folder at the top of the User tab, name it according to your purpose.
- Example:
Brand / 로고·CI,B-roll / 오피스,인트로·아웃트로,세로 쇼폼 전용 리소스etc.
- For individual resources,
- You can drag and drop cards (thumbnails) to move them between folders
- After selecting multiple items with long click/multiple selection, you can move them all at once to another folder.
- Through the settings (▼) menu above the folder, you can perform basic management such as renaming or deleting.
Because folders can be managed by workspace,
- You can upload frequently used logos or images just once
- And use them directly from the library without re-uploading for each project
You can use it like “My Brand Asset Storage”.
Delete uploaded resources all at once
If you hover the mouse over a resource, a settings button appears. Here, you can click "Select Multiple" and define the range by pressing the `SHIFT` key to select multiple items at once.Please proceed with the deletion through the trash can icon at the top right. However, if the resources have already been used in another project, please be careful when you wish to edit that project again as the elements may not load properly.
Visual
Editing Screen > Left Library Panel > Visual Tab > Stock
In the Visual tab's stock, you can search and generate photos, videos, AI images, and AI videos, then insert them directly into slides. Select a category and switch the search engine to get different results.
| Category | Description |
|---|---|
| Pexels | High-quality free stock photos and videos contributed by creators around the world. Commercial use available. |
| Pixabay | A variety of free resources such as images, videos, illustrations, and vectors. Commercial use available. |
| AI Images | Based on the text entered in the slide, AI automatically generates background images. Styles available include photorealistic, digital art, vector, cartoon, newspaper illustration, and silhouette. |
| AI Video | Based on the content entered in the slide, AI automatically generates a short video that fits. It turns screen content into video as-is without filming or prompts, and 500 credits are consumed per generation. |
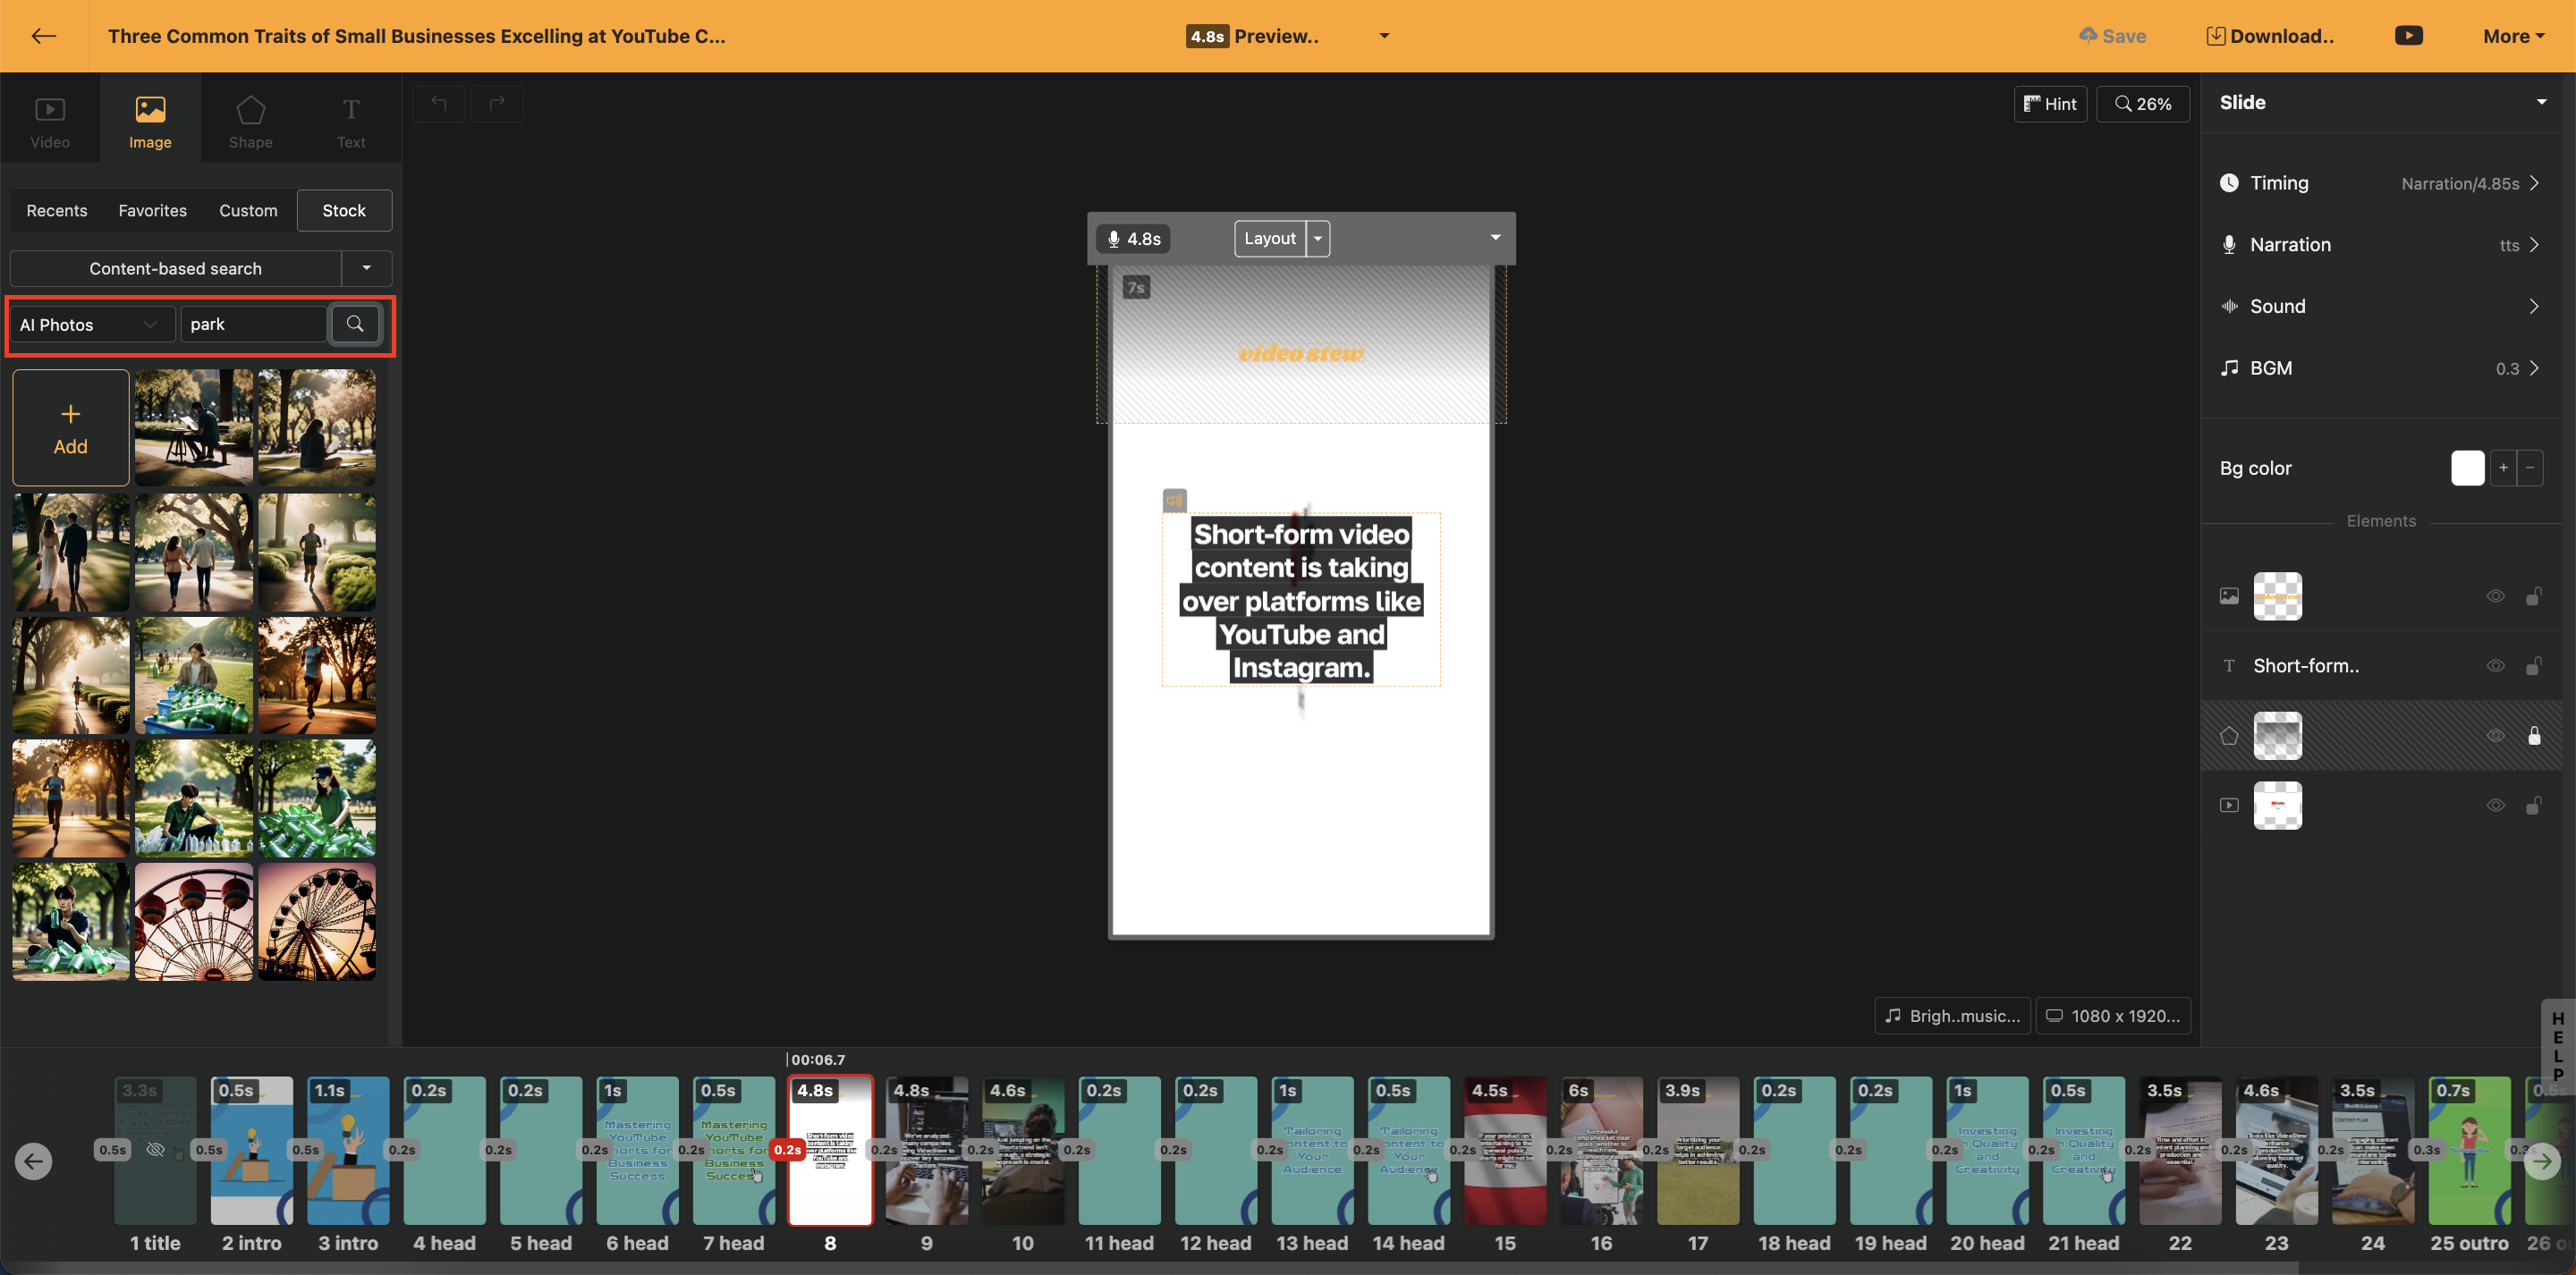
Search based on text content
If the auto-added b-roll elements (images and videos) do not suit your taste, you can search for recommended stock images based on the content you entered.
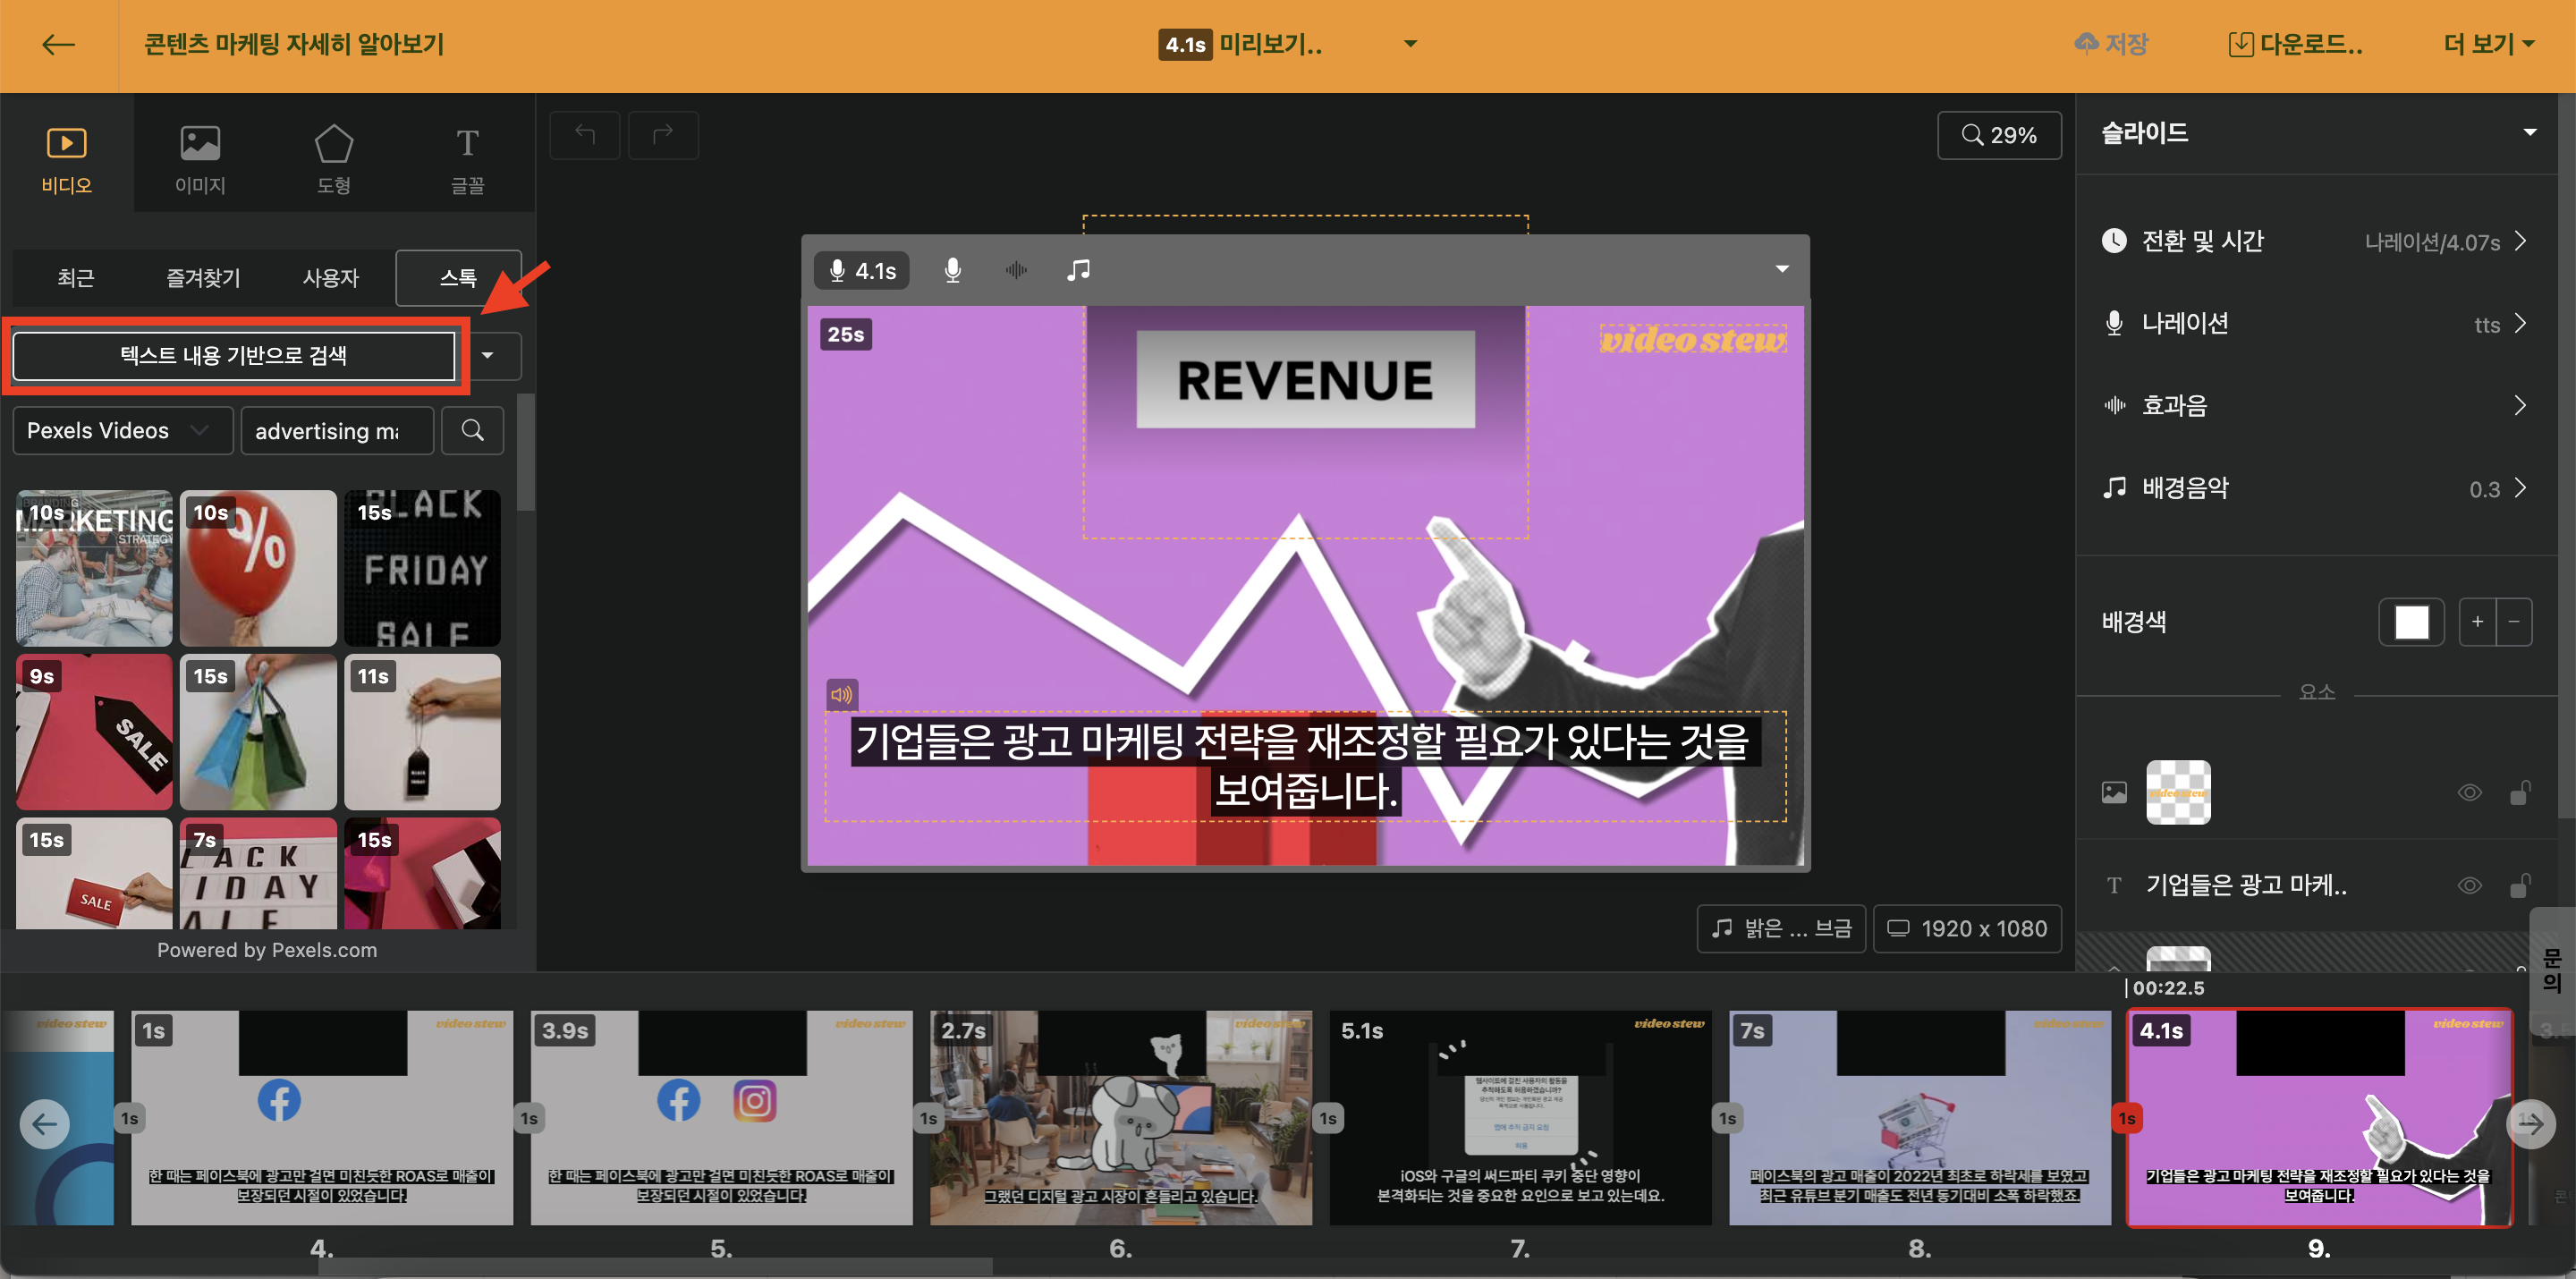
< Find videos and images by matching text >
You can also click the settings (▼) button to perform a "Search based on b-roll". This function searches for stock resources that are relevant and similar to the images currently included in the slide.
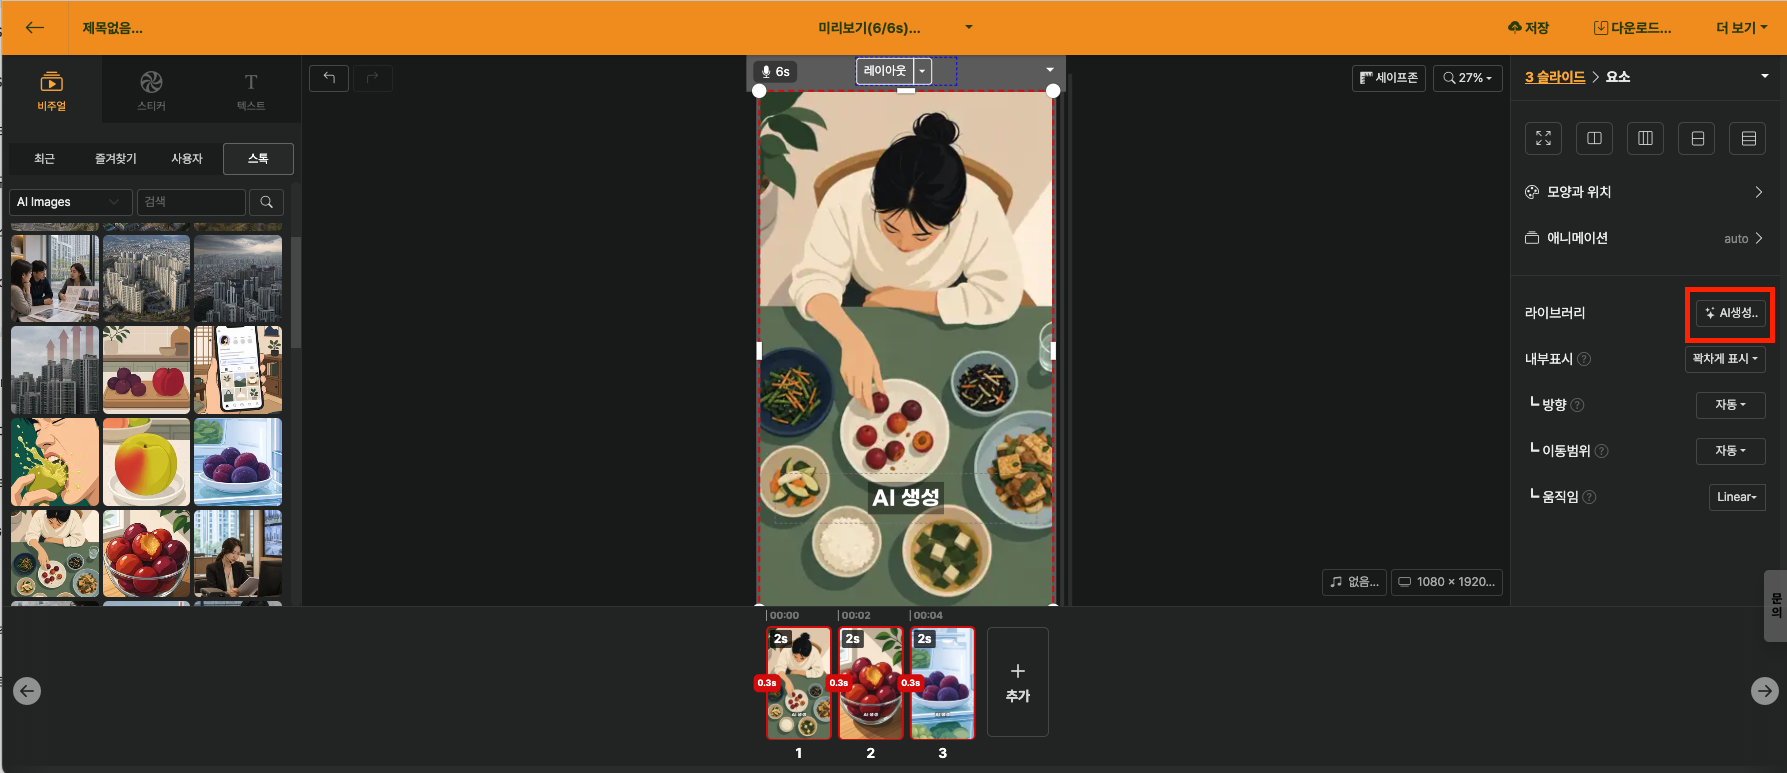
Create AI Image
The media library includes a feature that allows you to add AI images. It automatically generates background images based on the content entered for each slide.
You can generate AI images in various styles such as realistic, digital art, vector, flat, contemporary illustration, watercolor style, and more.
Selecting AI Image Categories
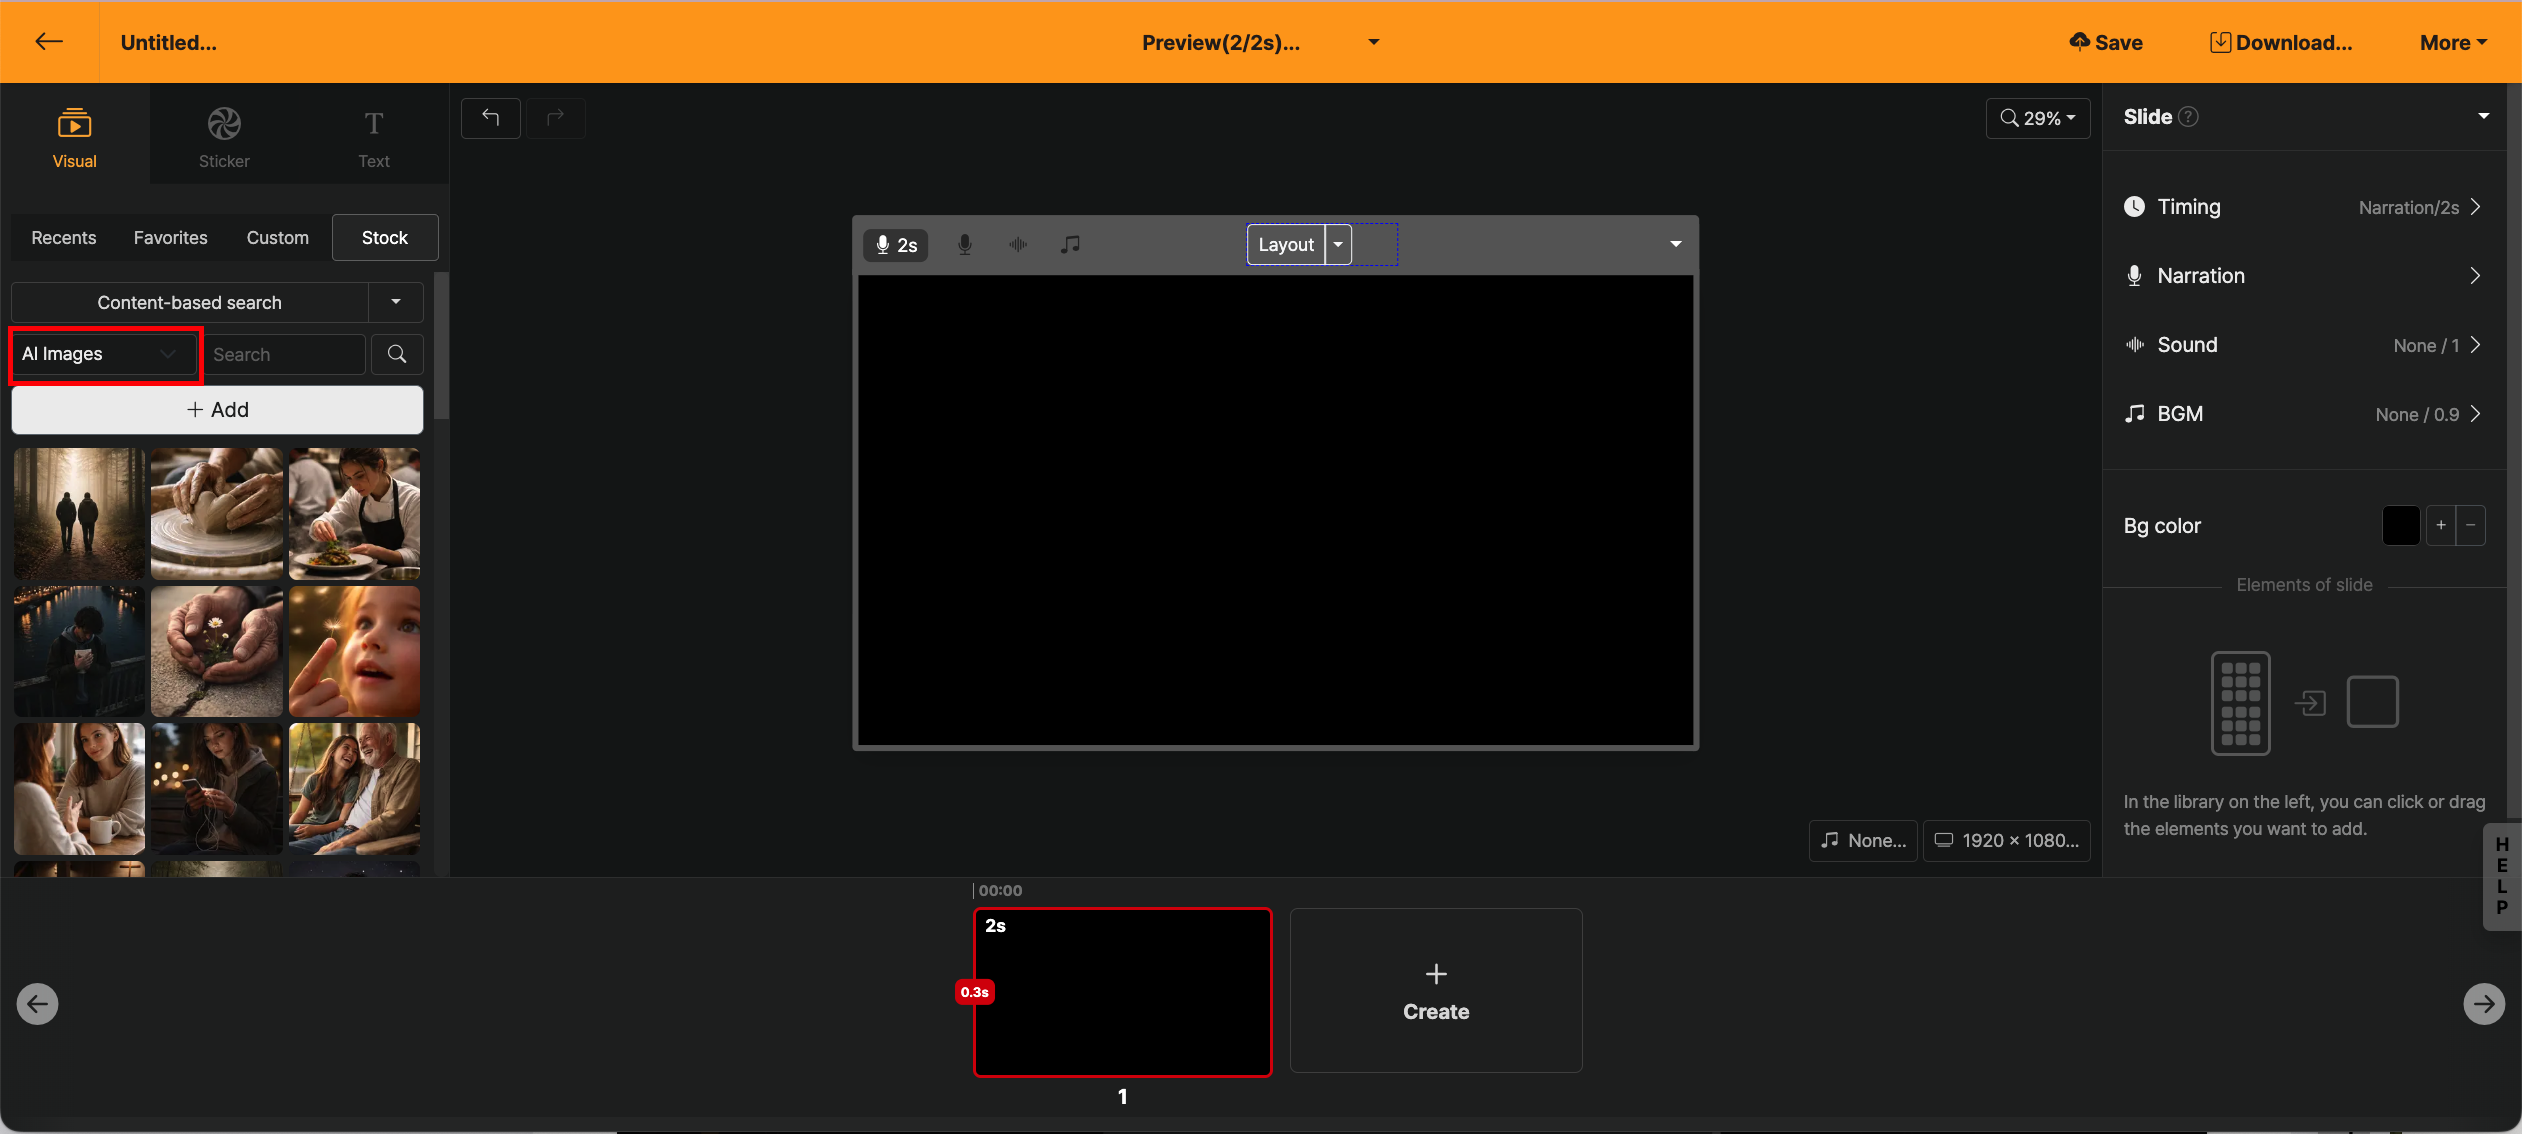
< Selecting AI images from the category panel on the left >
By default, categories pull stock libraries from Pexels or Pixabay. Click the category search button to select AI images.
Add AI Image
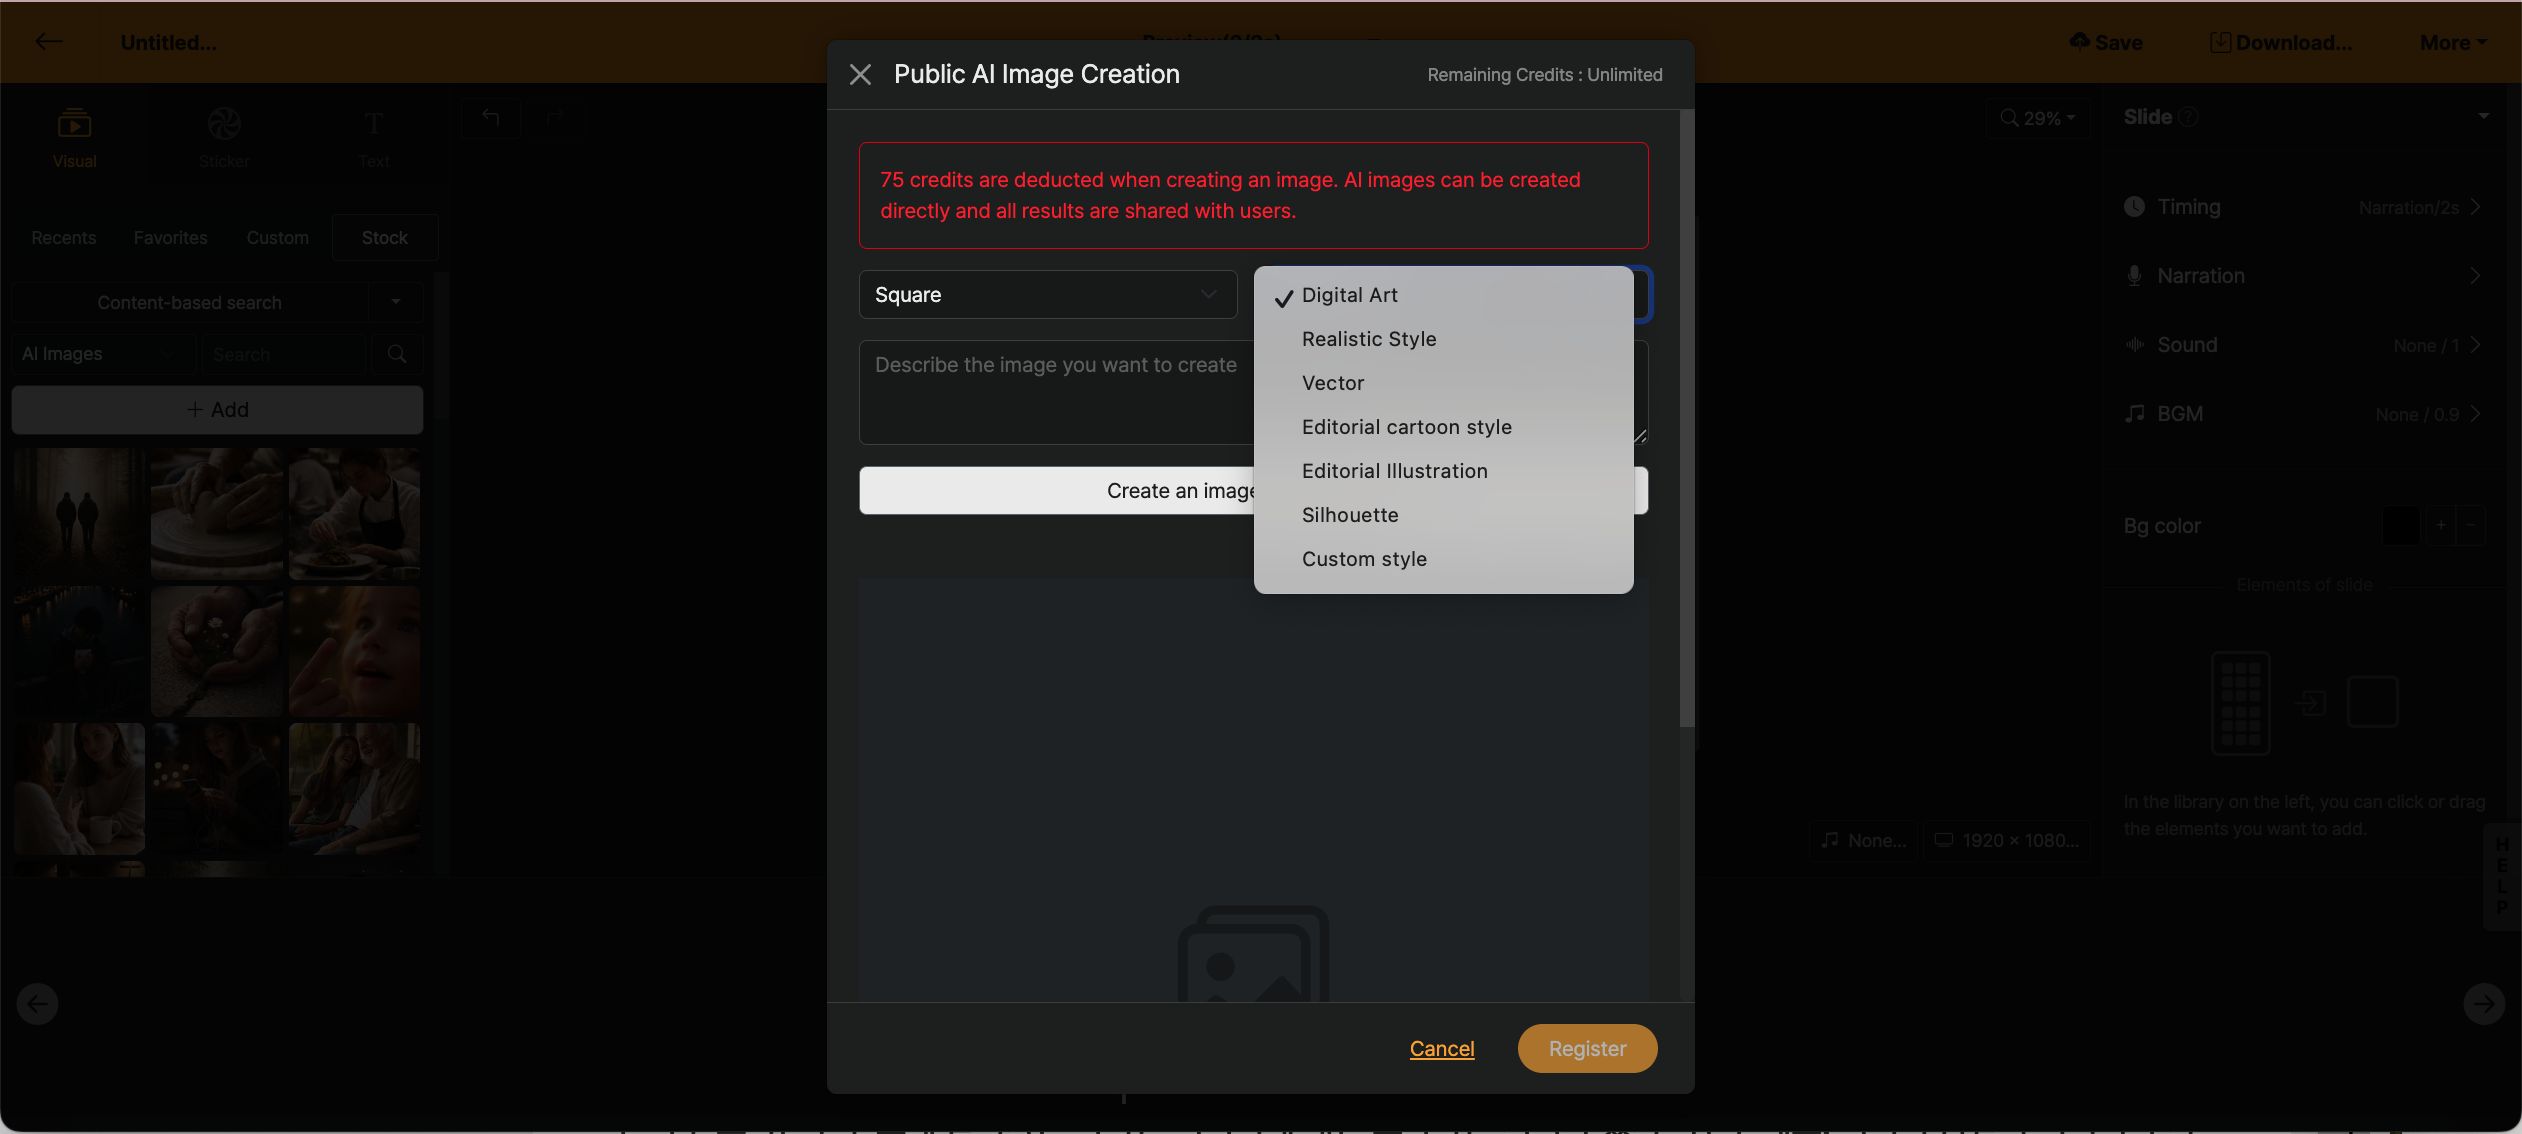
< Add public AI image window >
When you press the + Add button, a modal window appears to add AI images. By default, if there is a text block entered within the slide, the text will be fetched.
The size of the image to be added can be selected from square, horizontal, and vertical, with the default value being square. (It is recommended to add in square format.)
Videostew’s AI image-addition feature is provided so that anyone can use prompts easily. Normally, images that many people create for their content are quite different from the images they want; to add the highest-quality images, you have to refine the prompt yourself, and that makes high-quality AI image generation possible.
Search AI Image
< Search AI Image Library >
All AI images added by Videostew users are converted into a searchable format and stored in the public library. When you enter a search term, the newly added AI images appear in the list, and you can drag and drop them into the slide from the [library].
Copyright for AI images added in Videostew can be checked in detail in the AI Image Copyright guide document.
Create Similar Style
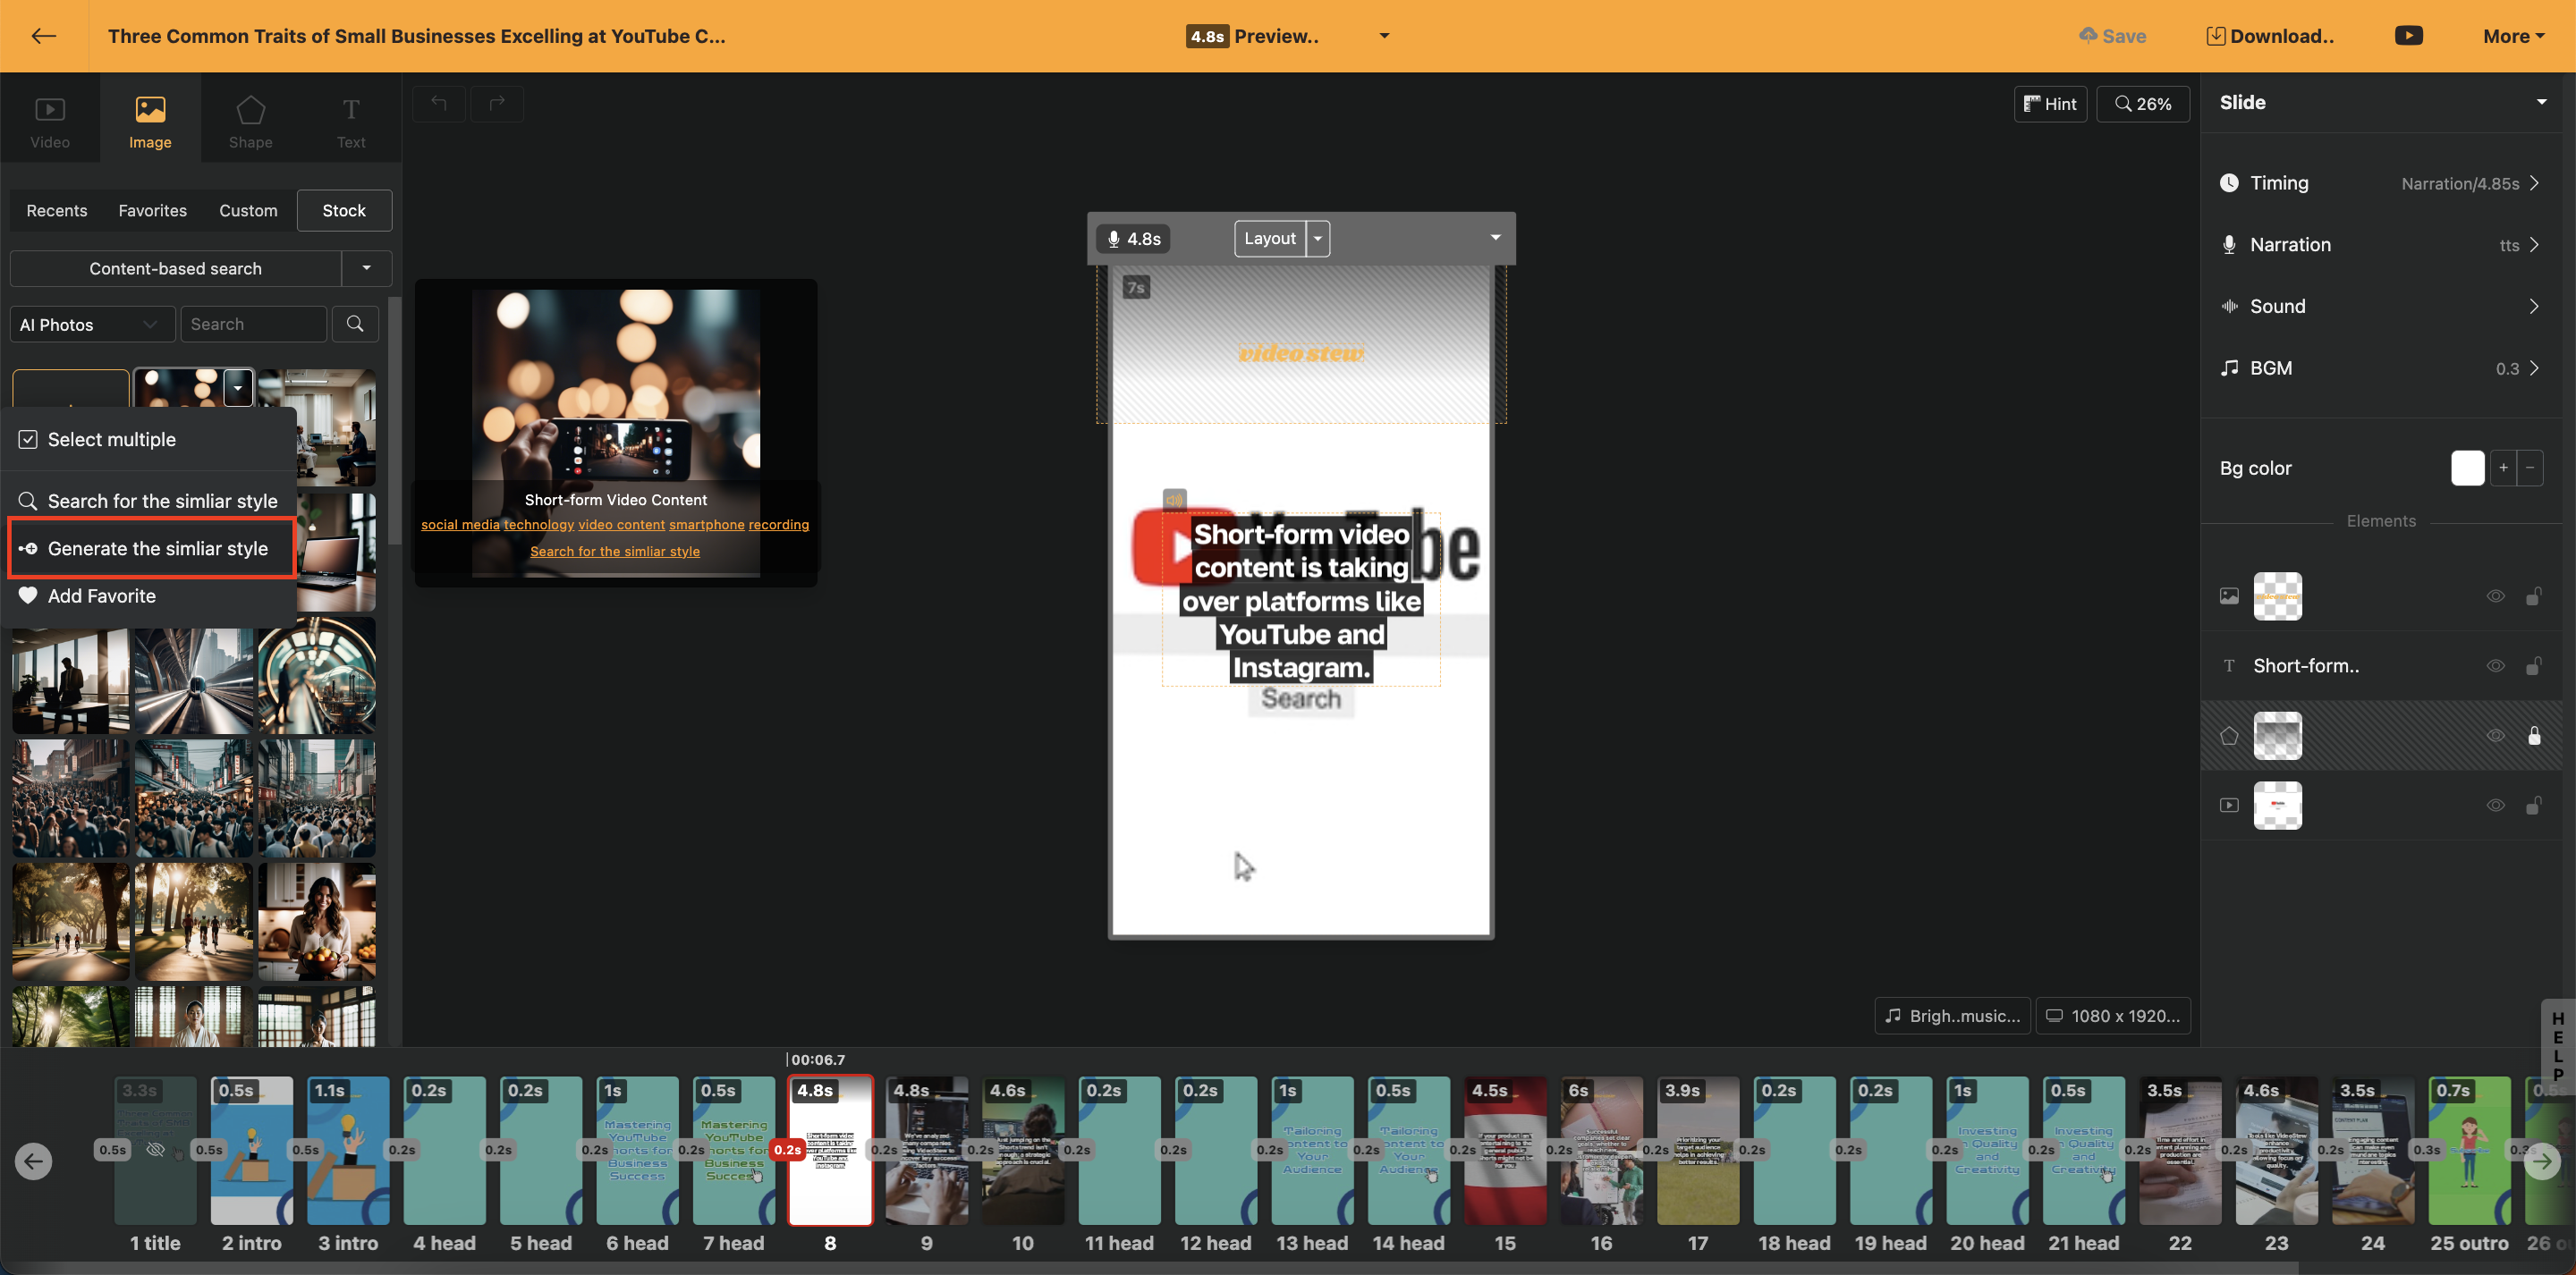
< Add as Similar Style >
If there is an image you like in the public AI image library, you can click the "Mouse Right Click > Create Similar Style" button to add a similar image. You can also briefly describe the idea you want to add in the text input window, allowing you to add an image that more closely matches the situation you are thinking of.
AI 비디오 생성하기
Videostew provides an AI video generation feature that automatically creates short videos suitable for scenes based on the content entered in slides, just like AI images. Without separate video filming or prompt writing, it naturally visualizes the content on screen as-is.
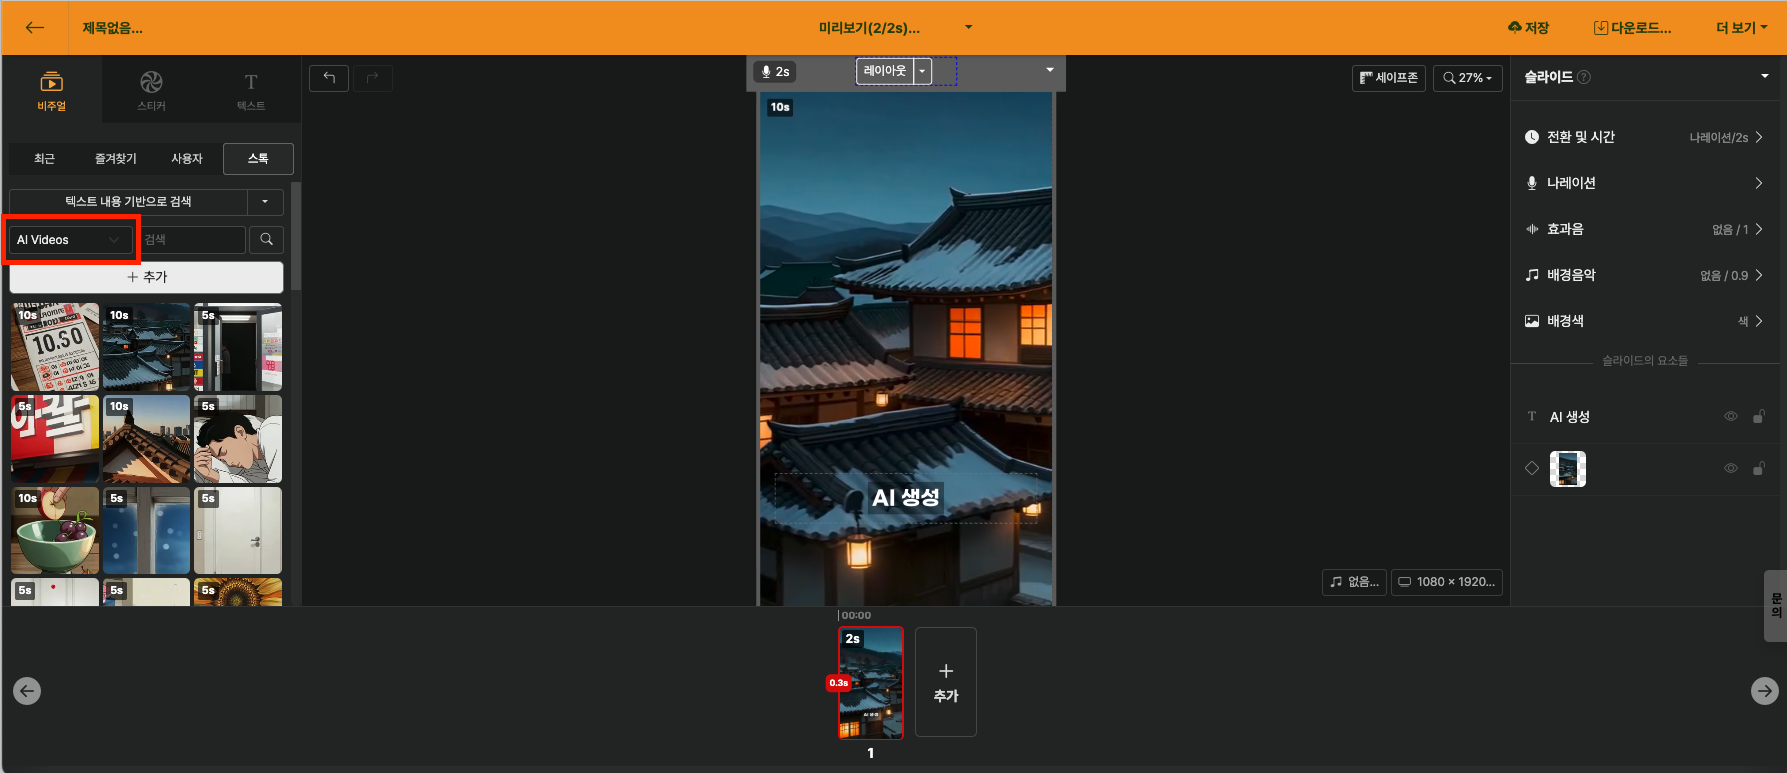
Selecting AI Video Category
Select AI Video from the Visual tab in the library, just like AI images. If there is subtitle text entered in the slide, it is automatically brought in and used as the basis for video generation.
Adding AI Video
Clicking the + Add button automatically generates a video that suits the slide content using AI. Even if you don't know prompts, Videostew naturally compensates for prompts on its own to create natural videos, so anyone can use it easily. However, video generation takes longer than image generation, and 500 credits are consumed per generation.
You can continue other editing work while generation is in progress, and when the video is complete, you will be notified with a real-time notification.
Videos generated by Videostew are added to a public library where anyone can search and reuse them, under the same policy as AI images. For more details, please refer to the AI Image Copyright guide document.
Processing Multiple Scenes at Once with AI Generation
AI images or AI videos originally require adding one scene at a time in the Library Window, then waiting until the result is complete before generating the next scene. When there are many scenes, this process can be tedious.
To address this, you can select multiple slides and generate or regenerate AI images·videos at once. If you request generation and continue with other editing work, the completed results will be automatically replaced in each slide in order. There is no need to wait in front of the screen until all scenes are finished.
Sticker
Editing Screen > Left Library Window > Sticker Tab > Stock
In the Stock section of the Sticker tab, you can search for GIF animations, transparent stickers, icons, and more to insert into the slide. The available sources vary by category.
| Category | Description |
|---|---|
| Tenor GIF | Tenor's GIF animations. Only personal use is allowed (Tenor policy). Do not use in commercial videos. |
| Tenor Sticker | Tenor GIF stickers with transparent backgrounds. Similarly, only personal use is allowed. |
| The Noun Project | A library of hundreds of thousands of vector icons, pictograms, and shape illustrations created by designers around the world. Search by keyword to insert monochrome icons or shapes into your slides. Commercial use is allowed. Videostew does not provide a separate shape-addition menu; if you need shapes, search for the shape you want in The Noun Project in the sticker tab and use it. |
| AI Icon | Videostew AI generates transparent sticker images. It can automatically recommend them based on slide text, or you can directly enter the object you want to generate. |
Create AI Icon
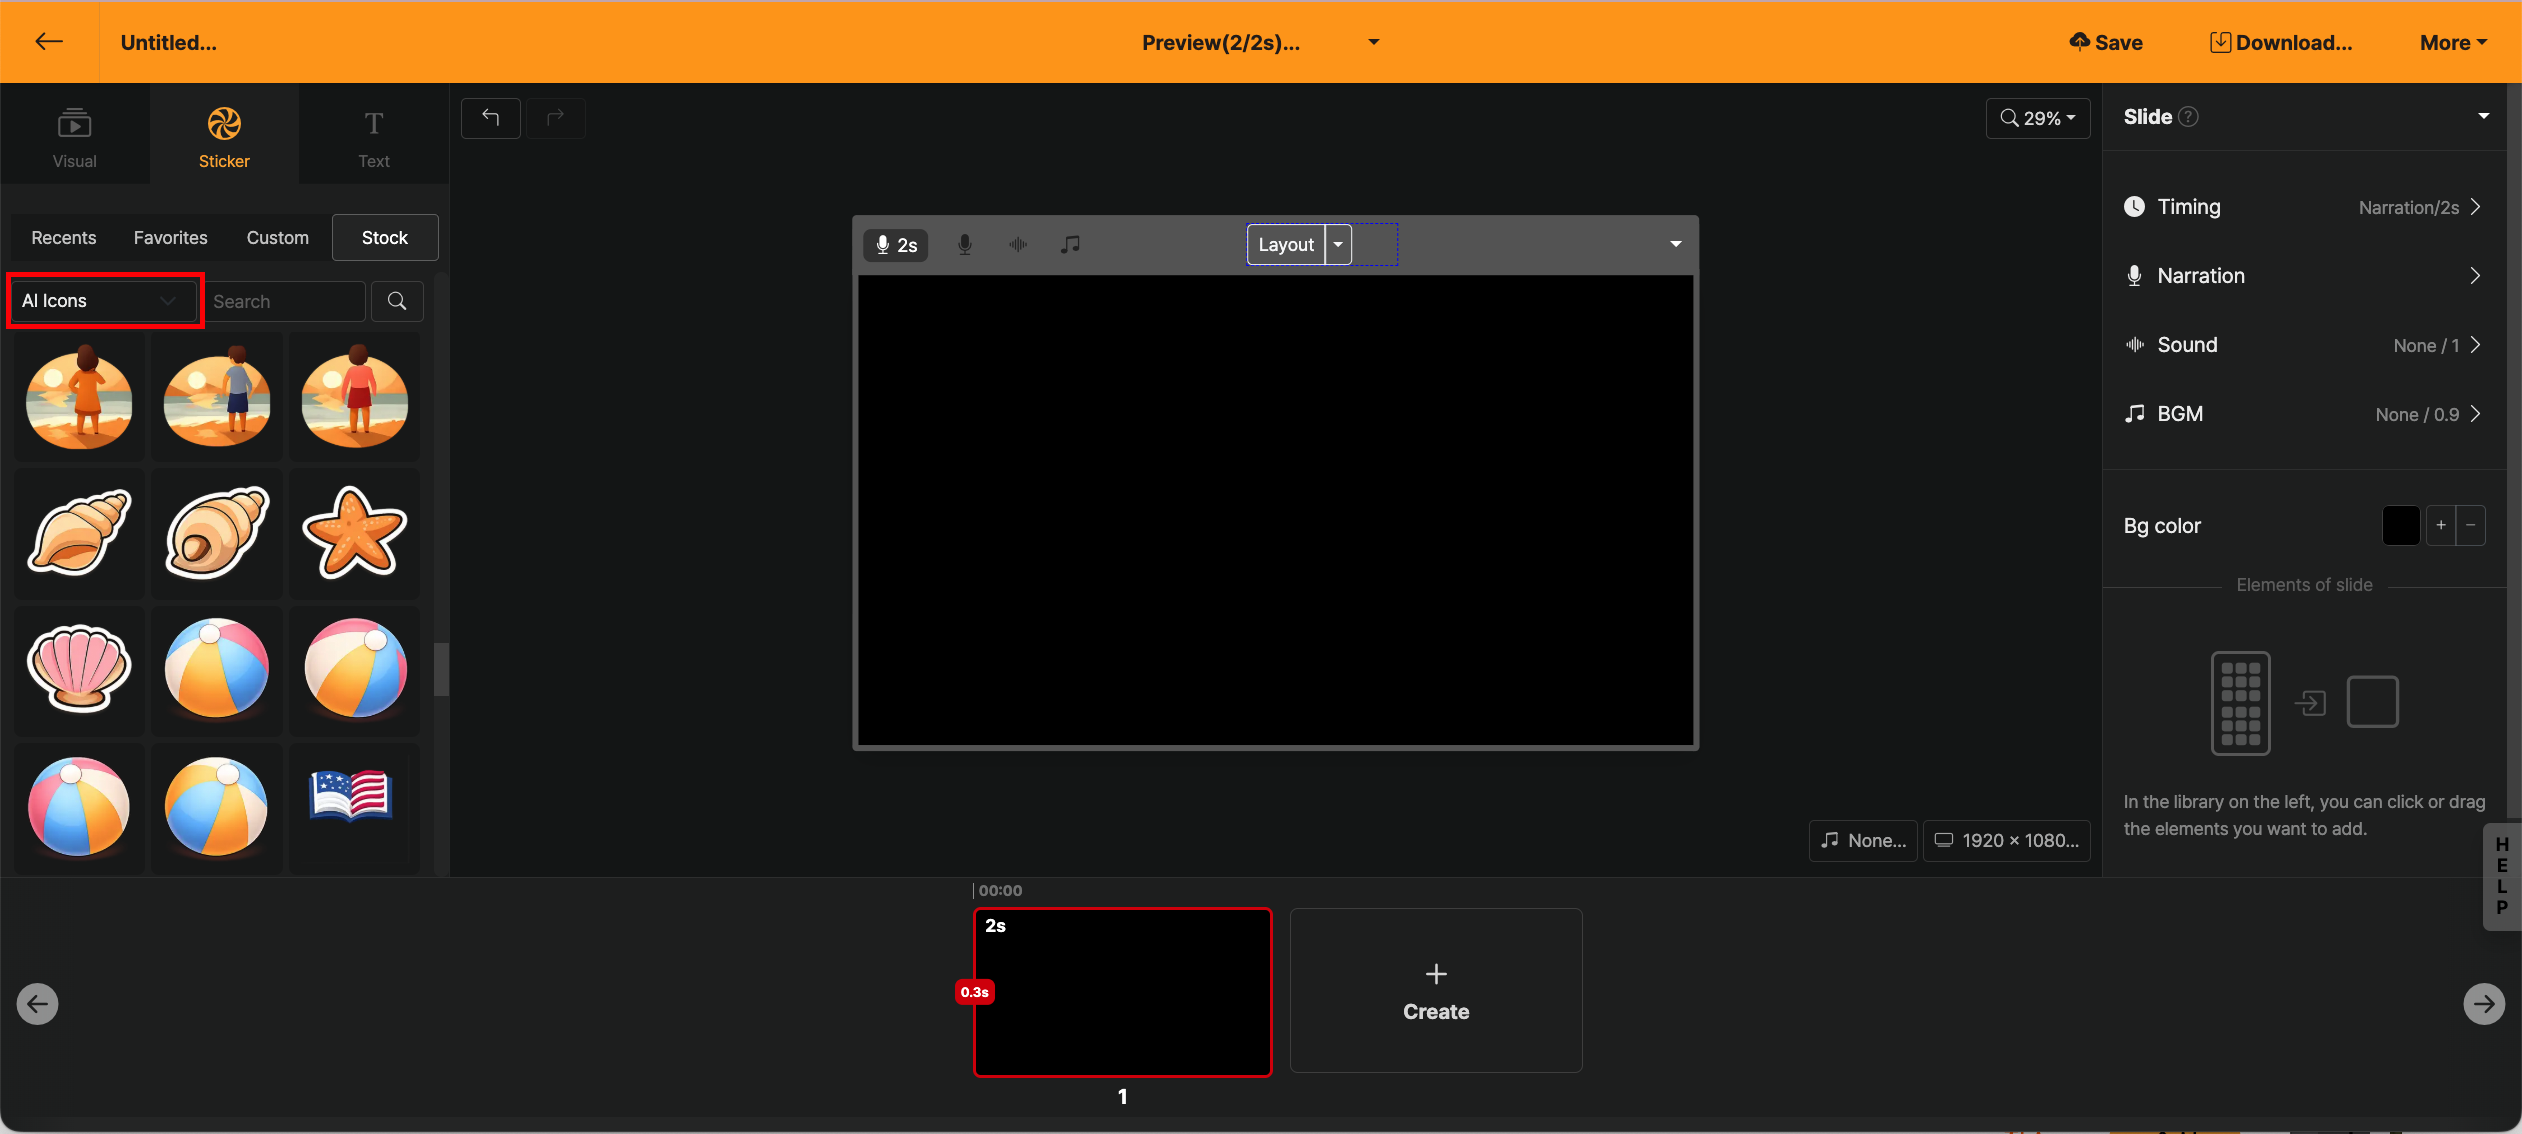
Press the + Add button to create AI icons in various styles. Based on the content already entered in the editing screen, you can create important objects, or simply enter the object you want directly to make the sticker image you want.
File Editing Tools
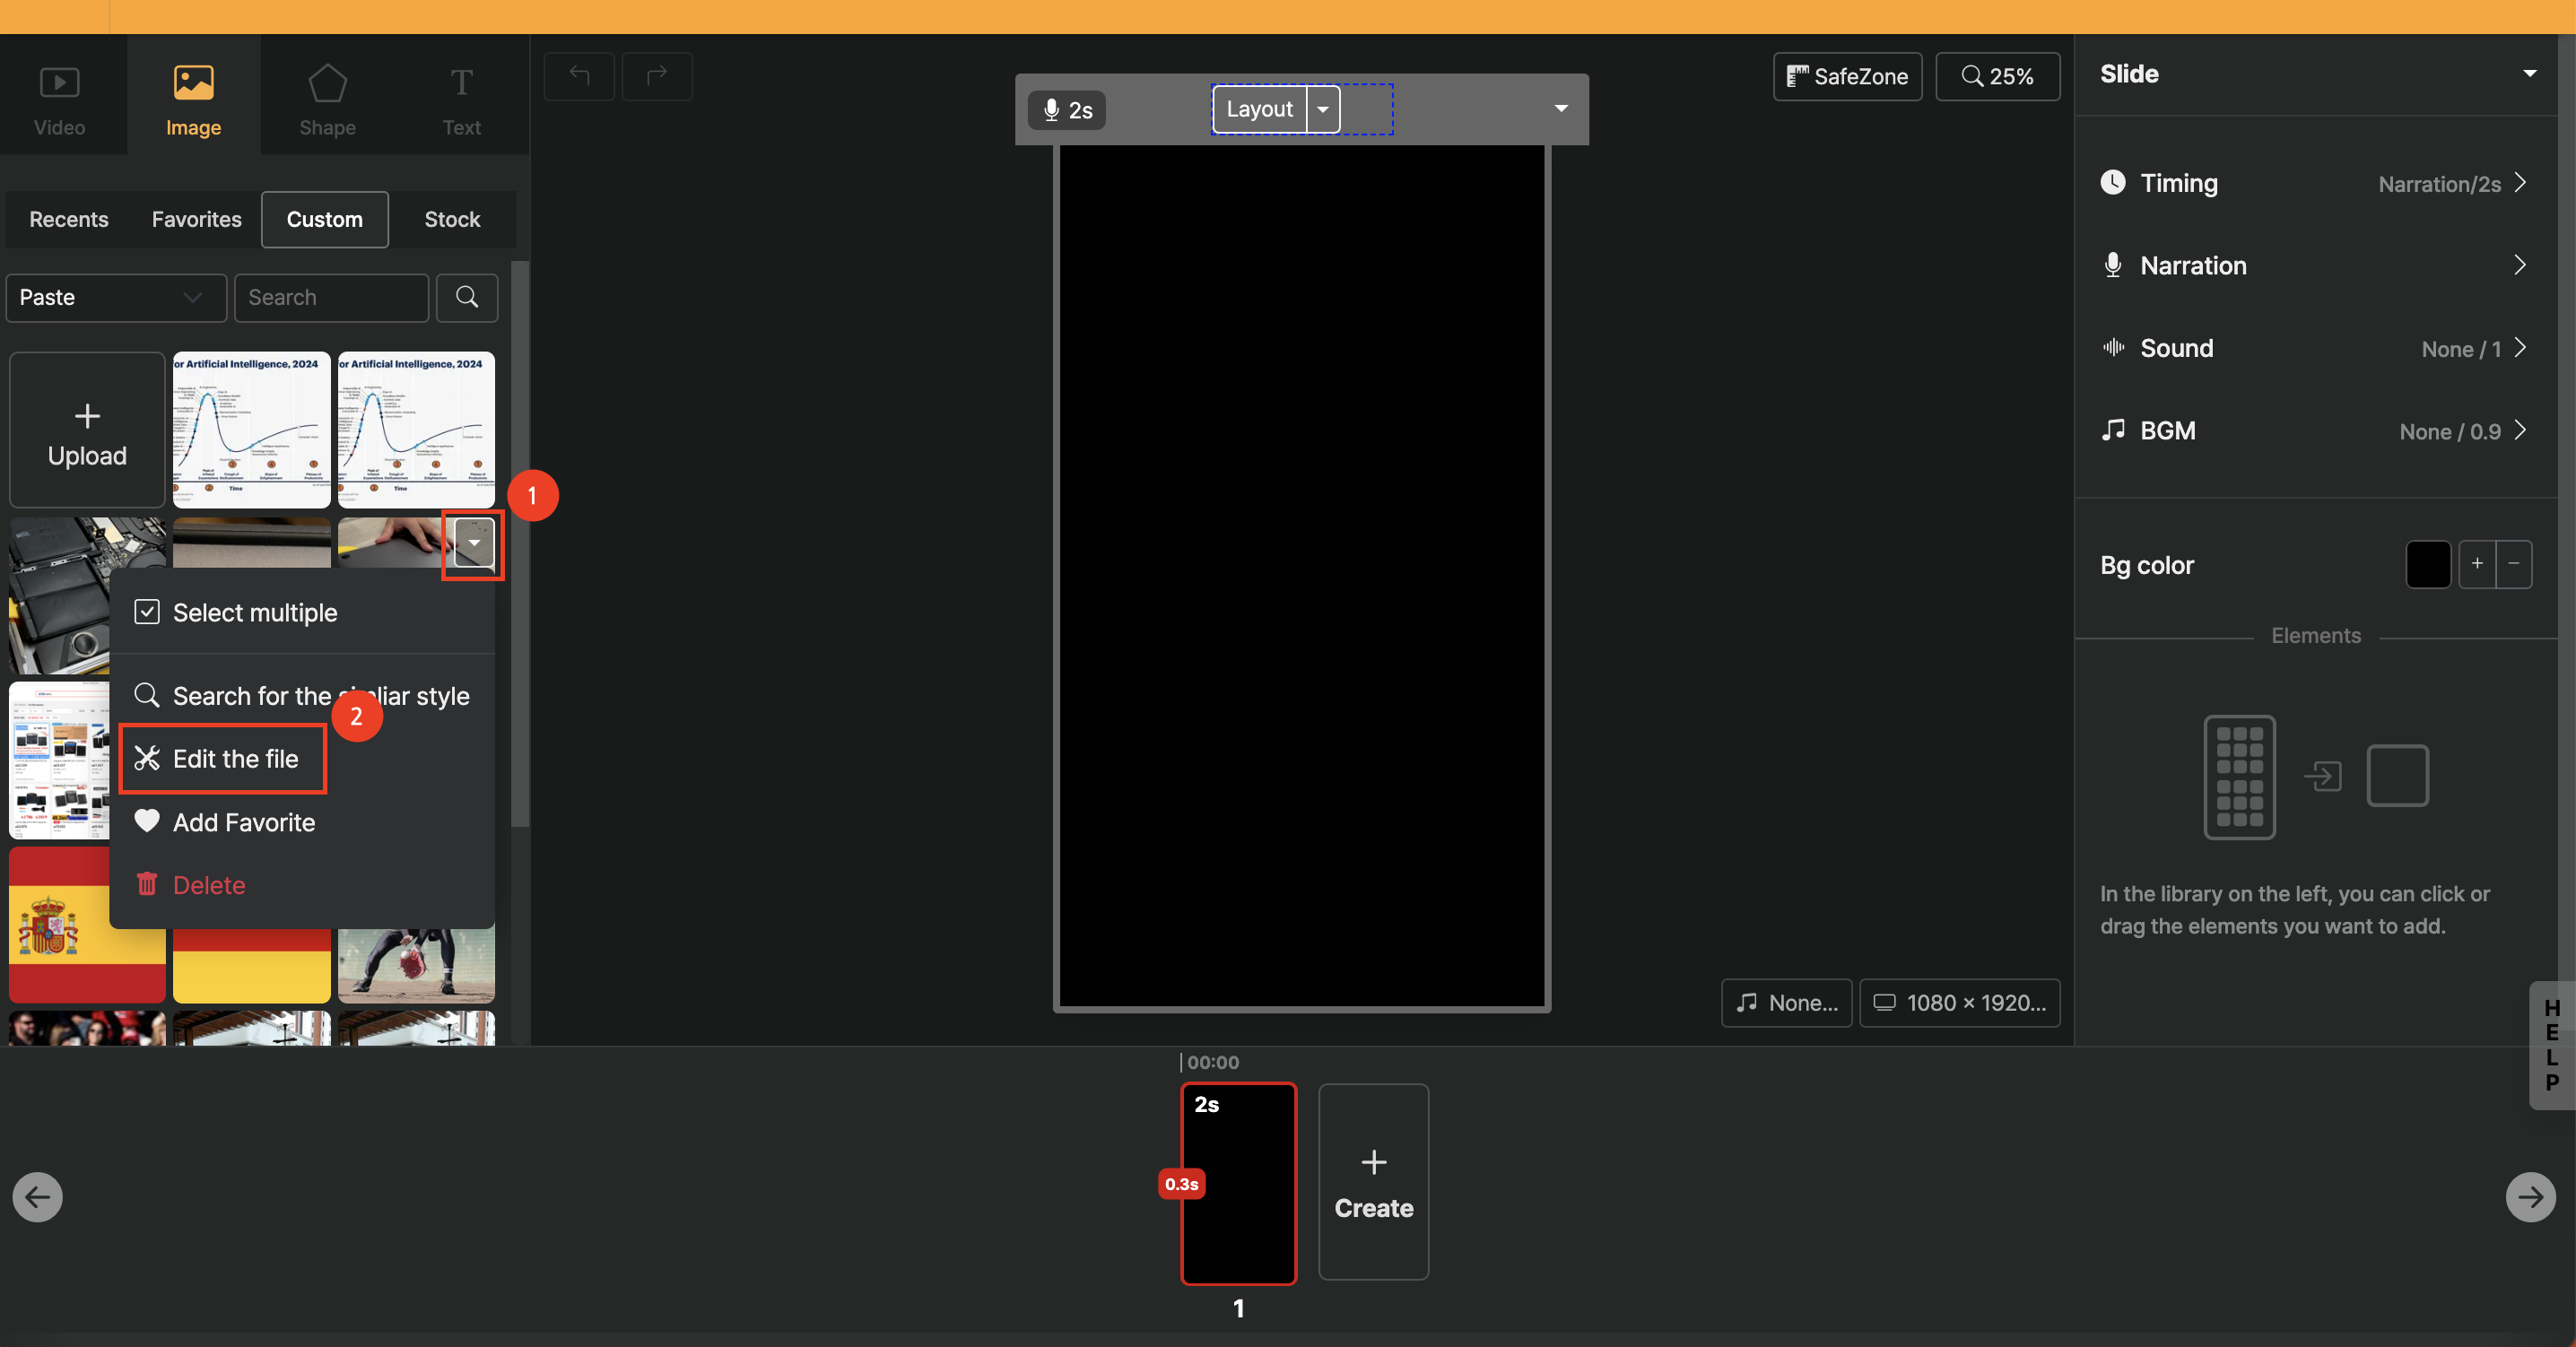
We provide various AI tools that allow you to edit the images and video files you have uploaded.
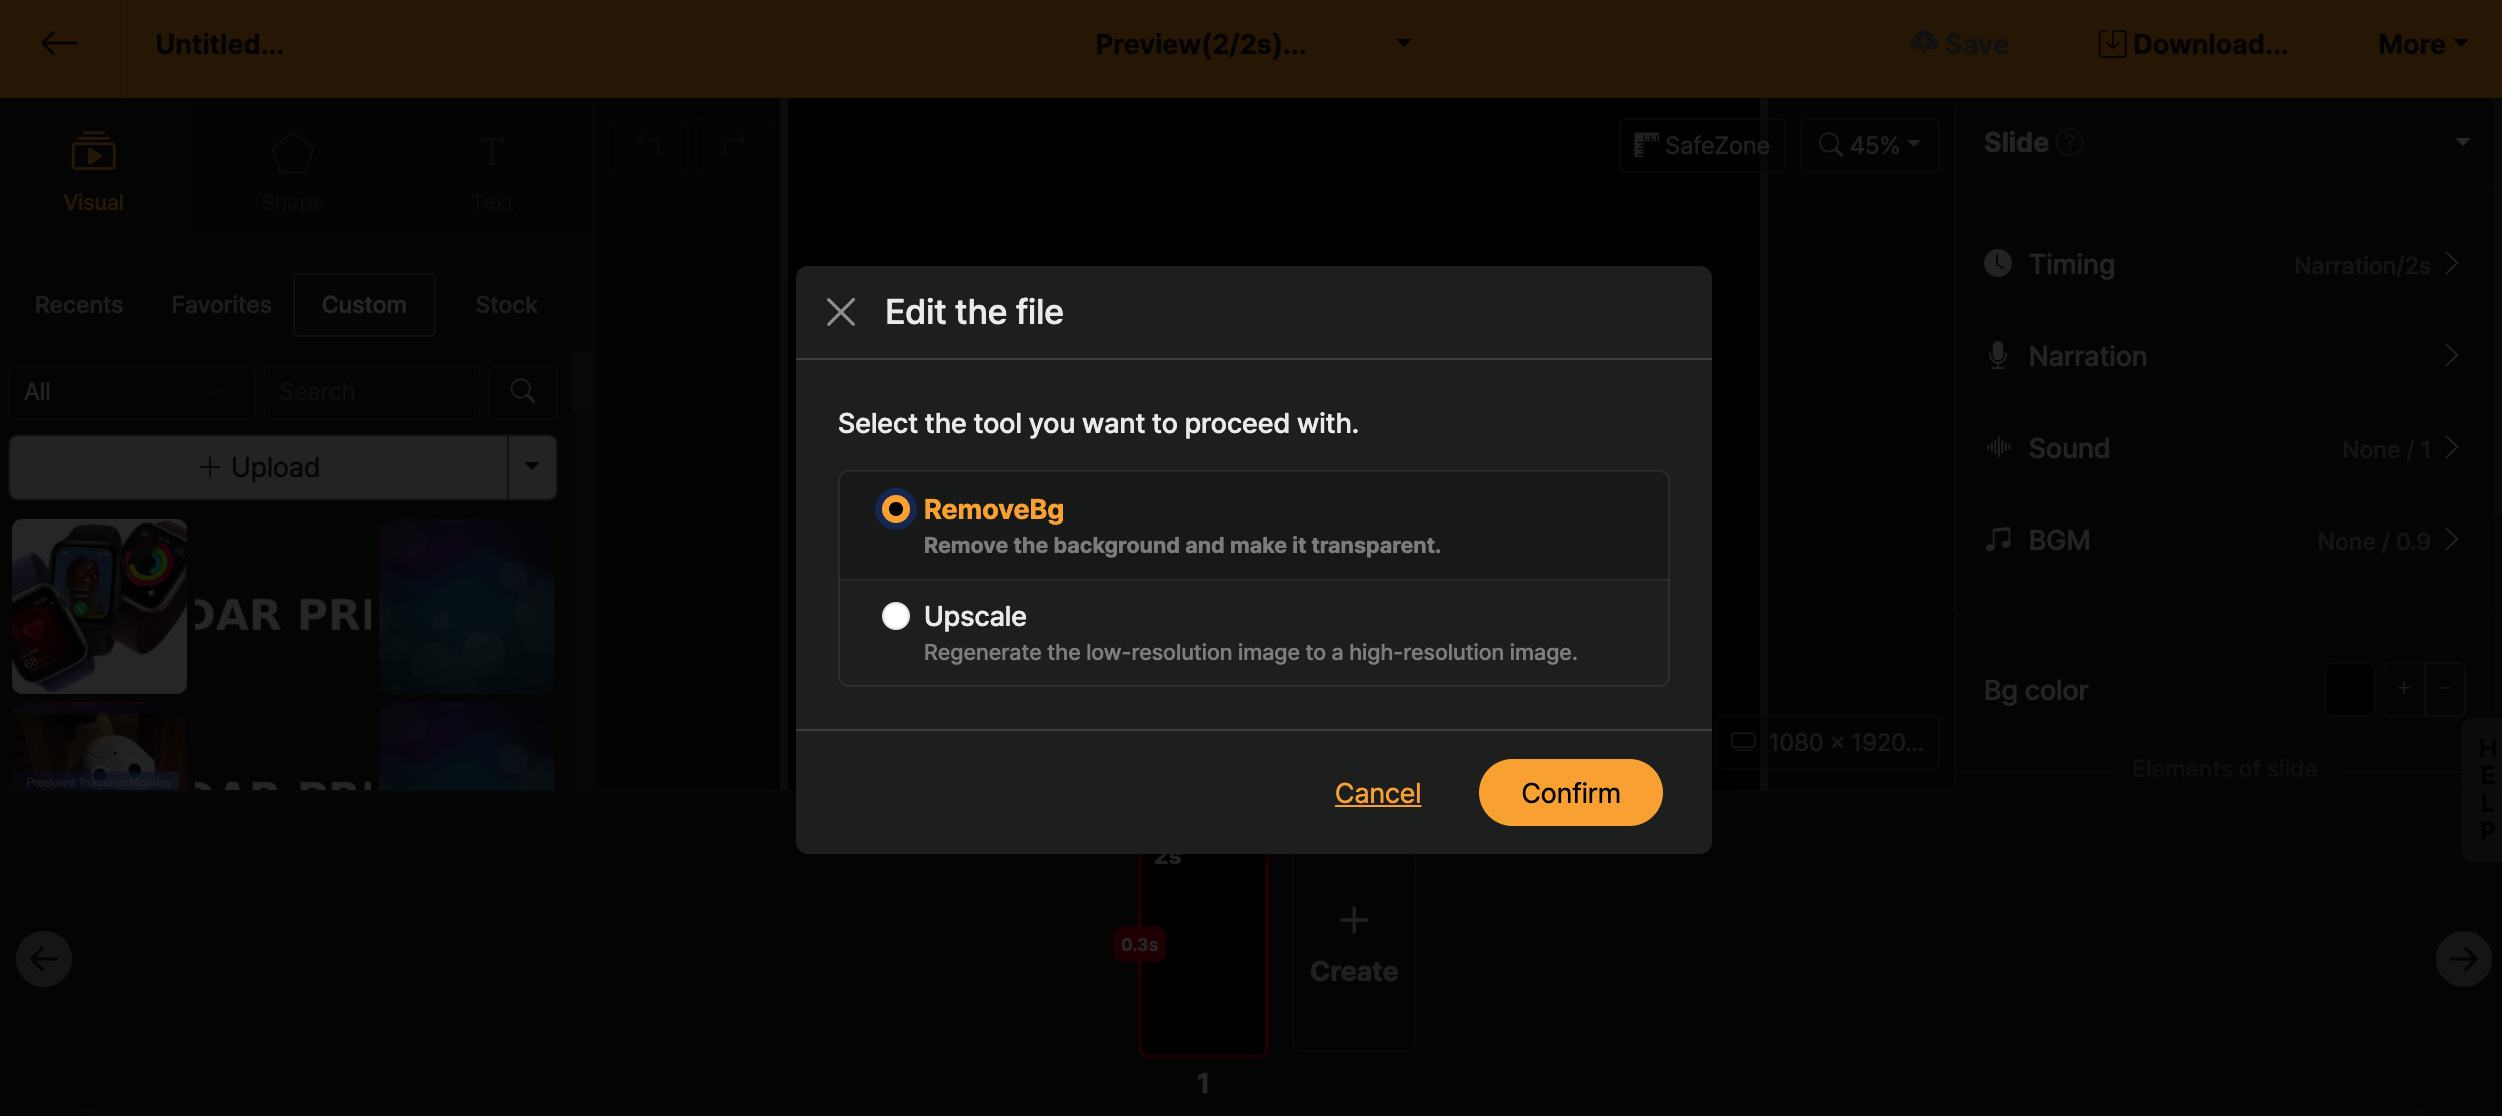
Different tools are provided depending on the type (image/video) of the file you selected.
For images, [Remove Image Background] and [Enhance Image Quality] features are provided; for videos, [Video Rewind] feature is provided.
Image background removal (nuke)
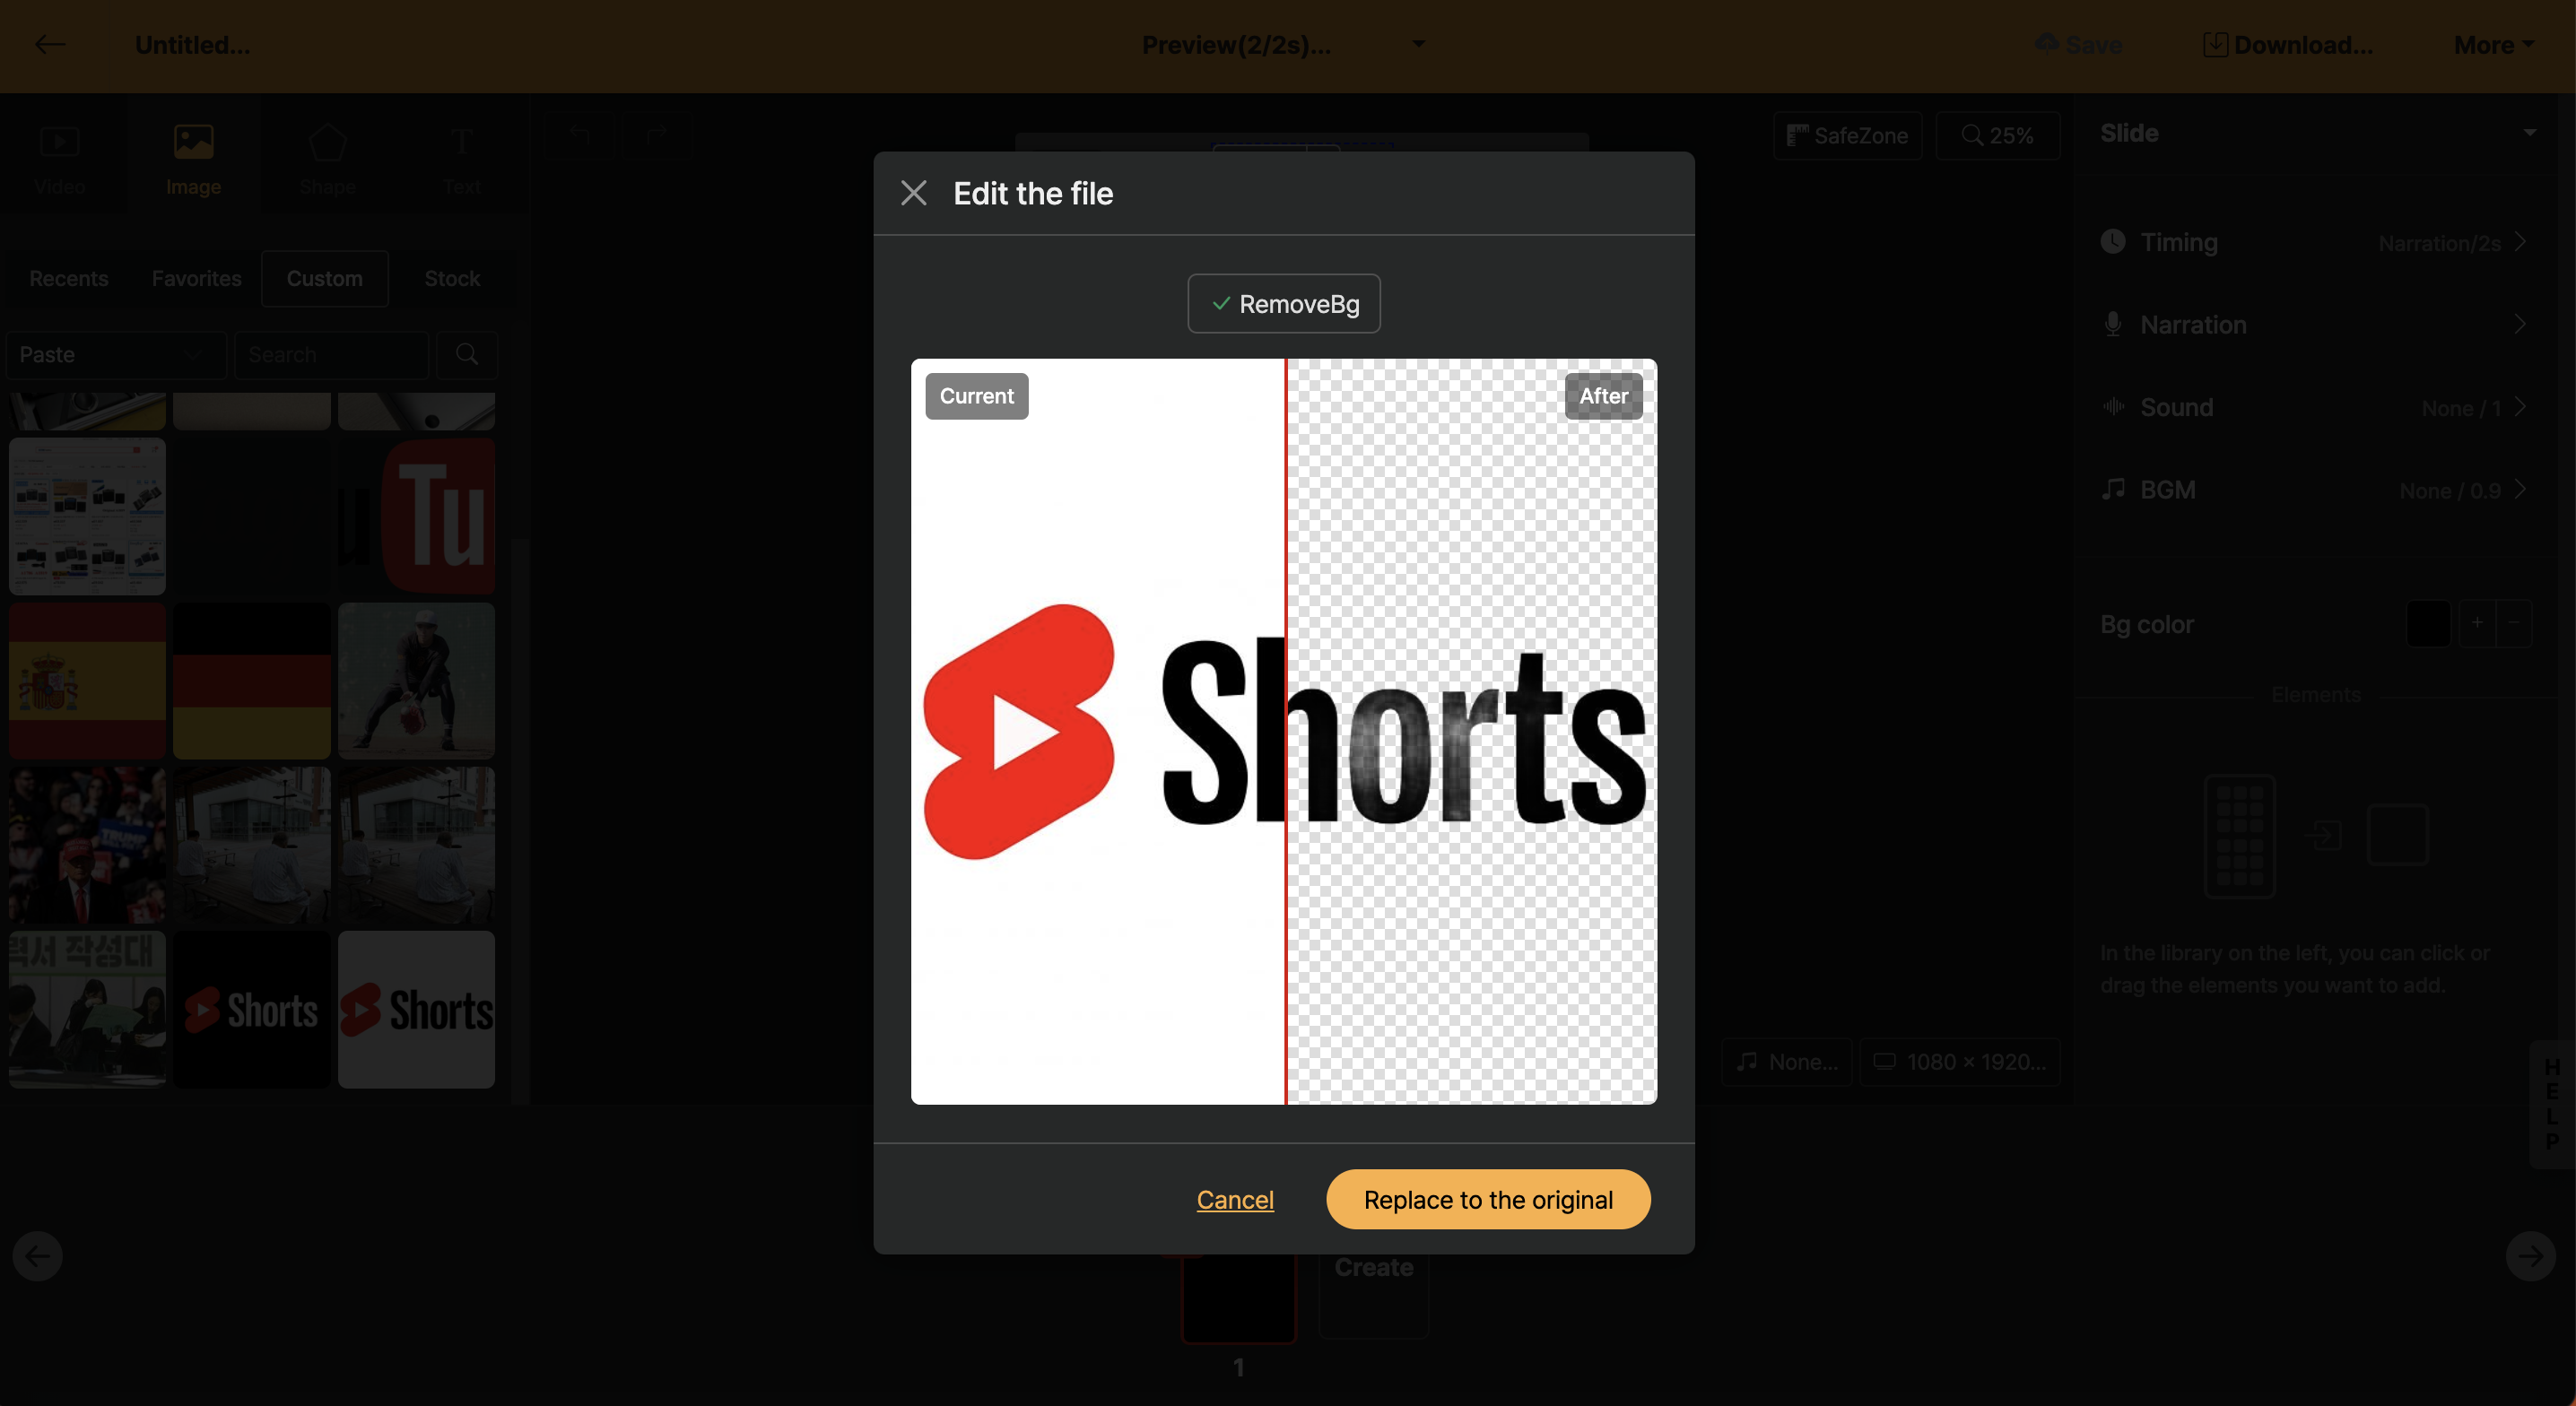
AI background removal feature. You can compare before and after background removal with your mouse.
Image Upscale Enhancement
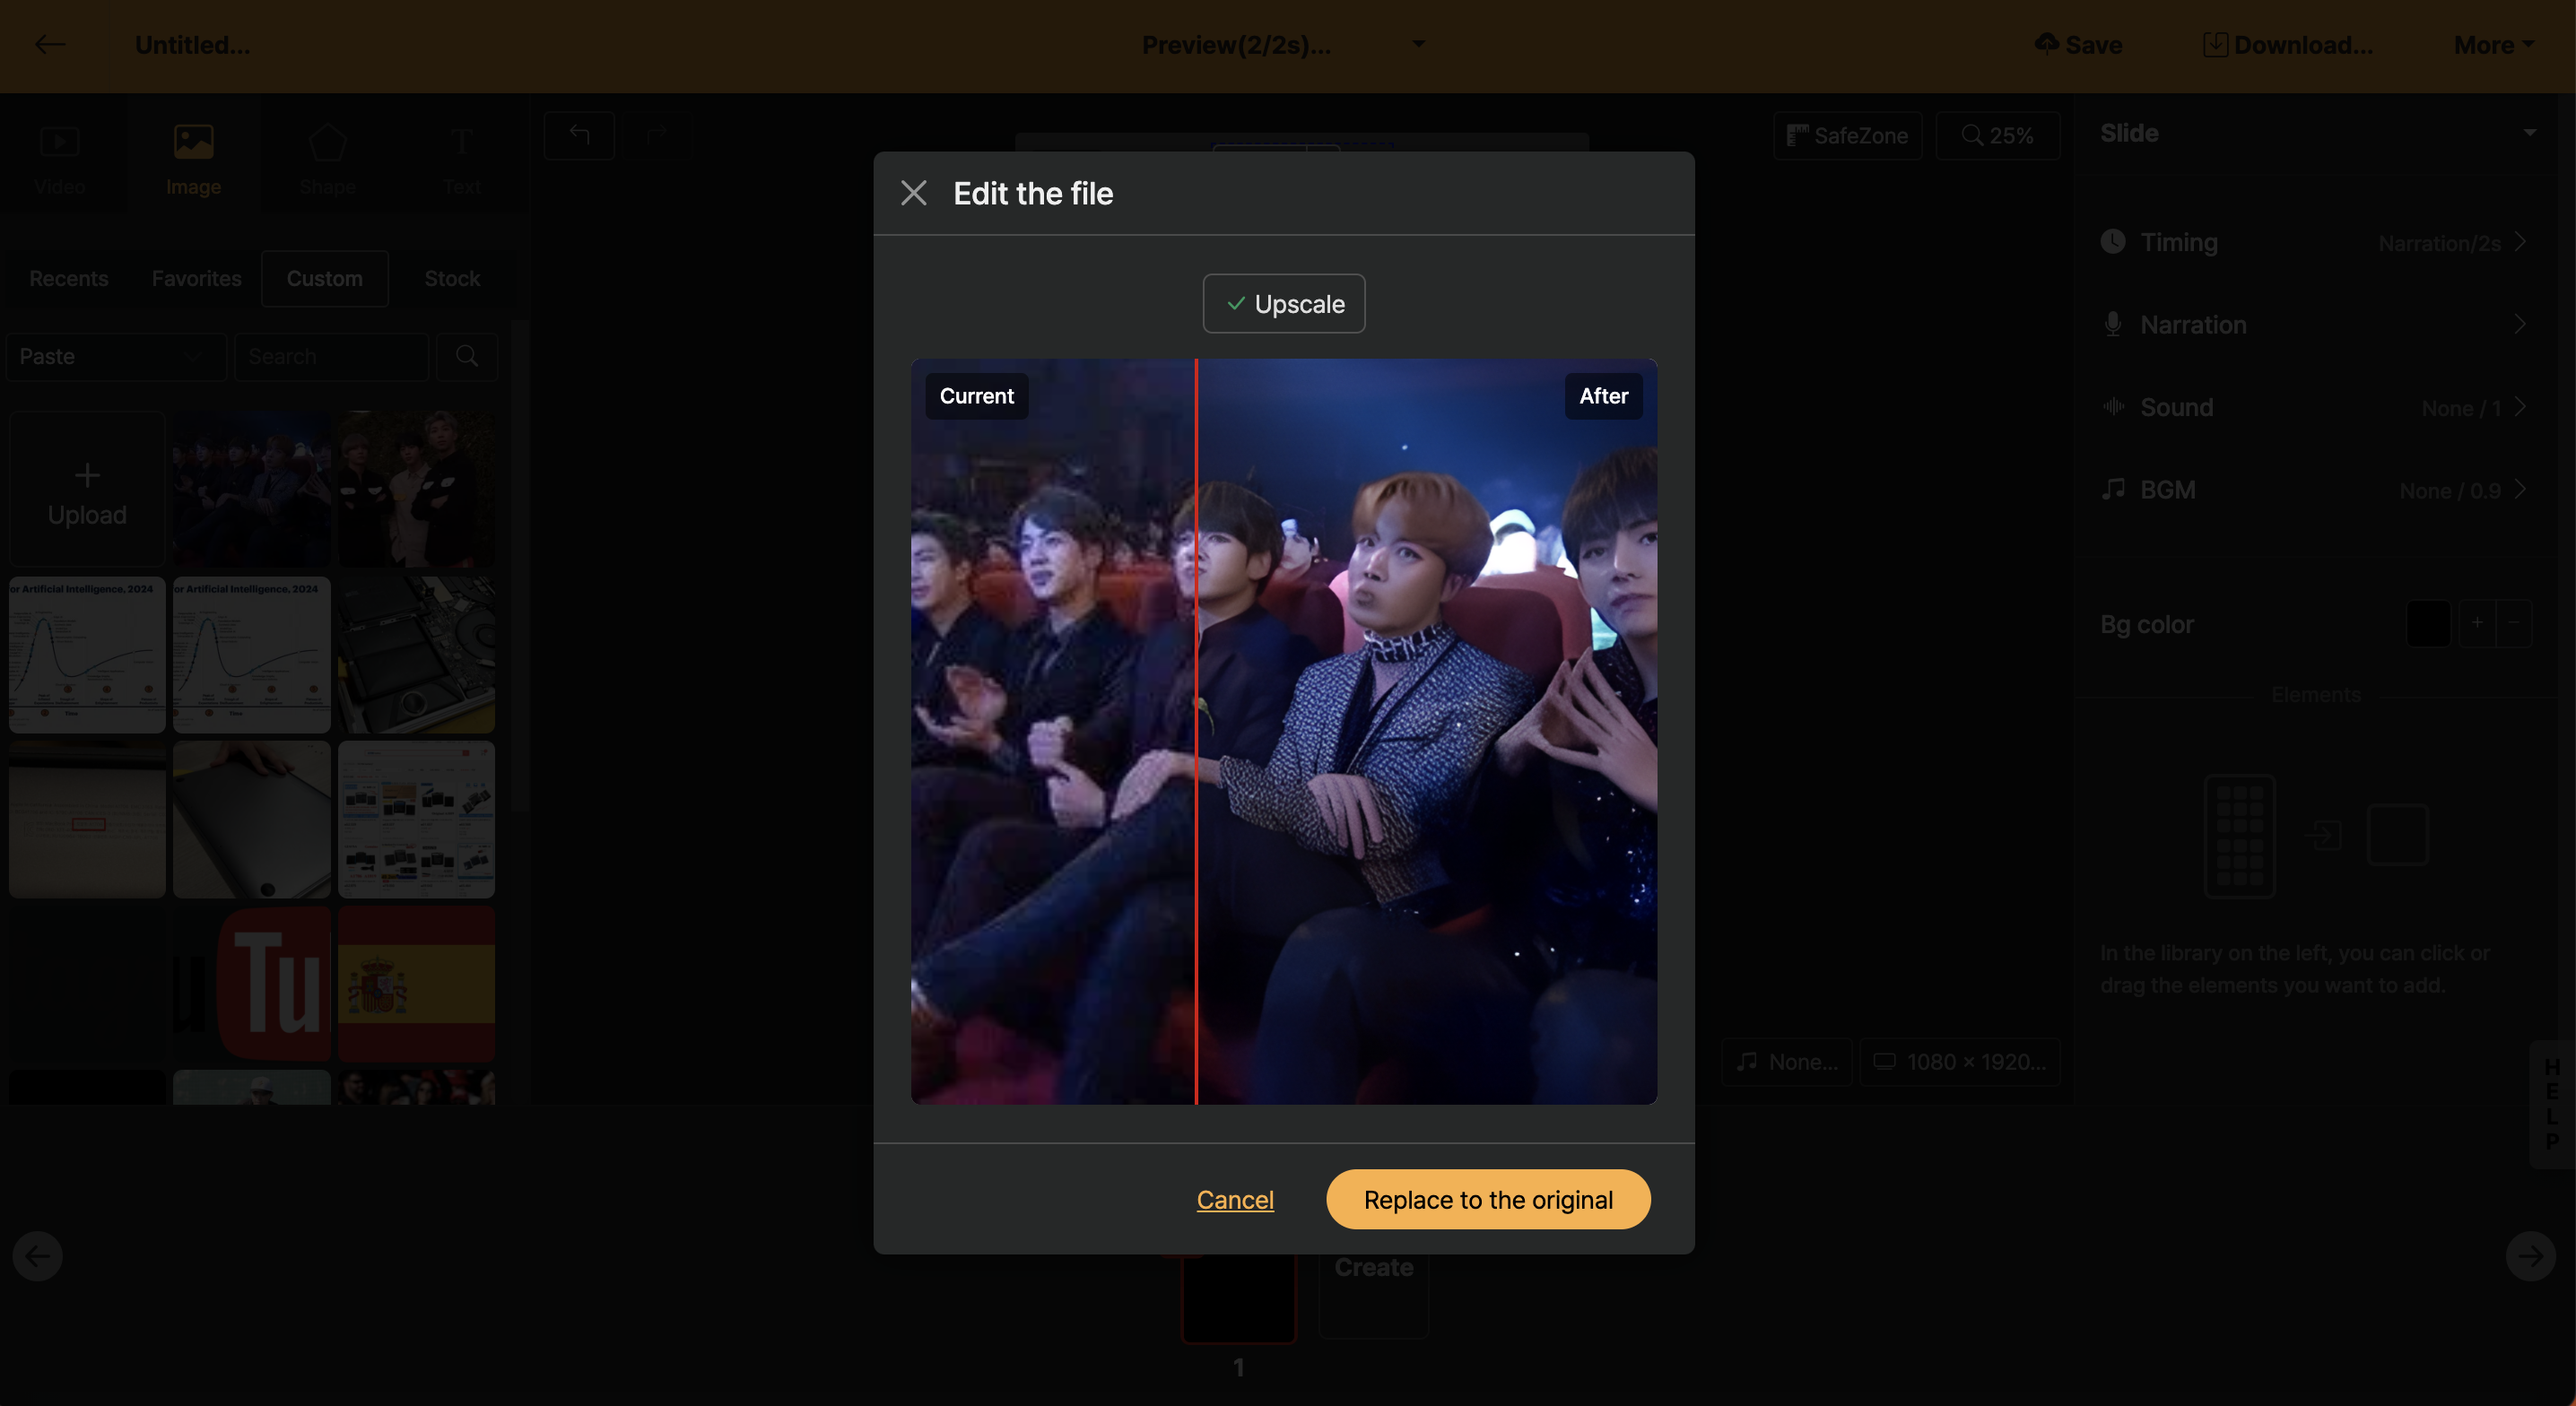
Using AI, it upscales low-resolution images to high-resolution.
Video Playback
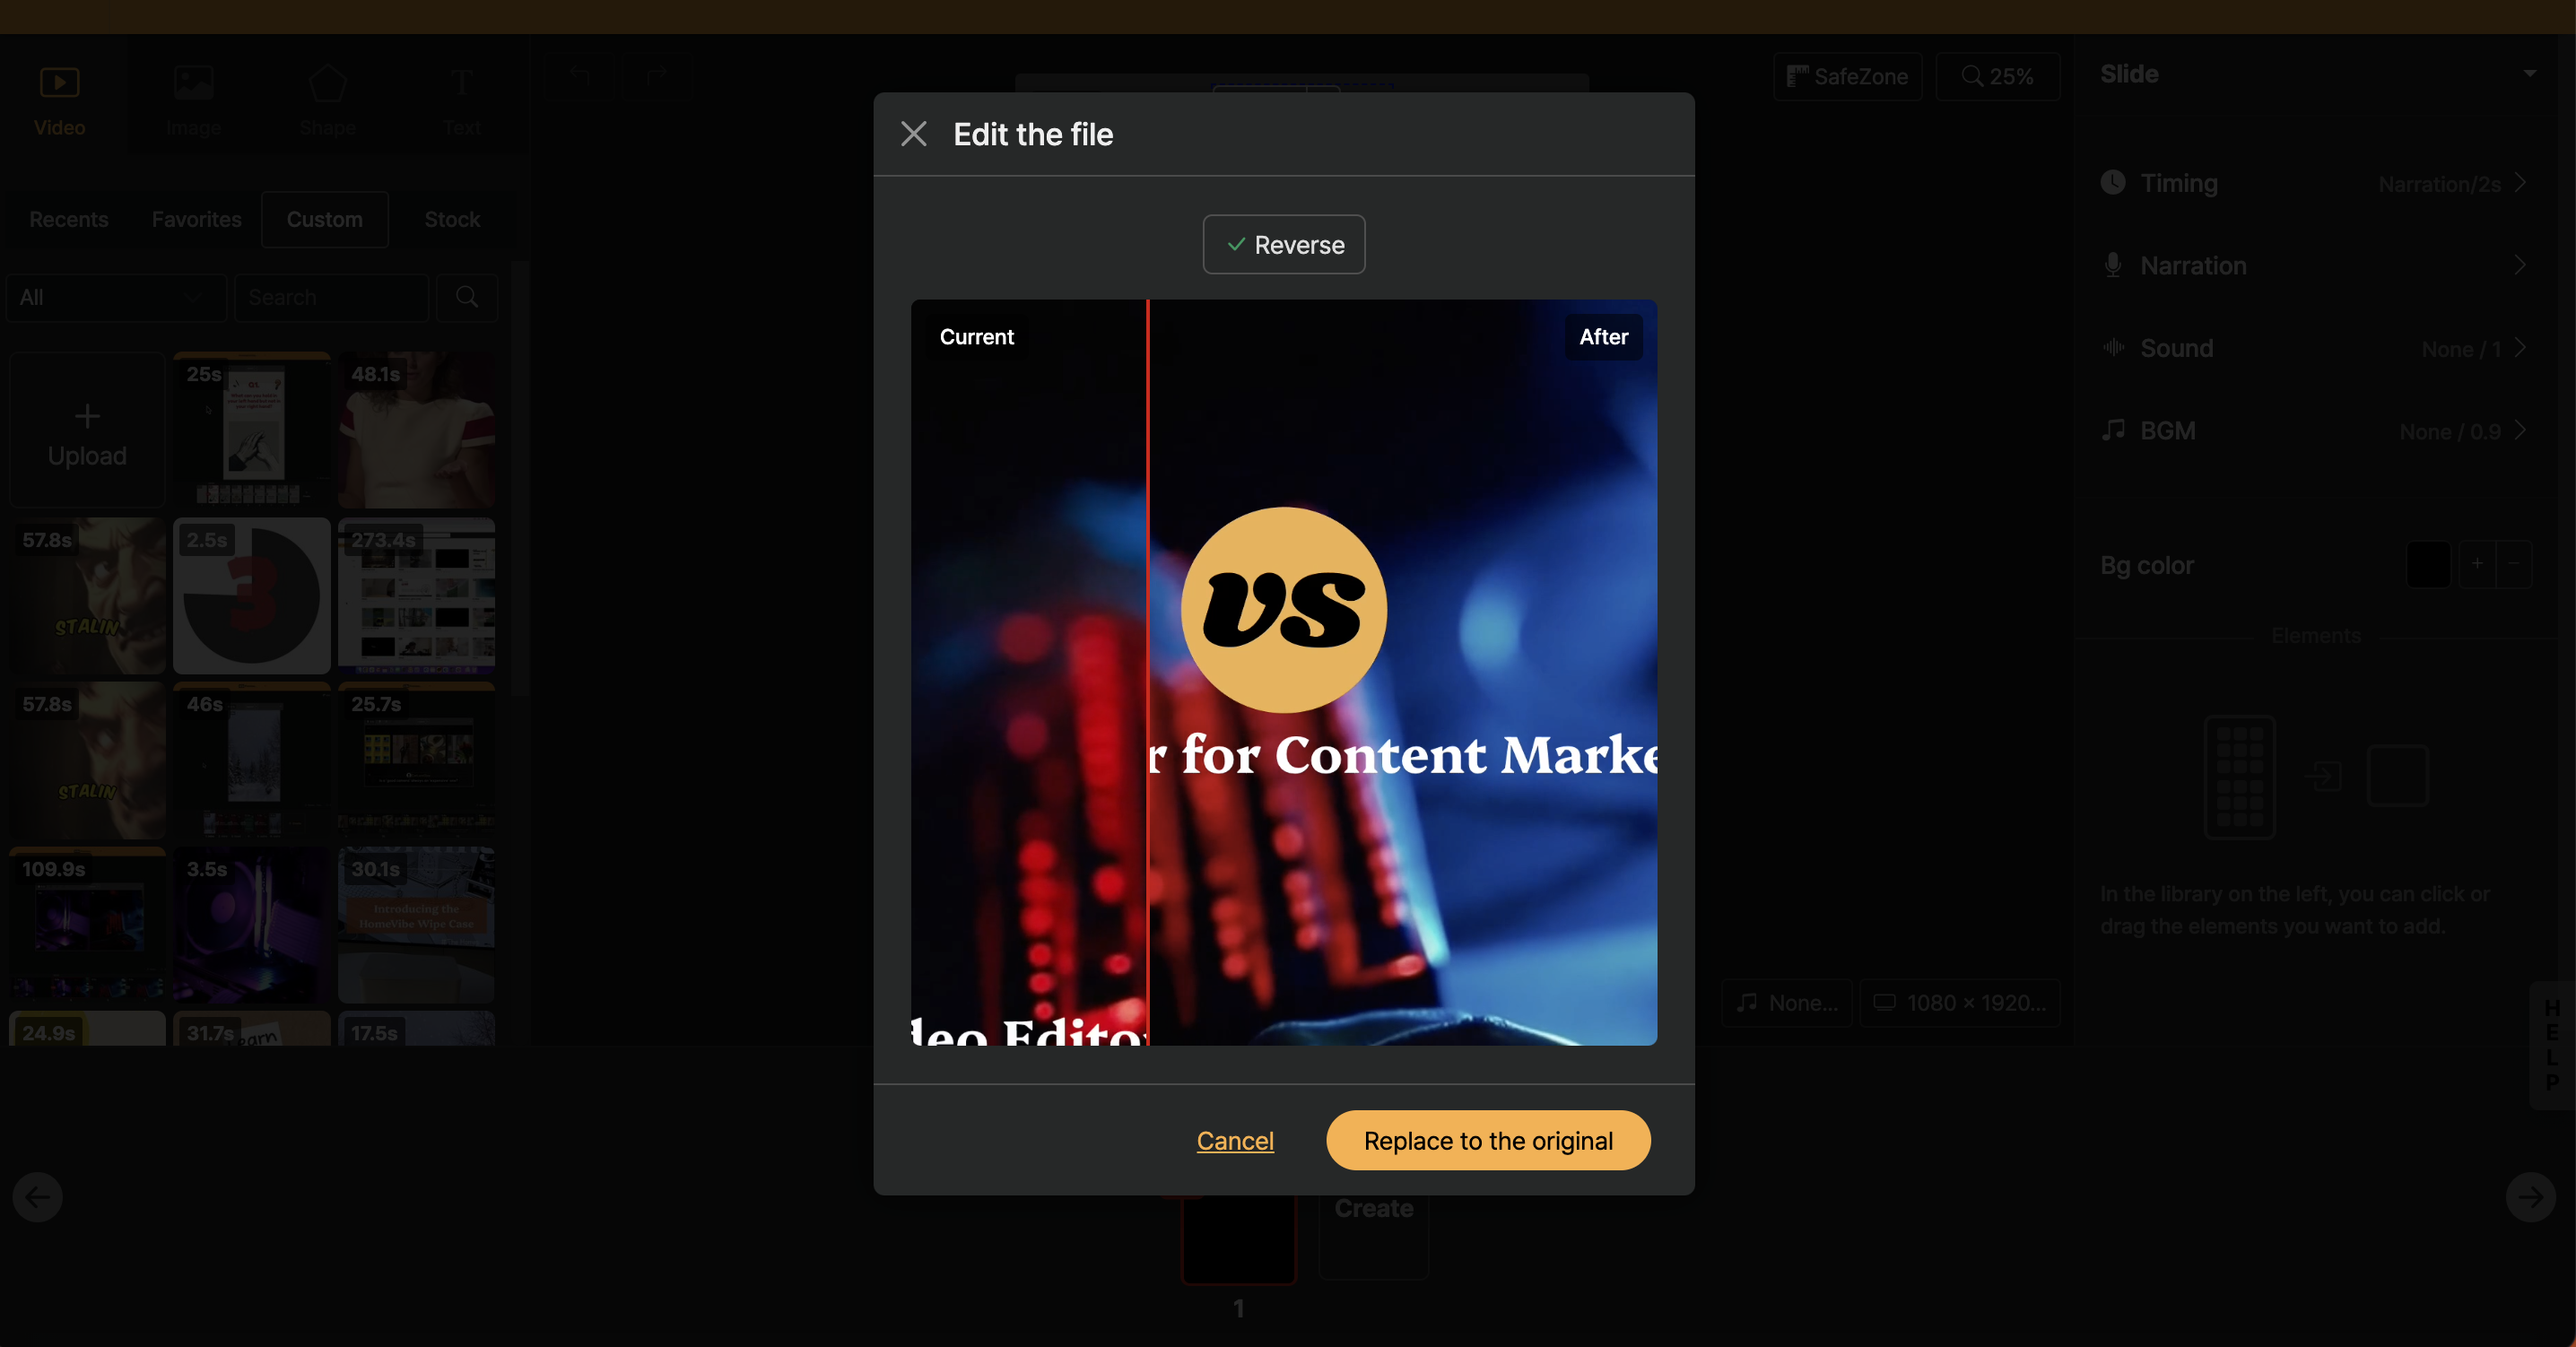
Play video files in a grid. Both video and audio are played back, so please pay attention when using.
Editing Window
This is the area where you can perform selection and position adjustments for elements.
Cancel/Redo action
This function allows you to cancel the action you just performed or redo it.
Safe zone (vertical size)
When creating the vertical size for separate left-right screens, in the actual platform display various buttons cause the surrounding area to be invisible. This feature is used to anticipate and prevent that.
Zoom in/out

Change the size of the current Editing Window! You can make it small to see the overall layout or zoom in to edit specific elements in detail. The shortcut for zooming in/out is Ctrl++/ -.
Slide settings

This is the space that displays the internal elements by the size of the slide. There is a direct access button for Slide Properties and a dropdown (▼) for management. For more information on managing internal elements, see [Element Operations].
Playback Duration
The default playback duration of a slide is 3 seconds, and you can click to change this duration.
For information on how to change the playback time, please refer to the [Conversion and Time] guide document.
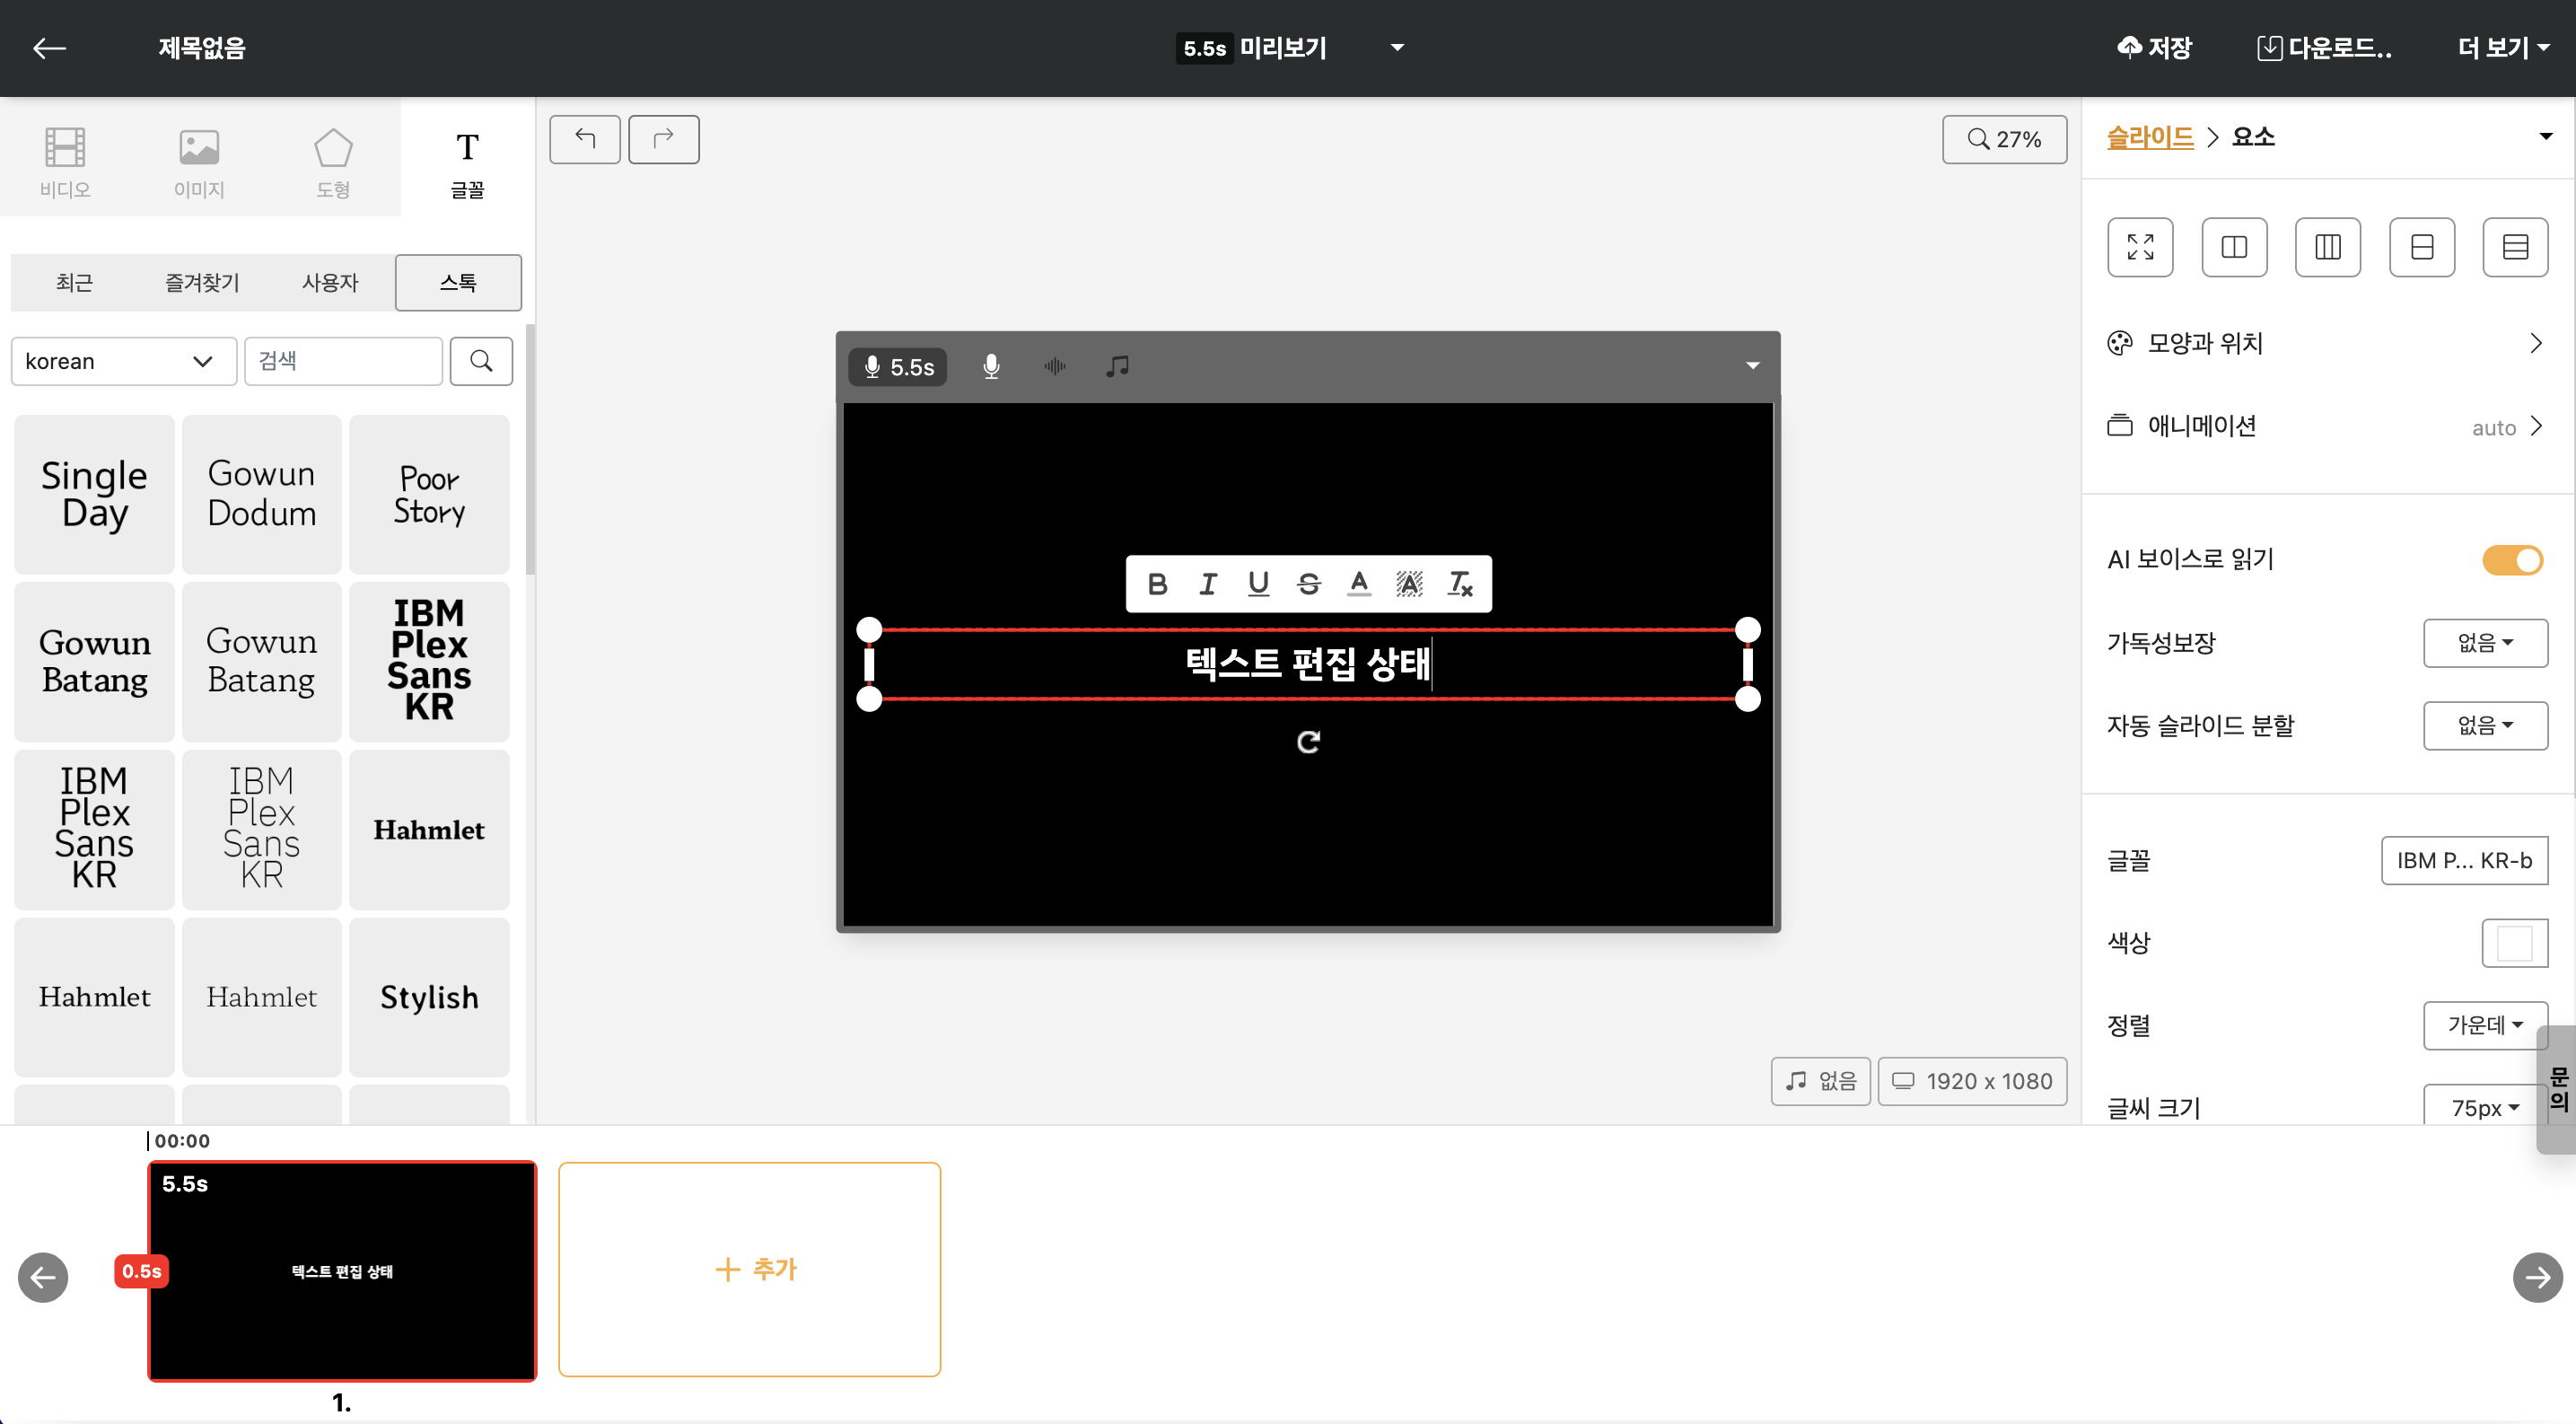
Narration
You can apply an AI voice to your slides, or record your own voice.
Sound Effects
You can set the sound effects that will play when the slide appears.
Background Music Volume Change
You can change the background music that plays across the entire project, and you can temporarily adjust the volume on this slide. For example, when important content appears or when you need to lower the volume of a video embedded in the slide, you can quickly adjust the volume.
Editing Window(Stage)
You can apply all the elements of the library panel by dragging and dropping or clicking.
Background Music Settings
You can set or change the background music that plays across the entire project.
Resize
You can change the size of the project. In addition to the default sizes provided, you can also set a custom size using the "User" tab.
properties 창
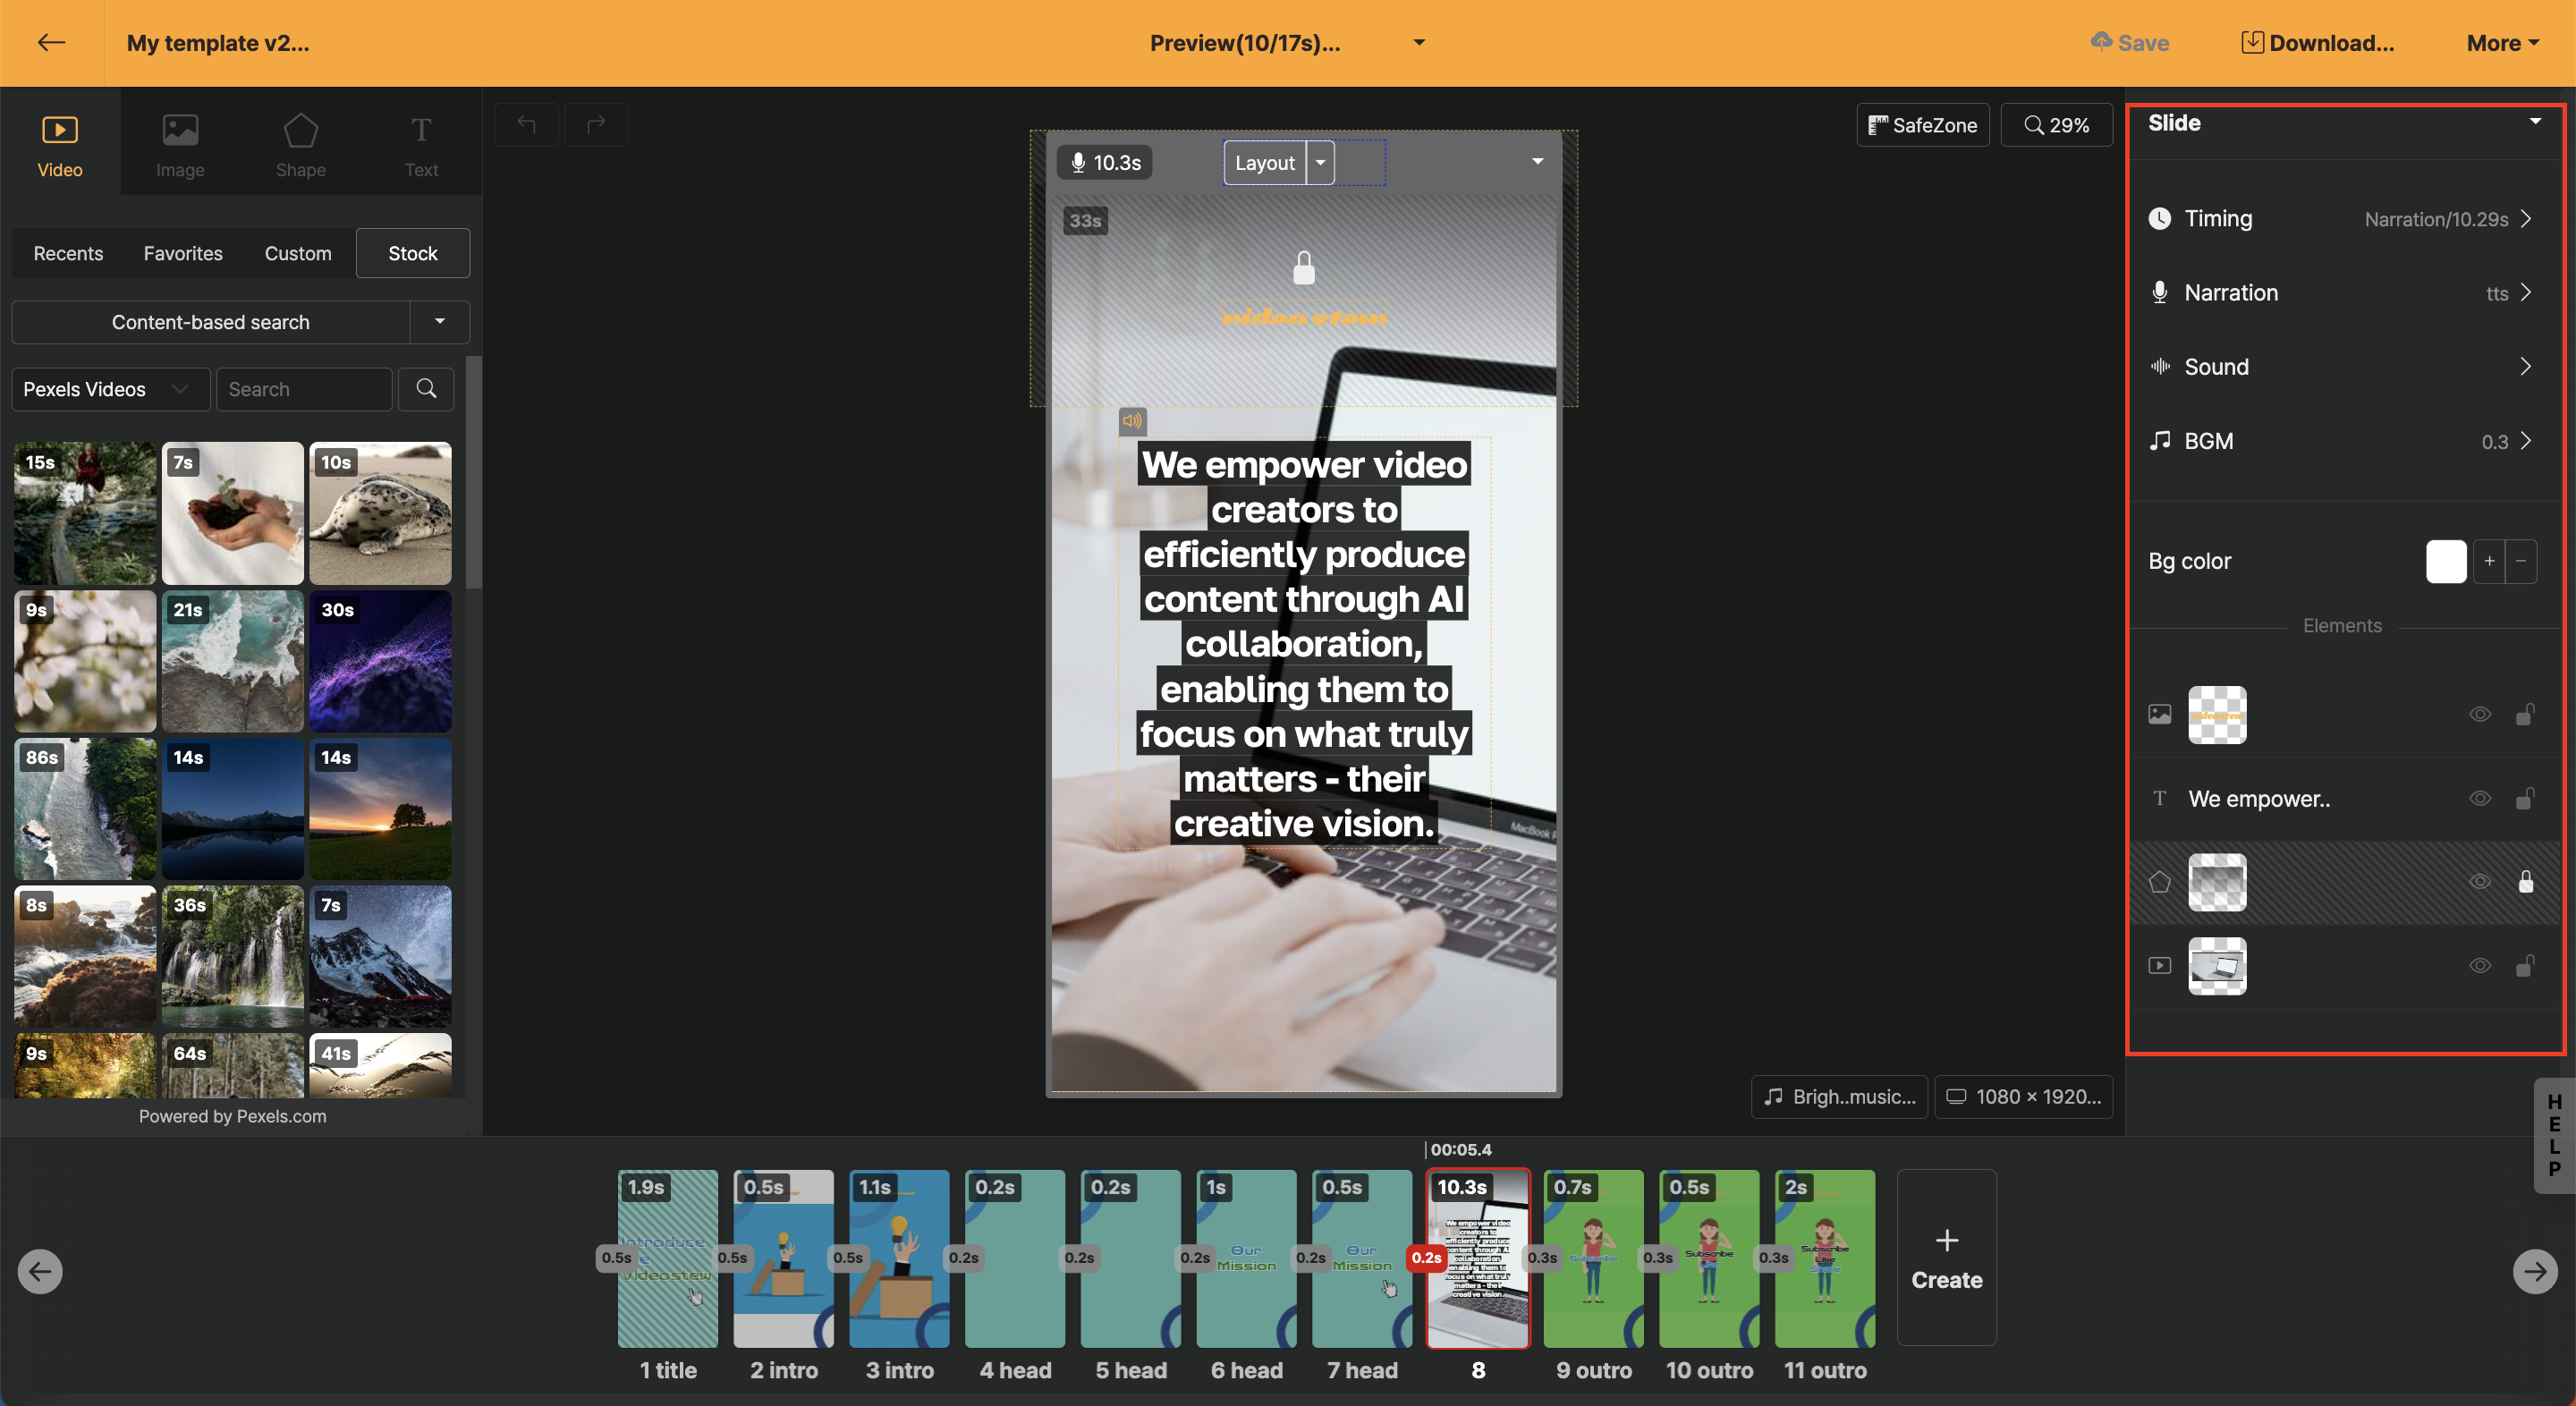
In the properties panel, when nothing is selected, you can edit the properties for the "slide" itself; when you select a text or image element, you can change the settings for that element.
In the lower "Element" panel, you can change the order of elements currently being used in the upper stage by dragging and dropping, or you can click the pause button to ensure that specific elements are not edited.
Slide Window
"Add" button allows you to keep adding new slides to create your video. You can select multiple slides at once for editing by holding the shift key and selecting the slides you wish to edit.
문의 (채팅상담)
Have questions during your work? Ask us in real-time chat. We'll quickly resolve your curiosities while you're working on your project after customer agreement.
Basic Usage
It's important to know what each button does, but it's also essential to understand how the operations work and how the workflow proceeds.
Slide creation method
As mentioned in Slides and Elements, a project is composed of multiple slides. The principle is that you put content on these slides, and when these slides are connected and played, they become a video.
Selecting Slides
Selecting slides is done by clicking with the mouse. When you click on the desired slide in the Slide Window at the bottom, the content in the Editing Window in the center changes to the current slide.
Keyboard Slide Selection
In the Editing Window, when no element is selected, you can change slides with the keyboard. Pressing Left or Right will switch the selection to the previous or next slide.
Individual Slide Selection
With the Ctrl key pressed, selecting a slide that is not the current one will add it to the selection, along with the current slide.
Range Slide Selection
With the Shift key pressed, selecting a slide that is not the current one will select all slides in the range between the current slide and the slide clicked with Shift.
In the Editing Window, when no element is selected, using Shift+Left/Right with the keyboard also selects a range similarly.
Select entire slide
Aside from Range Slide Selection, there is an easy way to select all. In the Editing Window, when no element is selected, press Ctrl+A to select all slides.
Slide Addition
In the Slide Window, you can add a slide by clicking the "Add" button located on the right side of the last slide. Typically, when adding an element, it's not added completely new, but rather, you often modify parts of the content from the slide just before, right? Therefore, when you add a slide, it automatically "copies" the previous slide.
Slide Copy
After selecting the slide you want to copy in the Editing Window, press the Enter key and the selected slide will be immediately copied behind it.
Slide Delete
Select the slide you want to delete in the Editing Window and press the Delete key to delete the selected slide.
Slide Order Change
After selecting the slide you want to reorder, you can drag it with the mouse to the desired position. This also allows you to select multiple slides at once and change their order in bulk.
< Changing the Position of Slides >
How to Operate Elements
What would a slide be without any content? You need to insert elements like images or text into the slide to create content for the video.
The main manipulation of elements is centered on the Editing Window in the middle, using both the Library Window on the left and the [Properties Window] on the right. You can click or drag the desired library item from the Library Window to add it to the Editing Window, change its position and size in the Editing Window, or, after selecting it, change its detailed properties in the [Properties Window].
Element Selection
Elements can be selected by clicking on the desired element in the central Editing Window.
Selecting Elements Individually
While holding the Ctrl key, if you select a different element that is not currently active, the newly selected element will be added to the selection along with the current one. This can be combined with Select Elements by Range below to add or remove elements more flexibly.
Select Elements by Range
If the elements you want to select are gathered in a certain area, you can activate the range selection by clicking and dragging from an empty space with your mouse. Continue dragging until the desired elements are within the selection box.
< Example of Selecting by Range >
Add Elements
There are several ways to add elements to a slide.
Add from the Library
Click on the desired library from the Library Window on the left side, and the corresponding type of element will be added to the Editing Window.
Add by Copying
You can also add a new element by using [Copy Element]. After selecting the element you want to copy on the current slide, or an element from another slide, press Ctrl+C, then go to the desired slide and press Ctrl+V. The same element will be copied and added.
Add by Uploading
If you have videos, images, or font files on your computer, you can upload them. Select the desired file from the explorer (or finder) and drag and drop it onto the Videostew editing screen. If you cannot drag and drop, select the desired type from the Library Window on the left side, choose "User" and click the "+ Upload" button to select files.
Edit Elements
There are many ways to edit elements.
Drag and Drop from the Library
This is how you modify an element itself. The Library implies content in the case of videos or images, shape in the case of figures, and font in the case of text. Select the type and sub-tab you want to modify in the Library Window, click on the desired library, and drag the element of the same type you want to modify onto it. It will then be replaced with a new element.
Alternatively, you can directly drag and drop files from your computer's file explorer into the stage to upload them.
Position and Size Adjustment
All elements in the Editing Window can be moved and resized after selection. Size changes can be made using the four handles in the corners, or by using the diamond-shaped handles to change the size proportionally. To adjust the position, simply drag the element to the desired location.
Some operations can also be done using the keyboard; after selecting the element you wish to change, pressing the arrow keys will adjust its position. Additionally, pressing Shift along with the arrow keys allows for fine-tuning the position by 1 pixel at a time.
Alternatively, you can also use the shape and position of the Properties Window in other ways. Please refer to [Shape and Position] for more information.
Double-Click Mode
Adjustments can also be made by double-clicking an element in the Editing Window. Depending on the type of element, different modes will be activated.
- Video and Image: Within the current size of the element, you can adjust the visible size and position internally.
- Shapes: No particular incidents will occur.
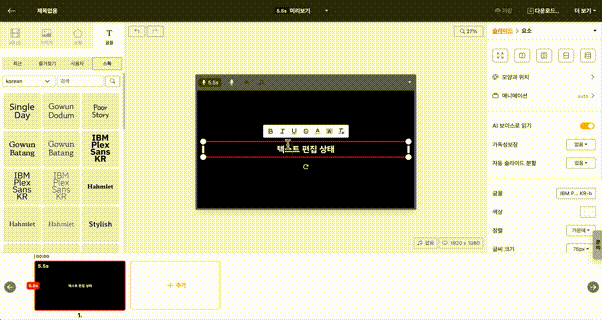
- Text : You can edit the content itself or select a part to change its color, add a bold effect, cancel selection, etc. For detailed explanation about the tool, please refer to [텍스트 요소].
Adjusting in Properties Window after selection
Each element has various properties. When you select an element in the Editing Window, various options that can be changed in the [Properties Window] on the right will appear. You can see detailed descriptions of each element through the [element-specific properties] guide.
Element Copy
After selecting the element you want to copy from the current slide, or an element from another slide, press Ctrl+C, and then press Ctrl+V on the desired slide to add a duplicated element.
< Copy Method >
Element Style Copy
There may be times when you want to leave the contents of an element as is, but only copy and apply other properties such as position, shape, or style. For example, when you want to arrange elements in the same slide in a row, or when you want to apply the same role of elements in different slides.
At this time, select the element to be copied and press Ctrl+C to perform a general copy first. Then, select the element where you want to apply the style copy and press Ctrl+Shift+V. This will allow you to see all properties copied except for the library or content.
Element Delete
If there's an element in the slide you don't want, click on the element you wish to delete in the Editing Window, select it, and then press the Delete key on your keyboard to remove it.
Global properties
Most properties are applied by slide, but there are properties that are applied to the entire project you are currently working on. Would you like to see what these elements are??
Global Background Music
Global background music lets you set music that plays by default throughout the project, and it is designed to fade in/out automatically at the beginning and end.
The music applied to the whole project can be accessed via the background-music icon at the bottom of the stage area. If you want different background music on only some slides, please refer to the Slide Background Music guide.
Background Music Selection
Clicking the [All] button allows you to set categories by genre and mood; it's convenient to make a selection while previewing by holding the mouse over it.
Volume Adjustment
Background-music volume can be changed globally through [Global Volume]. Generally, when AI voice is applied, setting it to 20 % works well. Use Preview to watch the narration and adjust the volume appropriately.
Similar Style Search (Similar Track Search)
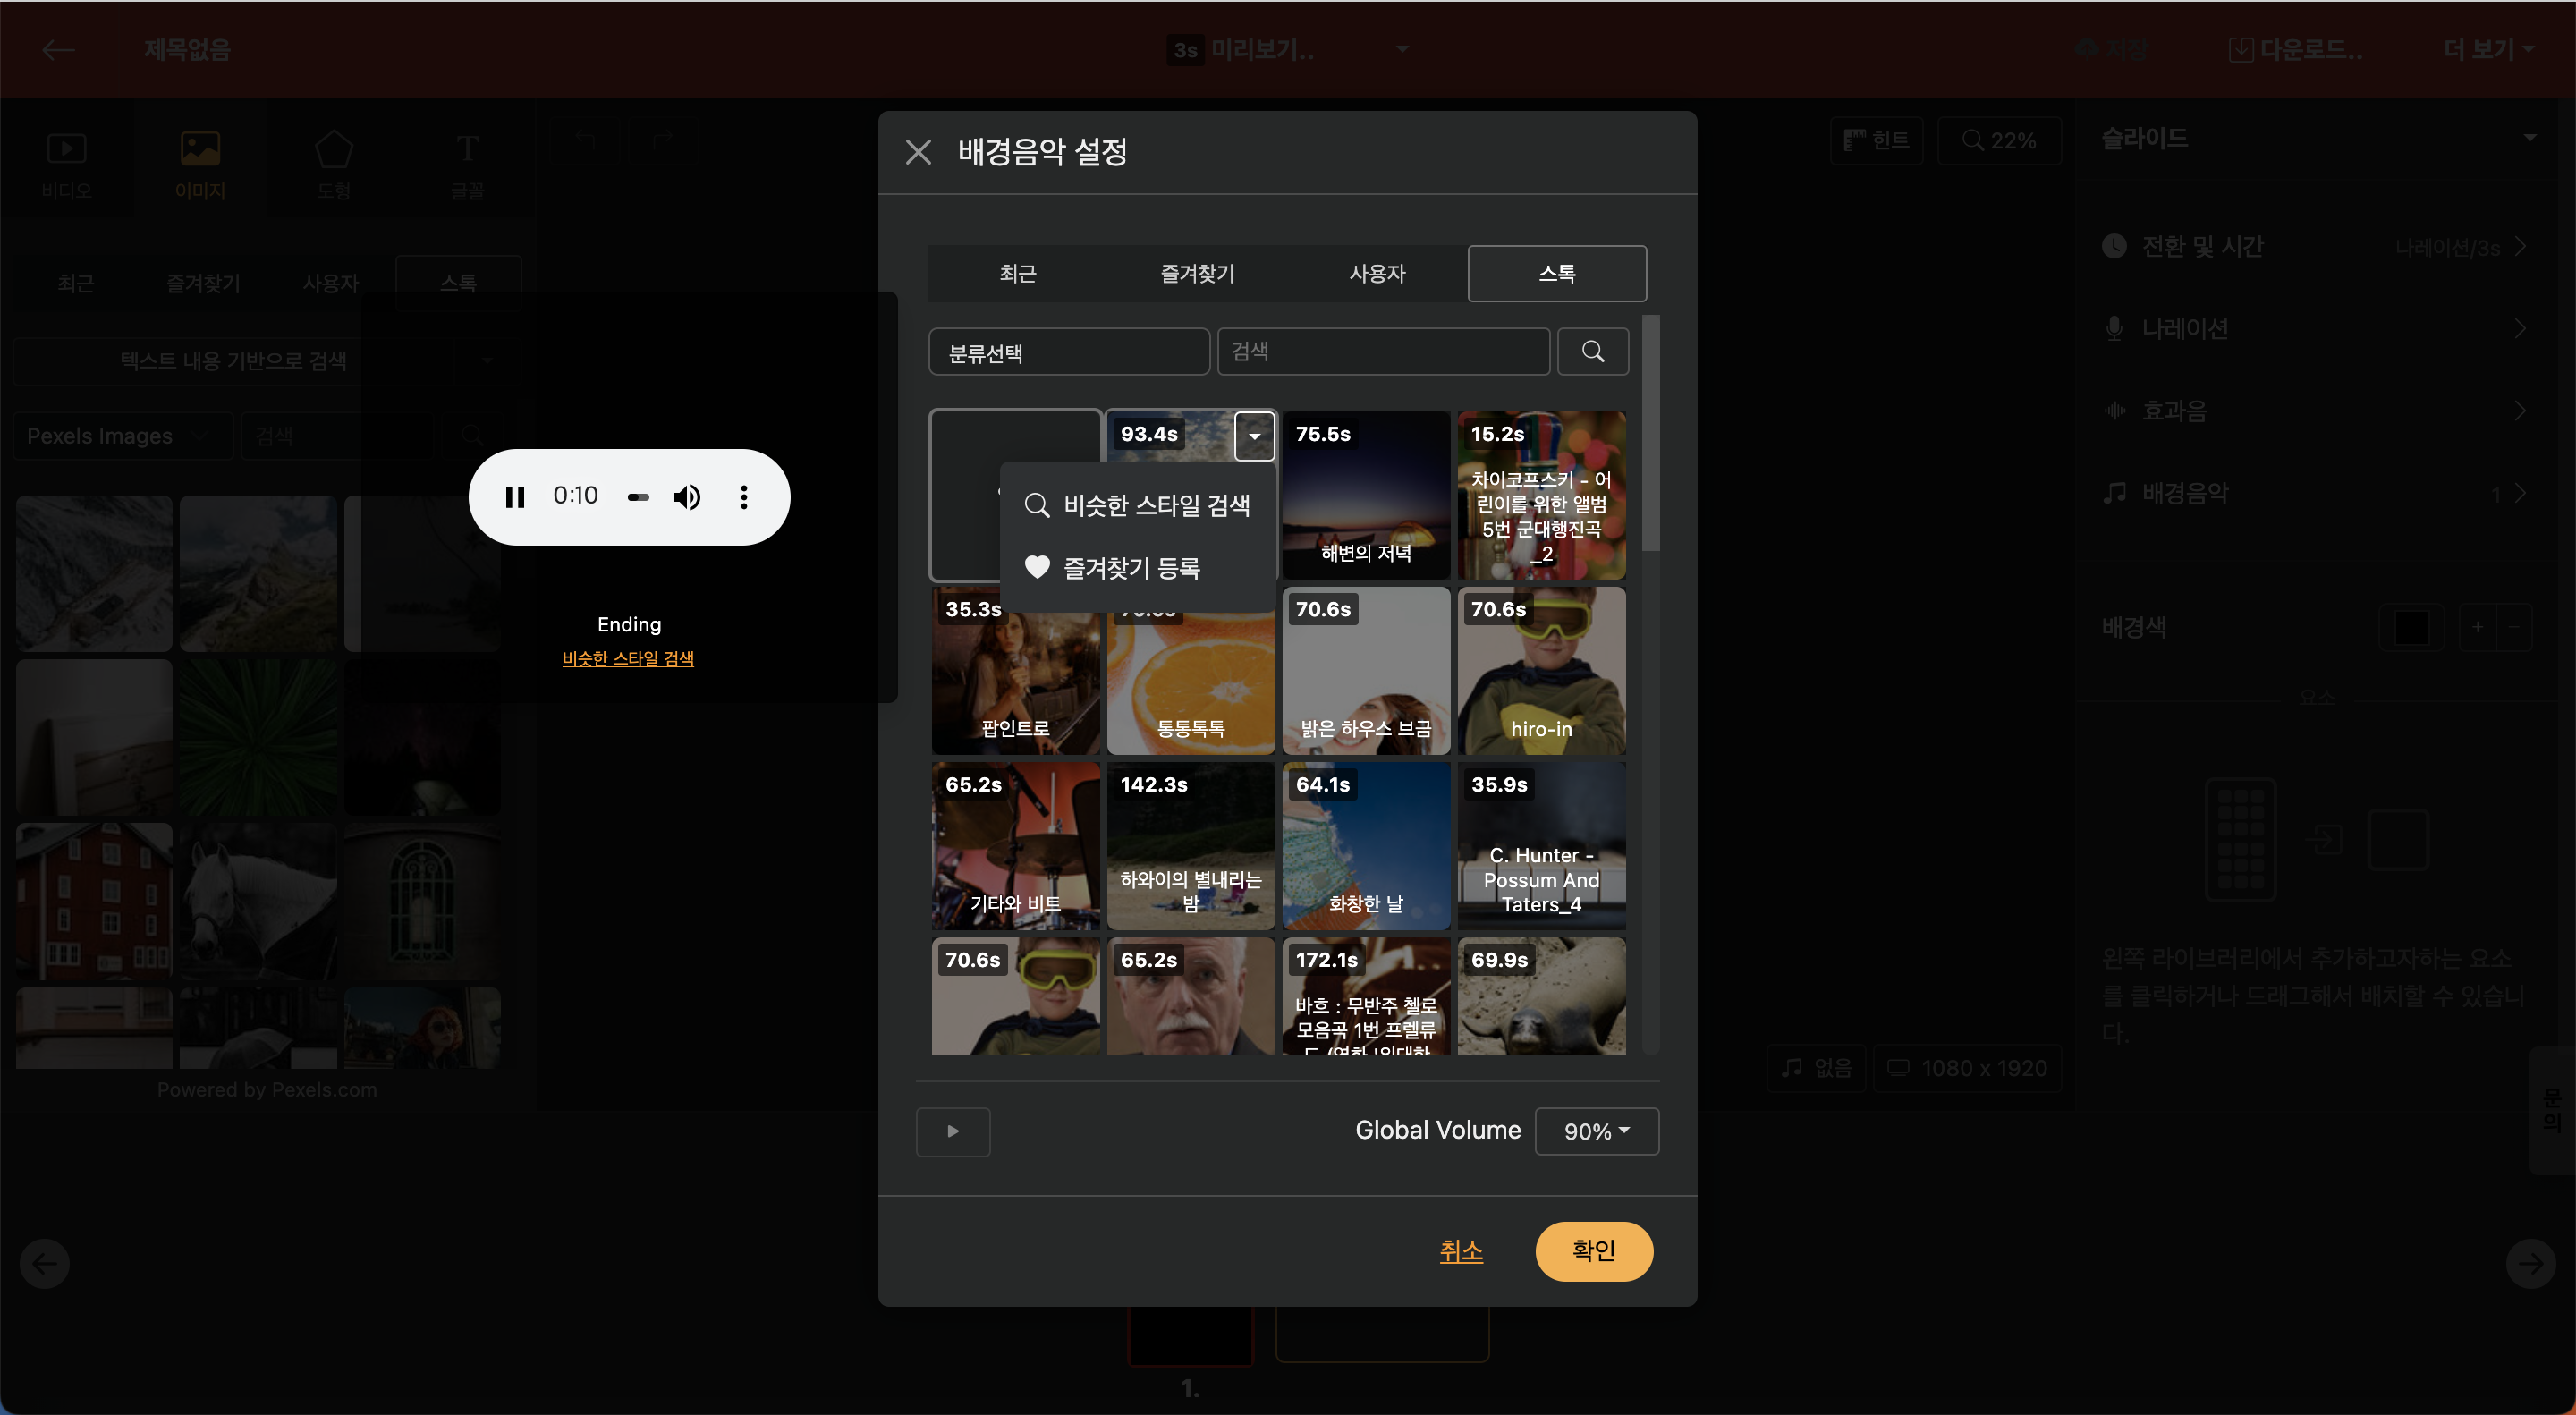
Hovering the mouse over the music and pressing the settings (▼) button reveals a "Similar Style Search" option. This feature allows you to receive recommendations for tracks that are similar to the music you are currently listening to.
View Detailed Sound Information
Selecting the music title next to the play button will provide detailed information about the sound, and the text can be copied.
Size
You can change the size of the project. In addition to the default sizes provided, you can also set your desired size directly through the "User" tab.
Transition (Movement Effect)
This setting is applied to the entire project and can change the feeling of animation movement. Click the 'Change' button to modify the movement effect of the animation as desired.
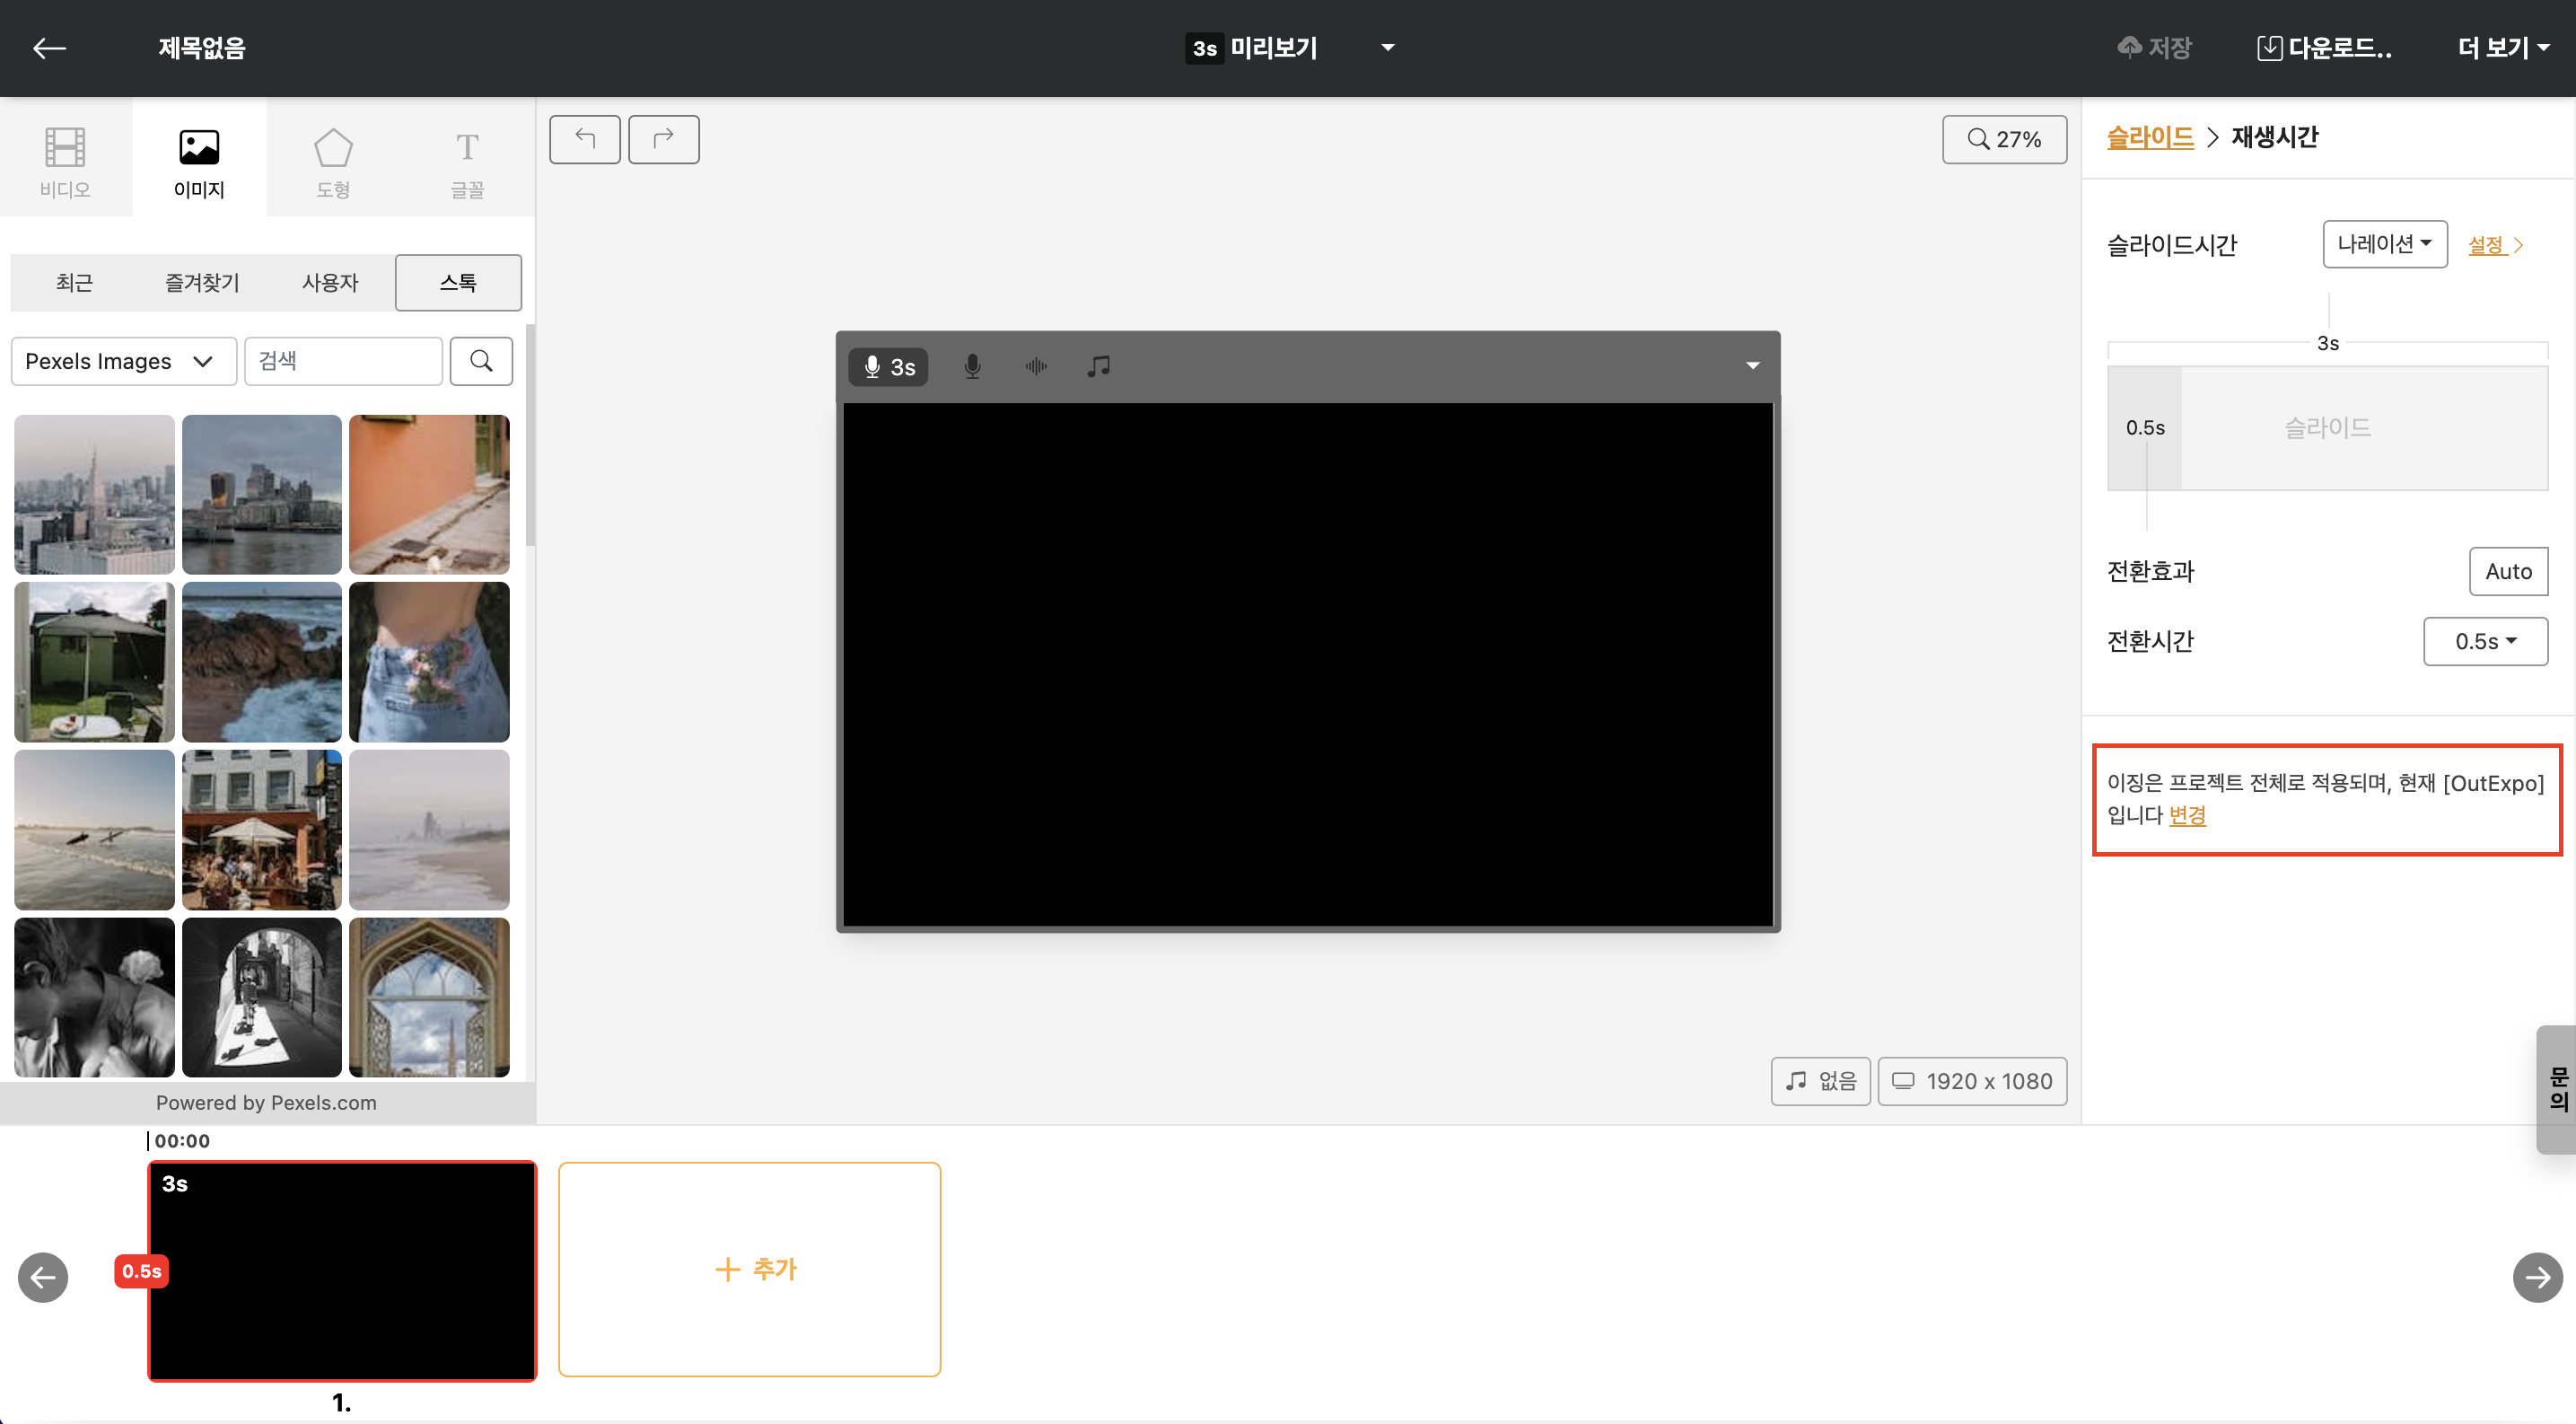
Slide Properties
Edit screen > Slide Properties on the right
When you select one or more slides in the slide window, or when no element is selected in the Editing Window, the Properties Window displays properties related to the slide.
Transitions and Time
Edit screen > Slide Properties on the right > Transition and duration
The time when the slide appears is changed automatically or manually.
Playback time
Edit screen > Slide Properties on the right > Transition and duration > Playback duration
The slide is displayed and then the time it takes to move to the next slide is adjusted. Depending on what content is included in the slide by default, the playback duration of that slide is determined.
For example, if the criterion is narration, it is automatically adjusted to the length of the AI voice, and if the criterion is video, it is adjusted to the length of the inserted video clip.
Want to reduce the overall length of the video? If you organize them in the order of the most efficient methods, it will be as follows.
- Increase narration speed — If you increase the reading speed of the AI voice (e.g.: 120130%), the narration time becomes shorter, and the slide playback time also decreases automatically. This is the most efficient way to reduce the overall length while maintaining voice quality. → AI Voice Speed Settings
- Reduce narration text — If you shorten the text that needs to be read, the narration becomes shorter, and the playback time is reduced as well. This method involves deleting unnecessary sentences or leaving only the core content.
- Trim the video clip — If the video is an inserted slide, you can shorten the length of the corresponding slide by reducing the playback section (trim) of the clip.
- Manually adjust slide playback time — Use manual mode when you want to shorten only a specific slide to a fixed duration. Since the narration may get out of sync, caution is needed.
Narration(Default)
Edit screen > Slide Properties on the right > Transition and duration > Playback duration
If there is a narration in the slide, the duration of that narration is used as the standard. If the narration is the standard but there is no narration, a default of 3 seconds is provided. If a specific segment is set to play only with settings such as trim for the narration, only that duration will be played.
Video
Edit screen > Slide Properties on the right > Transition and duration > Playback duration
If a video is embedded in the slide, the duration of that video is used as the standard. If a specific segment is set to play only with settings such as trim for the video, only that duration will be played. In the case of multiple videos, the most important video is automatically determined as the standard and adjusted accordingly.
Manual
Regardless of what elements are within a slide, it sets to play only for the specified time. Usually, narration or video is the standard, but understanding the concept of time in Videostew is important, and it is used only to modify the duration for constructing different effects.
Transition Effects
The transition effect refers to the animation that plays when moving to the next slide. After selecting the desired transition effect, you can instantly preview how it looks through the preview feature, allowing you to quickly check with your own eyes.
Transition Effects Time
Edit screen > Slide Properties on the right > Transition and duration > Transition effect duration
The transition-effect duration is the time the animation keeps running. For example, if you want the "Cube" animation to appear a bit slower, insert 10 seconds, press Preview, and verify it with your own eyes.
For reference, the transition-effect duration cannot exceed the slide's total duration.
Narration
Edit screen > Slide Properties on the right > Narration
Sets the type and properties of the narration used when the slide is recreated.
Type
Edit screen > Slide Properties on the right > Narration > Type
Select the type of narration to be used in the slide.
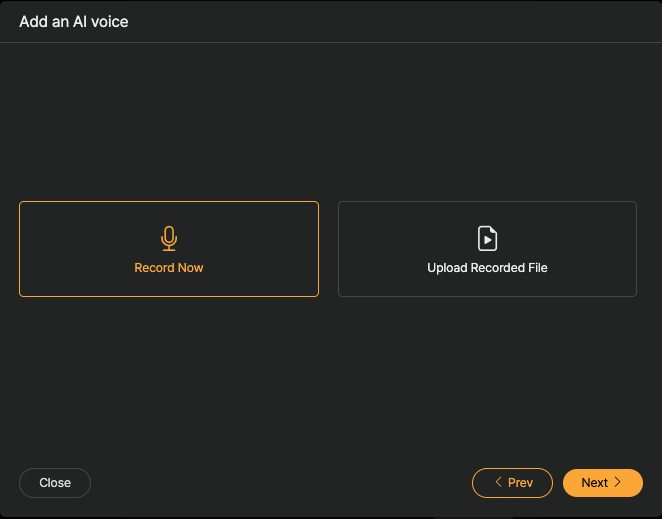
Upload: Upload an MP3 file to use.
Record now: Record your own narration right now and use it.
AI Voice: Use the TTS provided by Videostew.
Upload
Edit screen > Slide Properties on the right > Narration > Type:Upload
You can upload pre-recorded MP3 files. Use the trim feature to precisely insert 'fade in' intervals for each slide. Click here for a detailed introduction to the trim feature.
Trimming
Edit screen > Slide Properties on the right > Narration > Type:Upload > Trim
While checking the format of the uploaded audio file, you can set the regeneration interval for each slide or have it automatically generate gaps.
Voice Recording
Edit screen > Slide Properties on the right > Narration > Type:Voice recording
You can record your voice directly on the website. The recording continues seamlessly, allowing you to time it just right to move on to the next slide. For a splendid content creation method using the voice recording feature, please refer to [Using the Voice Recording Feature].
Trimming
Edit screen > Slide Properties on the right > Narration > Type:Voice recording > Trim
If you want to regenerate only a specific section within a noisy timeline, adjust this setting
AI Voice
Edit screen > Slide Properties on the right > Narration > Type:AI Voice
Voice
Edit screen > Slide Properties on the right > Narration > Type:AI Voice > Voice
You can change the AI voice. Select the entire slide to change the voice for the whole presentation, or apply a different voice to each slide individually.
You can search and apply the AI voice you want by language, emotion, age, gender, etc.
Table of contents detailed information
Videostew uses TTS provided by ElevenLabs, Humelo, Google Wavenet, Amazon Polly, Naver Clova, and Microsoft Azure.
You can set up complex search criteria based on each engine, such as gender, age, emotion, atmosphere, and language, allowing you to quickly find the voice you want.
Pro Tip: Each slide will have AI-generated voice. Follow the guidelines to ensure each slide has a completed sentence. Use the enter key to provide line breaks and apply [text appearance effects] to create a natural flow.
Provided languages
Korean, English, Chinese, Spanish, Hindi, Arabic, Bengali, Portuguese, Russian, Japanese, German, French, Turkish, Malay, Tamil, Thai, Vietnamese, Urdu, Persian, Italian, Thai, Gujarati, Polish, Ukrainian, Dutch, Greek, Swedish, Romanian, Hungarian, Danish, Finnish, Slovak, Norwegian, Hebrew, Malay, Czech, Bulgarian, Slovenian, Lithuanian, Latvian, Estonian, Croatian, Malayalam, Kannada, Welsh, Irish, Basque, Icelandic, Swahili, Filipino, Mongolian, Maltese, Catalan
Speed
Edit screen > Slide Properties on the right > Narration > Type:AI Voice > Speed
Change the reading speed of AI voice. Generally, readers prefer a speed of 120% - 130%, but it can vary depending on the characteristics of the AI voice, so you can decide while pre-listening.
After regeneration
Edit screen > Slide Properties on the right > Narration > Type:AI Voice > Mute after playback
You can use this when you want to read all the AI voice in one slide and add a slight pause. By setting the time to around 0.5 seconds, you can prevent it from moving to the next slide too quickly.
Conversely, if you think the mute time increases when moving to the next slide, you can set it manually. It supports up to -0.2 seconds, and generally, -0.1 seconds will give a slightly faster transition.
Manual text placement
Edit screen > Slide Properties on the right > Narration > Type:AI Voice > Manual text input
When you enable the automatic text designation toggle, you can adjust the content to be read however you want, independent of the text shown on the screen.
It is generally used when you want to display only the words on the screen and read the detailed content separately, or to adjust the pronunciation.
Playback Time
Edit screen > Slide Properties on the right > Narration > Type: AI Voice > Playback time
If the AI voice does not reach the end due to a network issue, or if the voice length is not calculated correctly, press the "Recalculate" button to regenerate the AI voice and reset the duration of each slide.
Slide Repeat Playback
Edit screen > Slide Properties on the right > Narration > Type: AI Voice > Slide repeat playback
When you enable the slide repeat toggle, the same sentence is read repeatedly when it appears in multiple slides.
For example, it can be used when intentional repetition is required in educational videos.
Voice Cloning
Edit screen > Slide Properties on the right > Narration > Type:AI Voice
In addition to the AI voices provided by Videostew, you can directly create and use TTS that has learned your voice.
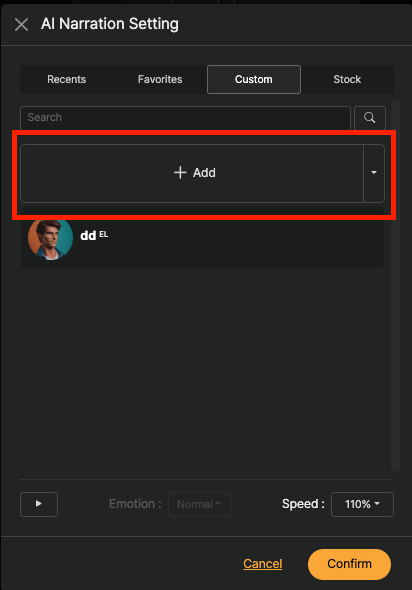
You can start recording your voice by clicking the 'Add' button on the custom tab. You can record in real-time on the website, or you can upload a pre-recorded file.
When recording, reading just five sentences is sufficient. When uploading a pre-recorded file, please upload an audio file that is longer than 15 seconds.
The reason for using voice-cloned TTS is to present a natural-sounding voice. Therefore, it is more effective to create a natural TTS without using professional recording equipment. It is also beneficial if the speaking style you frequently use comes out naturally. If you plan to create conversational content, please record a naturally conversing voice.
The cloned voice is tied to the workspace. If you want to use the AI voice you created in another workspace, press the Settings (▼) button next to the Add button and bring the voice you own to the other workspace via the “Import Voice from Another Workspace” button.
User Dictionary
When the AI voice reads proper nouns like personal names, brand names, or English loanwords awkwardly, you can directly specify the desired pronunciation.
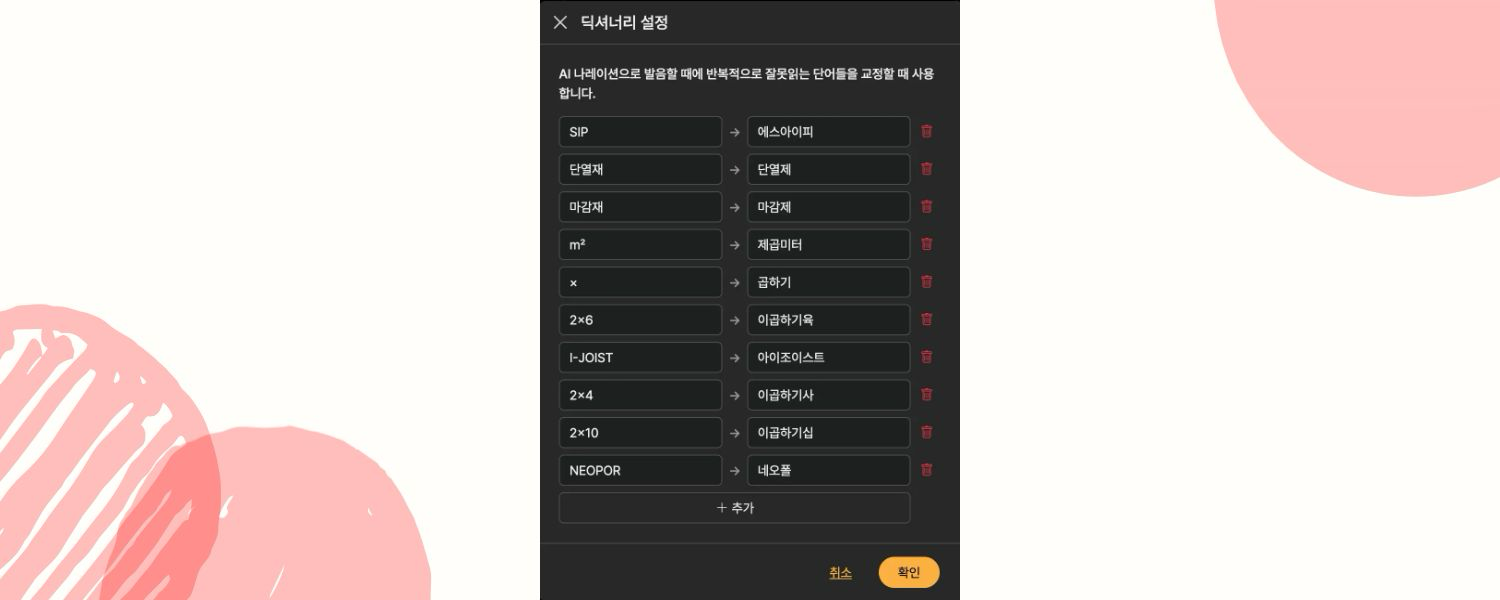
User-defined dictionaries can be managed separately for each workspace.
Sound Effects
Edit screen > Slide Properties on the right > Effects
Sets the effect that is regenerated when a slide starts. By default, the effect continues to regenerate until the slide ends, even if it is longer than the slide duration.
Type
Edit screen > Slide Properties on the right > Effects > Type
Clicking "Select" allows you to apply a sound effect to a slide. You can find sound effects by genre, and it is convenient to select while listening to previews by hovering the mouse. If you wish to remove a sound effect, select "None" after making your selection.
Volume
Edit screen > Slide Properties on the right > Effects > Blur
Change the speed of the sound effect. You can adjust it appropriately while listening to other elements through the preview.
Slide Repeat Playback
Edit screen > Slide Properties on the right > Effects > Slide repeat playback
If the same effect is applied to multiple slides, this option allows it to be regenerated repeatedly each time the next slide starts.
In the inactive state, the image is judged to have the same element (effect) continuously present on the slide, so it is regenerated only once.
Matching Slide Playback Duration
Edit screen > Slide Properties on the right > Effects > Match playback to slide
Activating this option will naturally fade out the effect if the effect's duration is longer than the slide's playback time, without exceeding the duration of the slide.
Background Music
Edit Screen > U-mute Slide Properties > Background Music
You can set background music that is used throughout the entire project and background music that is used only in specific slides.
Slide Background Music
Edit Screen > U-mute Slide Properties > Background Music > Select
After pressing the "Select" button, you can preview the music and apply it; if the same audio is already used in consecutive slides, it will continue seamlessly.
Volume
Edit screen > Slide Properties on the right > Background music > Volume
You can decide on the appropriate volume while previewing.
If the original audio is separate and you are only adjusting the volume, the global background music will automatically apply fade in/out effects, so the volume is adjusted smoothly.
Background Color
Edit screen > Slide Properties on the right > Background color
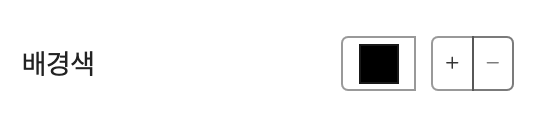
You can change the slide's background color from the default (black) to a different color. Additionally, you can add other colors by clicking the '+' button and specify gradient effects.
Recent
Edit screen > Slide Properties on the right > Background color > Recent
The colors recently used are displayed.
Favorites
Edit screen > Slide Properties on the right > Background color > 즐겨찾기
Frequently used colors can be added to Favorites for easy access. Favorites are managed separately for each workspace.
User
Edit screen > Slide Properties on the right > Background color > 사용자
< Add Custom Color >
Click the '+' button to directly add a custom color. You can easily find and add the desired color using the color spectrum in the 'Add Color' window.
Stock
Edit screen > Slide Properties on the right > Background color > 스톡
There are about 140 default colors prepared in the color palette. Selecting a color will apply it to the background of the slide, and you can also change the colors of multiple slides at once. Please refer to [Edit Multiple Slides at Once] for how to edit multiple slides simultaneously.
Properties by Element
If more than one element is selected in the Editing Window, the properties of the selected element can be changed in the Properties Window on the right.
Common Components
Auto Layout
< Automatically Construct Layout >
Automatically layout components. You can layout each [Whole], [Left/Right 1/2], [Left/Right 1/3], [Top/Bottom 1/2], [Top/Bottom 1/3], and change the layout by clicking a button multiple times.
Style and Position
You can finely adjust the transparency, outline, and color of the selected element.
Opacity
Select element > In the right Properties Window, [Shape and Position] > Change transparency
Change the opacity of the component. Generally, you can insert a transparent PNG file and change its opacity.
Border
Add a border to a specific component. You can change the thickness and color of the border.
Blend Mode
In blend mode, you can mix several overlapping components to create various visual effects.
Adjustment Preset
You can set the various effects that appear on images or videos in detail, and easily apply the effects through presets.
Flip
Applies a flip effect to the inserted images or video clips.
Animation
Sets the element's animation.
Entrance Effect
Sets an entrance animation such as fade-in or slide-in without adjusting the position.
Type
Sets the animation when the element first appears in the slide.
Video Components
Internal display
Determines how to display when the element's size on the slide differs from the actual content's internal size.
Fill Display
The video fills the specified container (red border) to match its size. (Some parts of the video may be cropped depending on the original size of the video; you can adjust the position or enlarge the video by double-clicking.)
Contain within borders
< Adjust the internal display method by zooming in >
The video is displayed at the maximum size within the bounds of the specified container (red border).
Original Ratio
Ignore the existing settings and change the container (red border) size to the original size of the video.
Volume
Change the length of the included sound effect. Via Preview, you can appropriately adjust the background music, sound effect, or AI voice volume. Setting it to 0 % will mute the sound effect.
Speed
Change the playback speed of the video clip to faster/slower. You can change the speed from 20% up to 500% compared to the original speed (100%).
Repeat
Select the part of the video clip to repeat when the slide length is longer than the video clip length. The default setting is 'Infinite repeat', and you can toggle the button to set the number of repeats. If it's set to 'Repeat once', the video clip will stop at the last scene and continue to play the slide if there is remaining slide playback time.
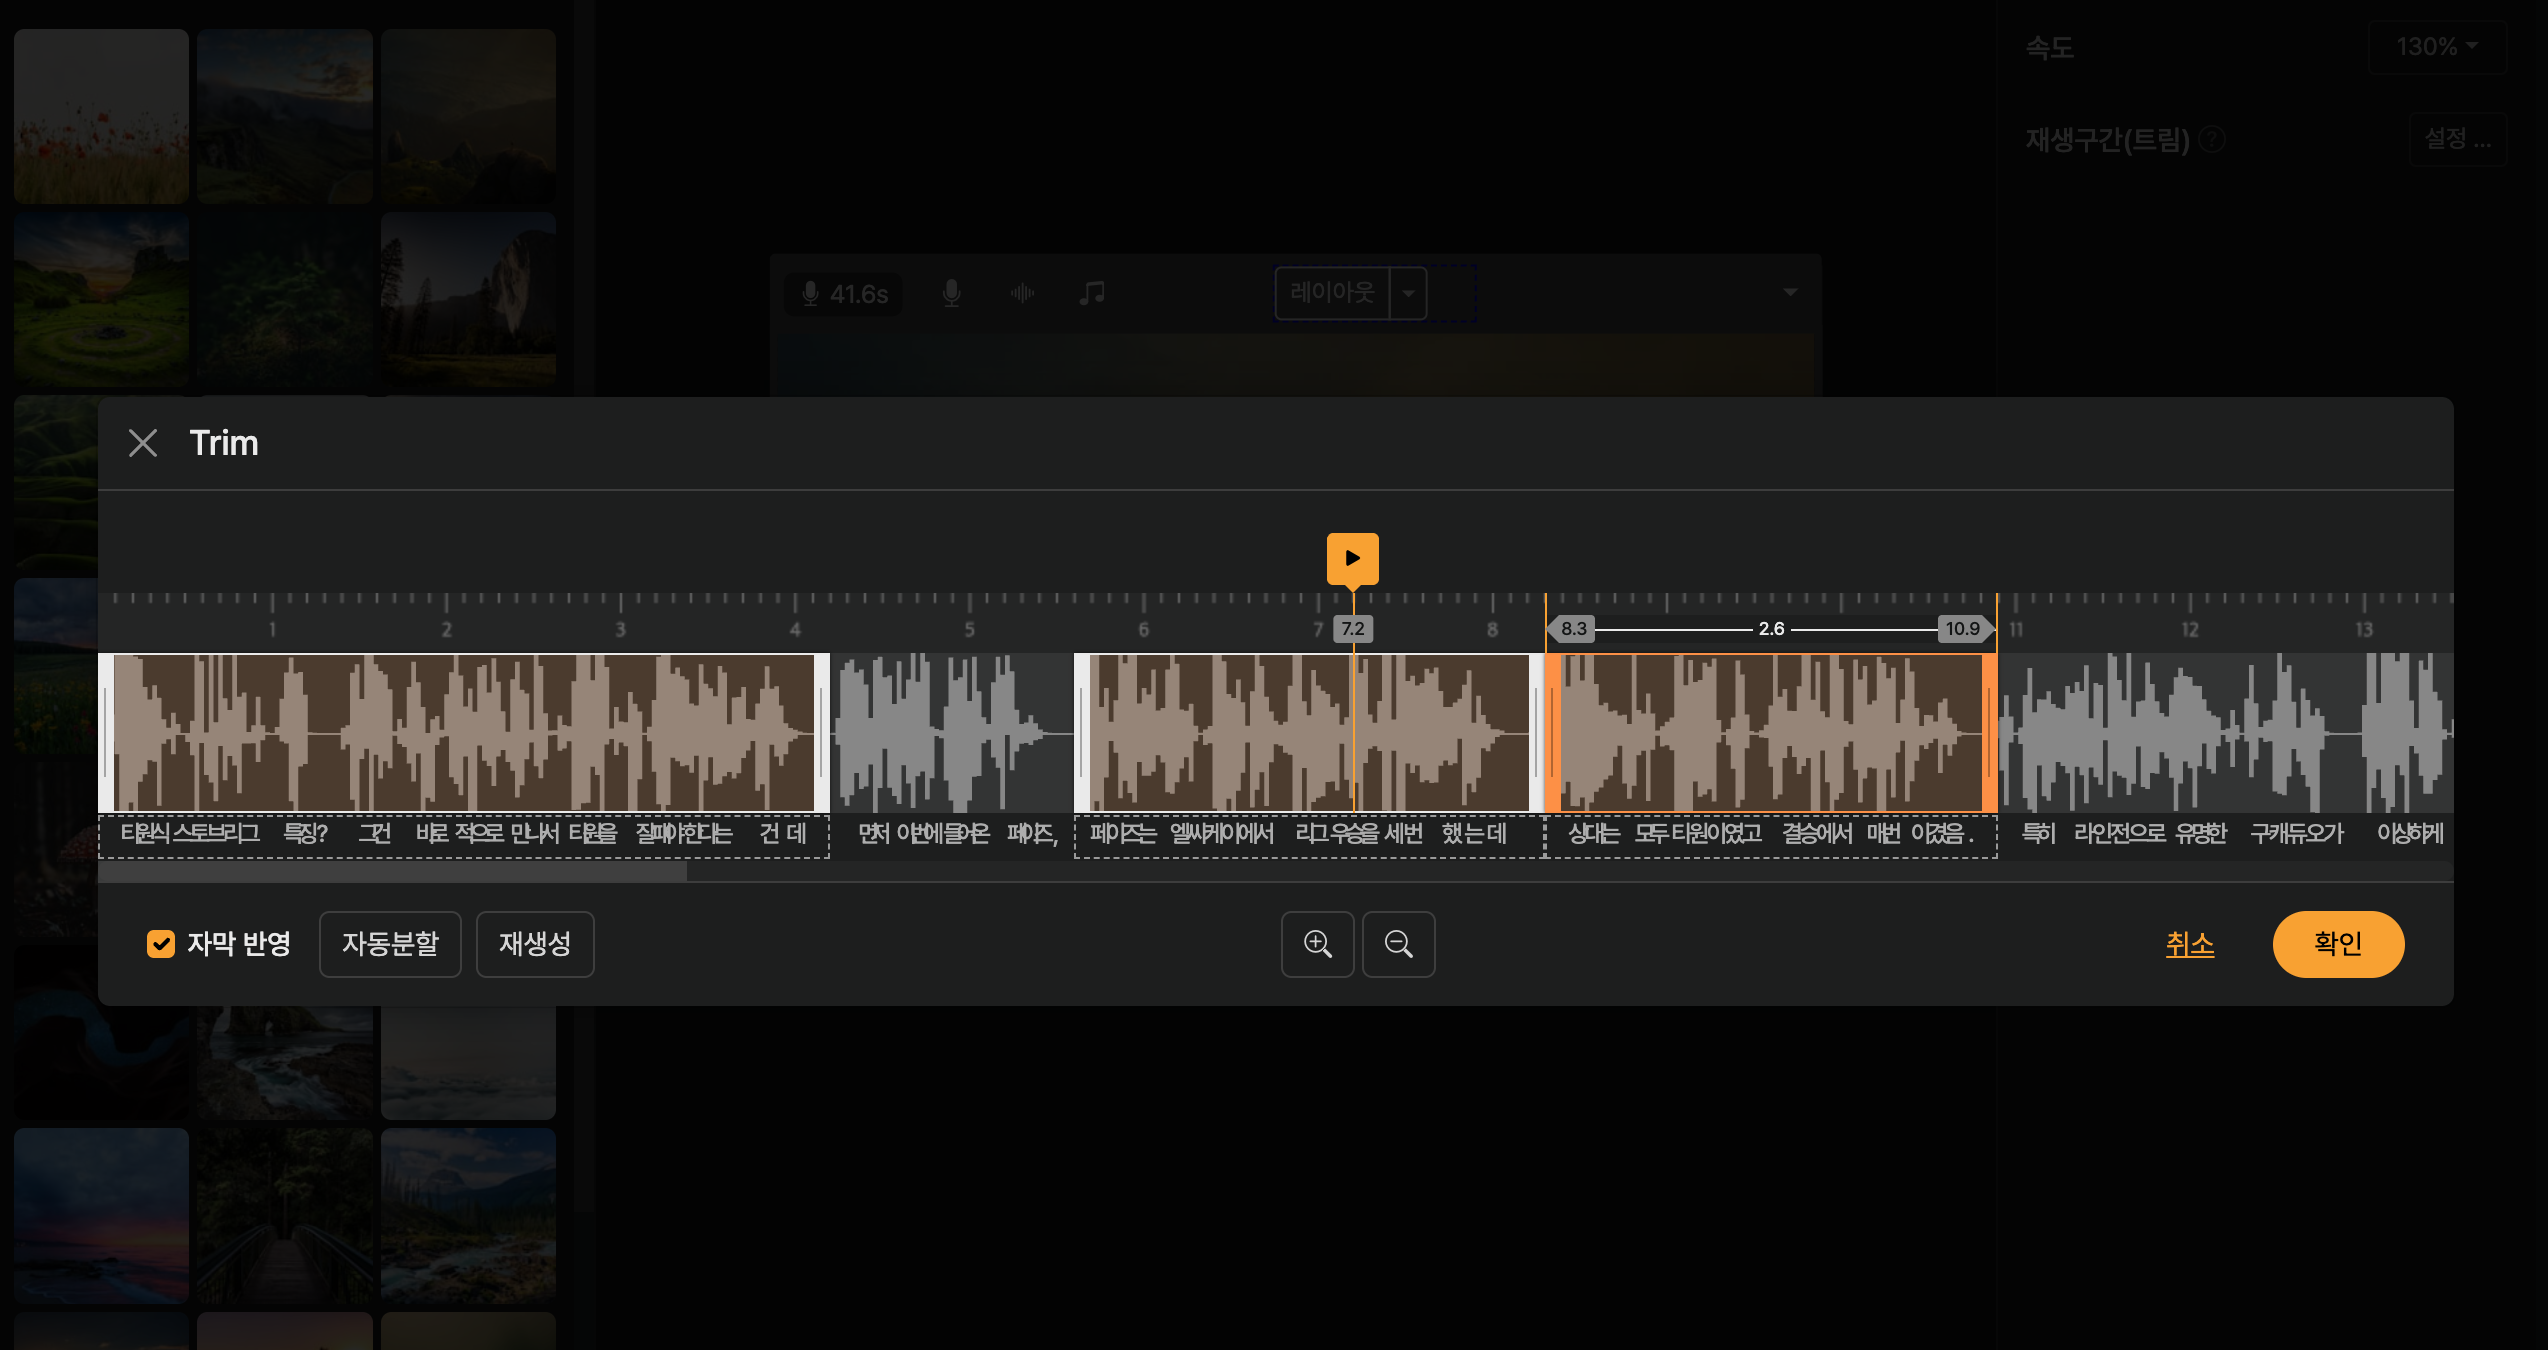
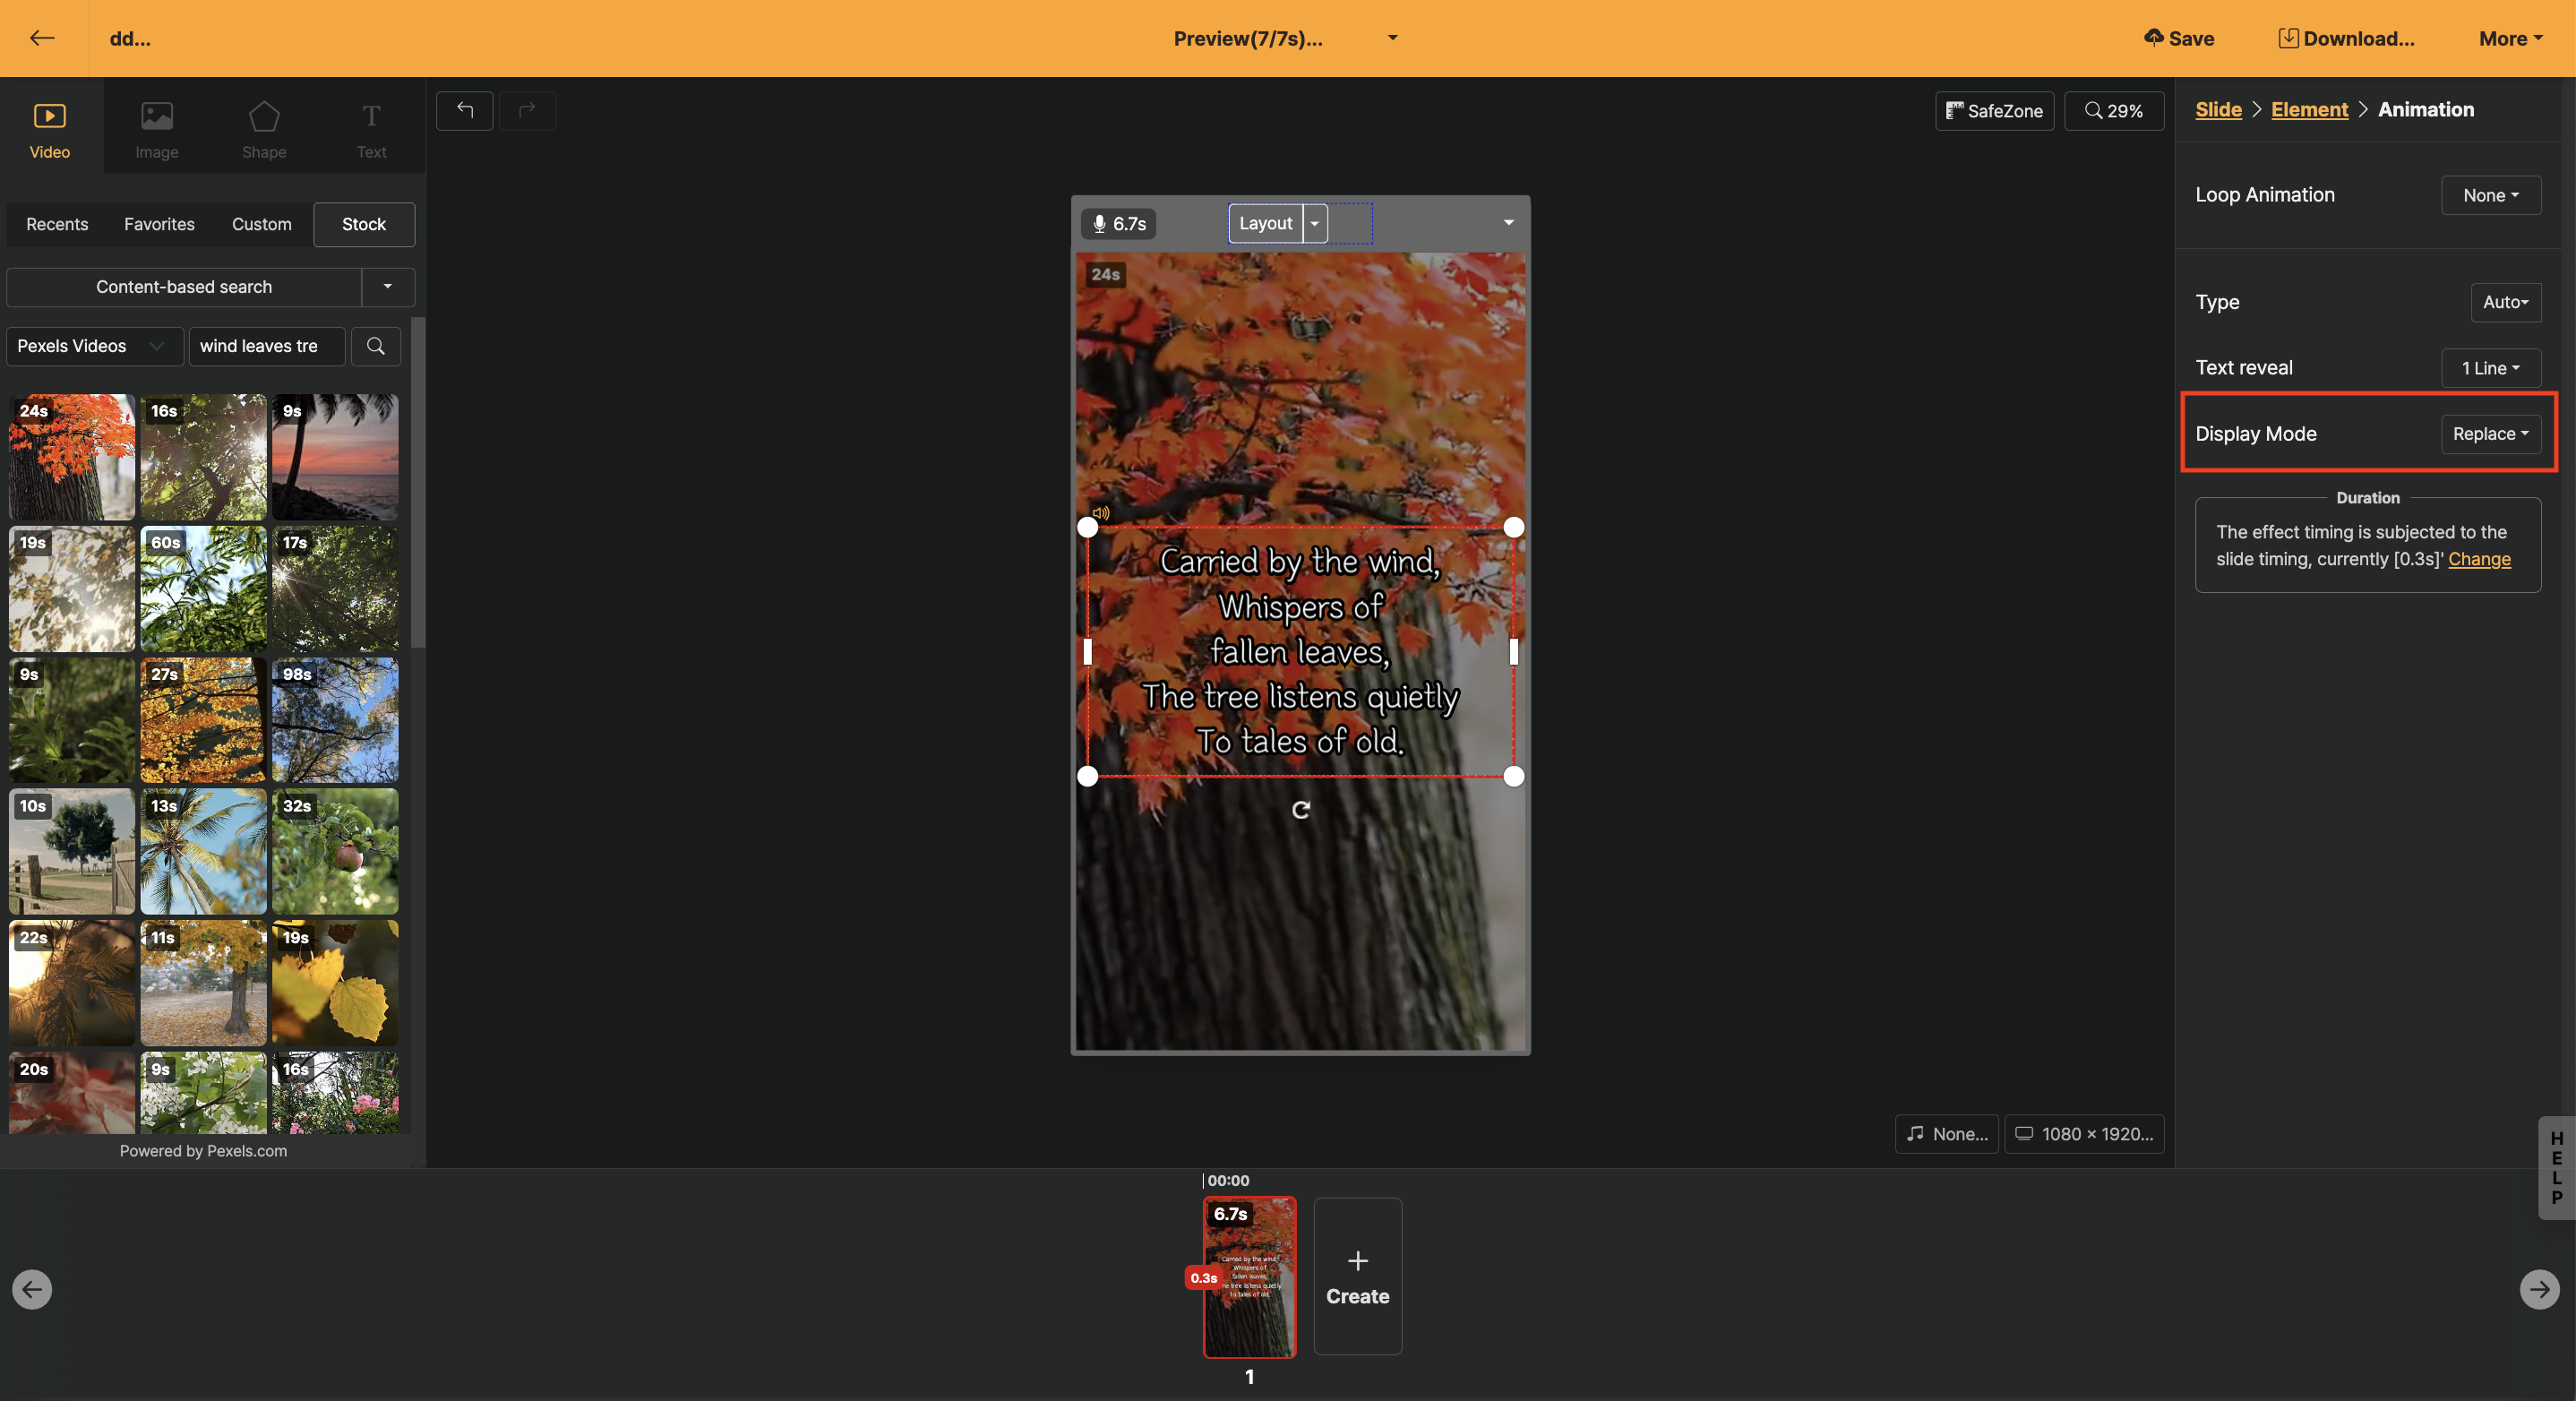
Regeneration Interval (Trim)
You can automatically change the start and end ranges of a video clip. For example, if the video is of someone speaking, you can set a range that will be re-created for each slide according to the speaker.
You can also set up automatic pauses for clips that have audio.
Open the playback interval change screen
Select the video inserted on the slide and click on the right side to adjust the playback interval.Trim the interval (Trim)
In the preview, you can drag the portion you want to show for each slide to set it. A new slide is added at each marked interval.Shortcut key guide
You can edit the video playback interval more conveniently using shortcut keys.
| Shortcut Key | Role |
|---|---|
s/double-click |
Splits the slide at the mouse-positioned interval. |
+ |
Expands the trim timeline. |
- |
Contracts the trim timeline. |
space |
Plays from the selected portion. |
j |
Moves the start point of the selected region forward by 0.1 seconds. |
k |
Moves the start point of the selected region backward by 0.1 seconds. |
l |
Moves the end point of the selected region forward by 0.1 seconds. |
; |
Moves the end point of the selected region backward by 0.1 seconds. |
Image Element
Internal display
You can set how elements appear on the screen.
- Fit to screen: Displays the image to fit exactly within the set size.
- Fill & Align: Ensures the entire image area is visible within the set size.
- Original ratio: Changes the selection window size to match the image's original dimensions.
Fill Display
The image is displayed to fill the specified container (red outline). (Some areas may be cropped depending on the original size of the image, and you can adjust the position or enlarge the image by double-clicking it.)
Fit to Match
The original size of the image is adjusted to fit the specified container (red outline).
Original Ratio
Ignore the existing settings and change the container (red outline) size to the original size of the image.
Internal Display Detailed Settings
Direction
| Menu | Description |
|---|---|
| Auto (default) | Automatically applies an appropriate crop effect according to the image's ratio or how much the user has enlarged it |
| Expand | When you enlarge a certain area with the image expansion function, the specified area is expanded as the slide is regenerated. |
| Shrink | When you enlarge a certain area with the image expansion function, an animation that shrinks a certain part according to the moving range is created. |
| To the left | Applies a panning effect that slowly moves the image to the left. |
| To the right | Applies a panning effect that slowly moves the image to the right. |
| Upward | Applies a panning effect that slowly moves the image upward. |
| Downward | Applies a panning effect that slowly moves the image downward. |
Move Range
The [Automatic] option is the default and you can finely adjust the moving range.
Margin
This menu allows you to fine-tune animations when images are panned or enlarged/shrunk. You can specify movements separately from the overall project-applied [Ease (movement effect)]. In the case of Kenbun effects, the default setting linear works best.
Shape Element
Color
You can change the color of the inserted shape. You can also add a different color by pressing the "+" button and specify the gradient effect.
Text Element
Double-click Mode
When you double-click on a text element in the Editing Window at the center, it switches to an editing mode where you can modify the content. When you select part of the text in this editing mode, a toolbar appears below, with each function as follows:
< When entering editing mode, a toolbar appears >
| Button | Function |
|---|---|
| B | Applies bold effect to the selected text area. |
| I | Applies italics effect to the selected text area. |
| U | Adds an underline to the selected text area. |
| S | Add a cancellation line to the selected area of the text. |
| A | Changes the color of the selected text area. (Choose from default colors and recently used colors) |
| A | Changes the background color of the selected text area. (Choose from default colors and recently used colors) |
| Tx | Removes all applied effects. |
< Change the color of some text characters >
Text Animation
You can set various animation effects for text elements. The duration that the applied animation takes to appear is as long as the [Transition Duration] on the slider. Therefore, if you want the animation to appear slowly, increase the [Transition Duration]. The functions that can be set in the text animation menu are as follows:Repetition Effect
Specifies a repetitive motion for the text. The available repetition effects are as follows. Once an effect is set, a menu to set the "Stop Motion Effect" function appears.| Repetition Effect | Description |
|---|---|
| None | Removes all repetition effects |
| Wiggle | |
| Bounce | A bouncing effect |
| Shake | |
| Up and Down | |
| Left and Right | |
| Swing | |
| Clockwise | The element continues to rotate clockwise |
| Counterclockwise | The element continues to rotate counterclockwise |
Types
Sets various text animations. After setting, you can preview it directly through the Preview slide.
| Animation | Description |
|---|---|
| Automatic | The default setting option applies a morphing effect |
| Sliding | An effect of sliding from the side |
| Expansion | An effect of expanding in one direction |
| Cube Rotation | An effect of rotating with a cube-like face |
| Flip | A flipping effect |
| Paging | |
| Page Turn | |
| Circle Appear | An effect of a circle gradually getting larger or smaller while appearing |
| Clock Appear | An effect of a circle filling up like a clock while appearing |
| Unfold | An effect of appearing bit by bit from one direction |
| Fade in Slowly | An effect of gradually appearing from a blurred state |
| Pop | An effect as if the element pops onto the screen or jumps out |
| Pop Spin | An effect as if the element spins and pops onto the screen or jumps out |
Text appearance effect
After selecting the text element, select 'Animation > Text appearance effect' to set the way texts in a slide are displayed.
In the editing screen, there are various types of texts in a slide, and it has the function to display them well.
| Text Registration Effect | Description |
|---|---|
| Entire | One text block appears at once |
| Line by Line | Text appears line by line according to the line break within the text block |
| Two Lines at a Time | Text appears two lines at a time according to the number of lines in the text block |
| Paragraph unit | Visible separation of paragraphs (enter) within the text block |
Display Style
When you set the option called "1 line" in the text animation effect, the "Additional Style" menu appears. Please refer to the image below for the styles that show each option.
< Swap >
A new text appears with animation effects, continuing in one line (or two lines depending on the settings) at the same position.
< Attach >
More lines appear based on [Vertical Alignment], either one line at a time (or two lines at a time). [Vertical Alignment] is most naturally used when fixed "above".
Auto-read
If AI Voice is applied to the slide narration, all the text on the screen will be read sequentially.
If you have text you want read aloud automatically, select the text element and turn on "Auto-read". For other ways to have included text read aloud without completely muting the screen, please refer to [Text Auto Settings].
Readability Enhancement
Voice enhancement is a feature that uses the ‘text highlight’ function to change settings so that the text on the screen can be read clearly. You can apply effects such as "None", "Box Background", "Line Background", "Outer Line", and "Shadow".
Additionally, the color of the box and outline can be changed in the "Readability color" menu.
Automatic Slide Division (deprecated)
The "automatic slide separation" feature can be set in Text Animation's [Text Appearance Effect].
Slide division can be set as "One line at a time", "Two lines at a time", [Paragraph unit], and when [Automatic Slide Division] is applied, it will be displayed as shown below.
< Preview of Automatic Slide Division application >
Font Family
You can select the desired font family to change the font. The font library is organized into tabs such as "Recent", "Favorites", "User", and "Stock".
To change the font family of multiple slides at once, please refer to the content of the Edit multiple slides at once action.
Color
Change the color of the entire text element. All colors of the text box will change, and you can combine up to three colors to create a gradient effect.
To change the color of some text, drag the desired text and use the inline editor that appears at the top.
In the inline editor, you can choose from the basic colors and the recently used colors. If there is a color you want, set it once as the background color, and it will appear in the recent colors.
Alignment
Change the alignment of the text within the box to "Left", "Center", or "Right".
Size
You can change the font size from 10 px to 256 px. For vertical short-form video content, we recommend using 80 px to 90 px.
Margin Left/Right/Top/Bottom
Change the size of the left and bottom margins of the text box.
Line Spacing
Change the line spacing when multiple lines of text are entered into a text box.
Letter Spacing
Adjust the spacing between letters. It can be changed from -40% to 200%, with 0% being the default value.
Horizontal Alignment
You can change the alignment within the text box. Alignment can be set to "Left", "Center", or "Right".
Horizontal Alignment
Changes the vertical alignment inside the text box. The default option is "Auto", and you can set it to "Top", "Middle", or "Bottom".
If text looks staggered across multiple slides, align them all at once by matching the position of the text box on one slide as the reference.
Height lock
Activating height lock adds handlers to the top/bottom of the box, allowing you to change the height of the text box.
Generally, when using text boxes in auto mode, even if the text is one or two lines, you can maintain the same box size.
Shortcut Key Information
Editing with just a mouse can be limiting for quick operations. Therefore, Videostew provides various keyboard shortcuts for common editing tasks, which can be used alone or in combination with the mouse.
| Area | Shortcut | Description |
|---|---|---|
| General | Space |
Execute/Close preview of the selected slide |
| General | Ctrl+S |
Save project |
| General | ESC |
Close modal window, cancel operation, deselect |
| Entire | Ctrl+Z |
Undo action |
| Entire | Ctrl+Shift+Z |
Redo action |
| Editing Window | Space+Drag |
Move stage view |
| Editing Window | Ctrl+Click |
Select/Deselect multiple elements |
| Editing Window | Ctrl+C |
Copy selected element (includes style copy) |
| Editing Window | Ctrl+V |
Paste copied element |
| Editing Window | Ctrl+Alt+V |
Paste copied element with style only |
| Editing Window | After selecting an element L/R/U/D |
Move position of selected element |
| Editing Window | After selecting an element Shift+L/R/U/D |
Move position of selected element by 1 pixel |
| Slide window | Ctrl+Click |
Select/Deselect multiple slides |
| Slide window | Shift+Click |
Select range of slides |
| Slide window | Left |
Select previous slide |
| Slide window | Shift+Left |
Extend selection to previous slide |
| Slide window | Right |
Select next slide |
| Slide window | Shift+Right |
Extend selection to next slide |
| Slide window | Ctrl+A |
Select all slides |
| Properties Window | When recording Right |
Change to the next slide |