It's important to know what each button does, but it's also essential to understand how the operations work and how the workflow proceeds.
As mentioned in Slides and Elements, a project is made up of multiple slides. These slides contain content, and as they play in sequence, they make up your video.
Selecting slides is done by clicking with the mouse. When you click on the desired slide in the Slide Window at the bottom, the content in the Editing Window in the center changes to the current slide.
In the Editing Window, when no element is selected, you can change slides with the keyboard. Pressing Left or Right will switch the selection to the previous or next slide.
With the Ctrl key pressed, selecting a slide that is not the current one will add it to the selection, along with the current slide.
With the Shift key pressed, selecting a slide that is not the current one will select all slides in the range between the current slide and the slide clicked with Shift.
In the Editing Window, when no element is selected, using Shift+Left/Right with the keyboard also selects a range similarly.
Aside from Range Slide Selection, there is an easy way to select all. In the Editing Window, when no element is selected, press Ctrl+A to select all slides.
In the Slide Window, you can add a slide by clicking the "Add" button located on the right side of the last slide. Typically, when adding an element, it's not added completely new, but rather, you often modify parts of the content from the slide just before, right? Therefore, when you add a slide, it automatically "copies" the previous slide.
After selecting the slide you want to copy in the Editing Window, press the Enter key and the selected slide will be immediately copied behind it.
Select the slide you want to delete in the Editing Window and press the Delete key to delete the selected slide.
After selecting the slide you want to reorder, you can drag it with the mouse to the desired position. This also allows you to select multiple slides at once and change their order in bulk.
< Changing the Position of Slides >
What would a slide be without any content? You need to insert elements like images or text into the slide to create content for the video.
Elements can be selected by clicking on the desired element in the central Editing Window.
While holding the Ctrl key, if you select a different element that is not currently active, the newly selected element will be added to the selection along with the current one. This can be combined with Select Elements by Range below to add or remove elements more flexibly.
If the elements you want to select are gathered in a certain area, you can activate the range selection by clicking and dragging from an empty space with your mouse. Continue dragging until the desired elements are within the selection box.
< Example of Selecting by Range >
There are several ways to add elements to a slide.
Click on the desired library from the Library Window on the left side, and the corresponding type of element will be added to the Editing Window.
You can also add a new element by using [Copy Element]. After selecting the element you want to copy on the current slide, or an element from another slide, press Ctrl+C, then go to the desired slide and press Ctrl+V. The same element will be copied and added.
If you have videos, images, or font files on your computer, you can upload them. Select the desired file from the explorer (or finder) and drag and drop it onto the Videostew editing screen. If you cannot drag and drop, select the desired type from the Library Window on the left side, choose "User" and click the "+ Upload" button to select files.
There are many ways to edit elements.
This is how you modify an element itself. The Library implies content in the case of videos or images, shape in the case of figures, and font in the case of text. Select the type and sub-tab you want to modify in the Library Window, click on the desired library, and drag the element of the same type you want to modify onto it. It will then be replaced with a new element.
All elements in the [Editing Window](/guide/edit/view/stage) can be moved and resized after selection. Size changes can be made using the four handles in the corners, or by using the diamond-shaped handles to change the size proportionally. To adjust the position, simply drag the element to the desired location.
Some operations can also be done using the keyboard; after selecting the element you wish to change, pressing the `arrow keys` will adjust its position. Additionally, pressing `Shift` along with the `arrow keys` allows for fine-tuning the position by 1 pixel at a time.
Adjustments can also be made by double-clicking an element in the [Editing Window](/guide/edit/view/stage). Depending on the type of element, different modes will be activated.
- Video and Image: Within the current size of the element, you can adjust the visible size and position internally.
- Shapes: No particular incidents will occur.
- Text : You can edit the content itself or select a part to change its color, add a bold effect, cancel selection, etc. For detailed explanation about the tool, please refer to [텍스트 요소].
Each element has various properties. When you select an element in the [Editing Window](/guide/edit/view/stage), various options that can be changed in the [Properties Window] on the right will appear. You can see detailed descriptions of each element through the [element-specific properties] guide.
After selecting the element you want to copy from the current slide, or an element from another slide, press `Ctrl`+`C`, and then press `Ctrl`+`V` on the desired slide to add a duplicated element.

< Copy Method >
At this time, select the element to be copied and press `Ctrl`+`C` to perform a general copy first. Then, select the element where you want to apply the style copy and press `Ctrl`+`Shift`+`V`. This will allow you to see all properties copied except for the library or content.
If there's an element in the slide you don't want, click on the element you wish to delete in the [Editing Window](/guide/edit/view/stage), select it, and then press the `Delete` key on your keyboard to remove it.
Most of the properties are applied slide-by-slide, but there are properties that are applied to the entire project you are currently working on. Would you like to see what elements are available?
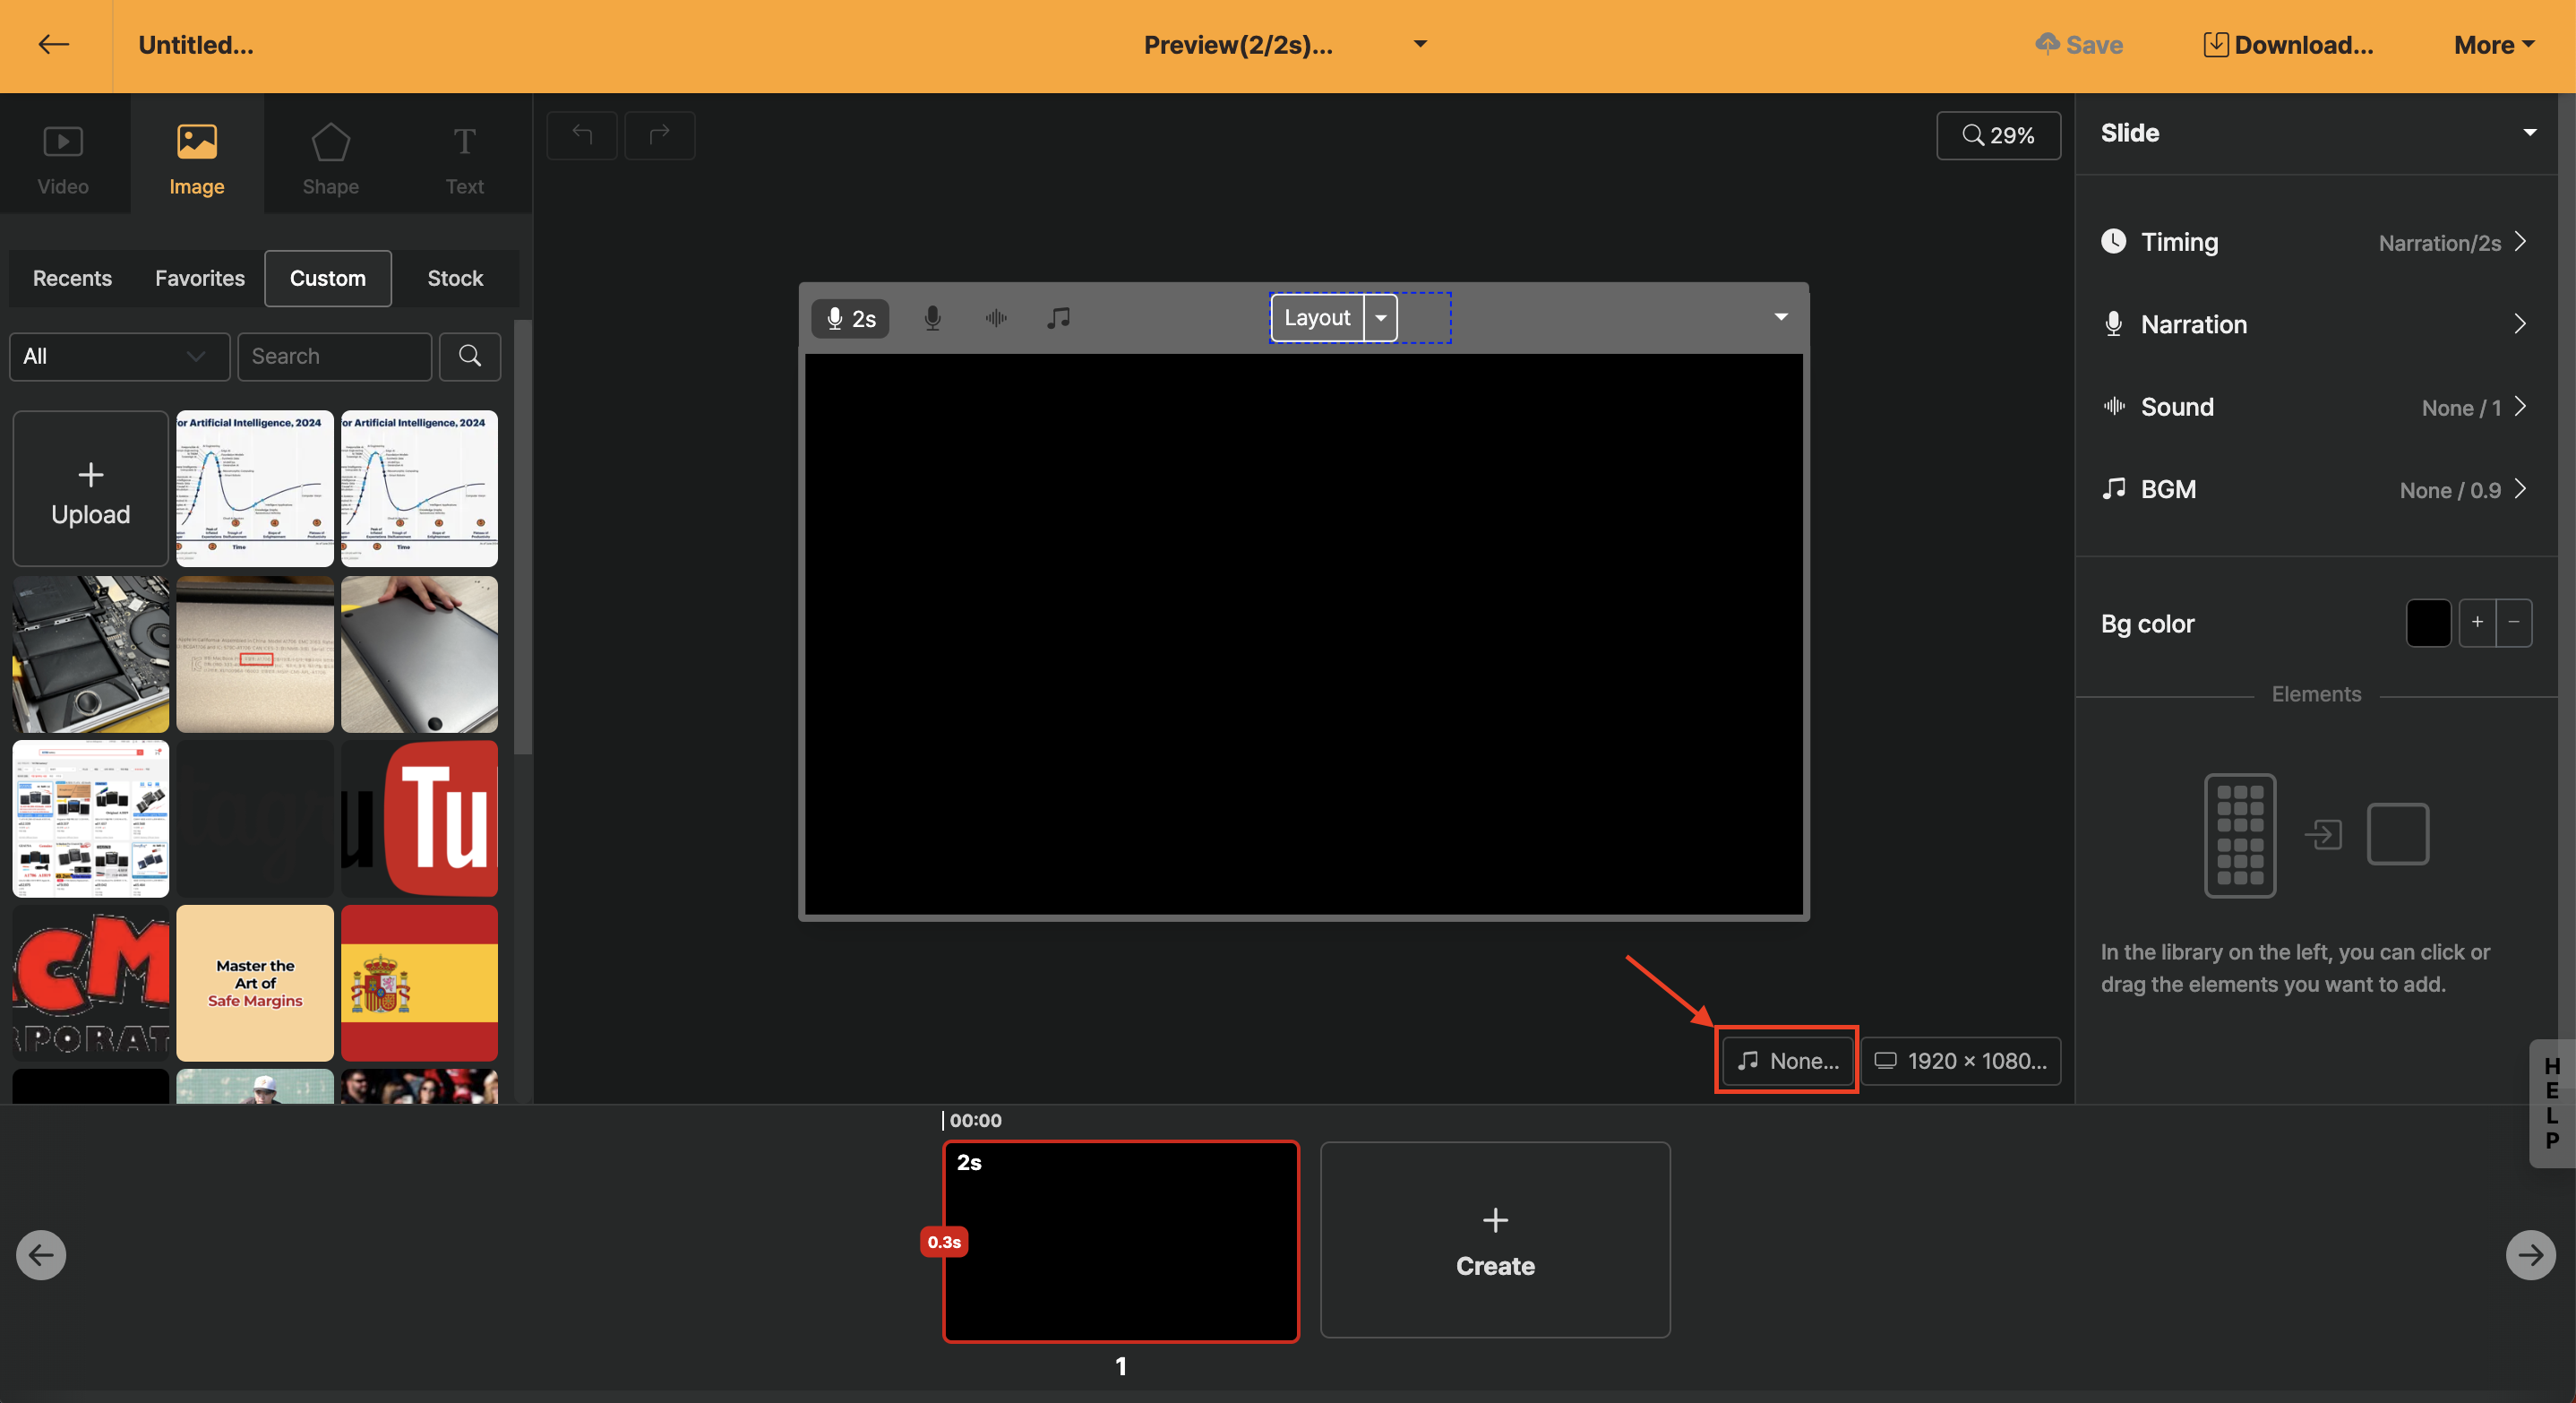
Global BGM allows you to set the music that is played by default in the project, and it is designed to fade out naturally at the end point.
The music applicable to the entire project can be output through the BGM icon at the bottom right stage. If you want to play a different BGM only on certain slides, please refer to the [Slide BGM](/guide/edit/basic/slide-bgm) guide.
Clicking the [All] button allows you to set categories by genre and mood; it's convenient to make a selection while previewing by holding the mouse over it.
You can change the overall volume through [Global Volume] for BGM volume. Generally, it is good to set it to 20% when AI voice is applied. Adjust it appropriately so that the narration can be heard well while [previewing].

Hovering the mouse over the music and pressing the settings (▼) button reveals a "Similar Style Search" option. This feature allows you to receive recommendations for tracks that are similar to the music you are currently listening to.

Selecting the music title next to the play button will provide detailed information about the sound, and the text can be copied.

You can change the size of the project. In addition to the default sizes provided, you can also set your desired size directly through the "User" tab.

This setting is applied to the entire project and can change the feeling of animation movement. Click the 'Change' button to modify the movement effect of the animation as desired.
You can change the time a slide is displayed automatically or manually.
You can change the time a slide is displayed before moving to the next slide. The default playback time for a slide is determined by the content within the slide. For example, if a narration is set on a slide and it's set to 'Use the duration of this narration as the standard', the slide playback time changes accordingly as the narration changes. Each standard is as follows.
If there is a narration in the slide, the duration of that narration is used as the standard. If the narration is the standard but there is no narration, a default of 3 seconds is provided. If a specific segment is set to play only with settings such as trim for the narration, only that duration will be played.
If a video is embedded in the slide, the duration of that video is used as the standard. If a specific segment is set to play only with settings such as trim for the video, only that duration will be played. In the case of multiple videos, the most important video is automatically determined as the standard and adjusted accordingly.
Regardless of what elements are within a slide, it sets to play only for the specified time. Usually, narration or video is the standard, but understanding the concept of time in Videostew is important, and it is used only to modify the duration for constructing different effects.
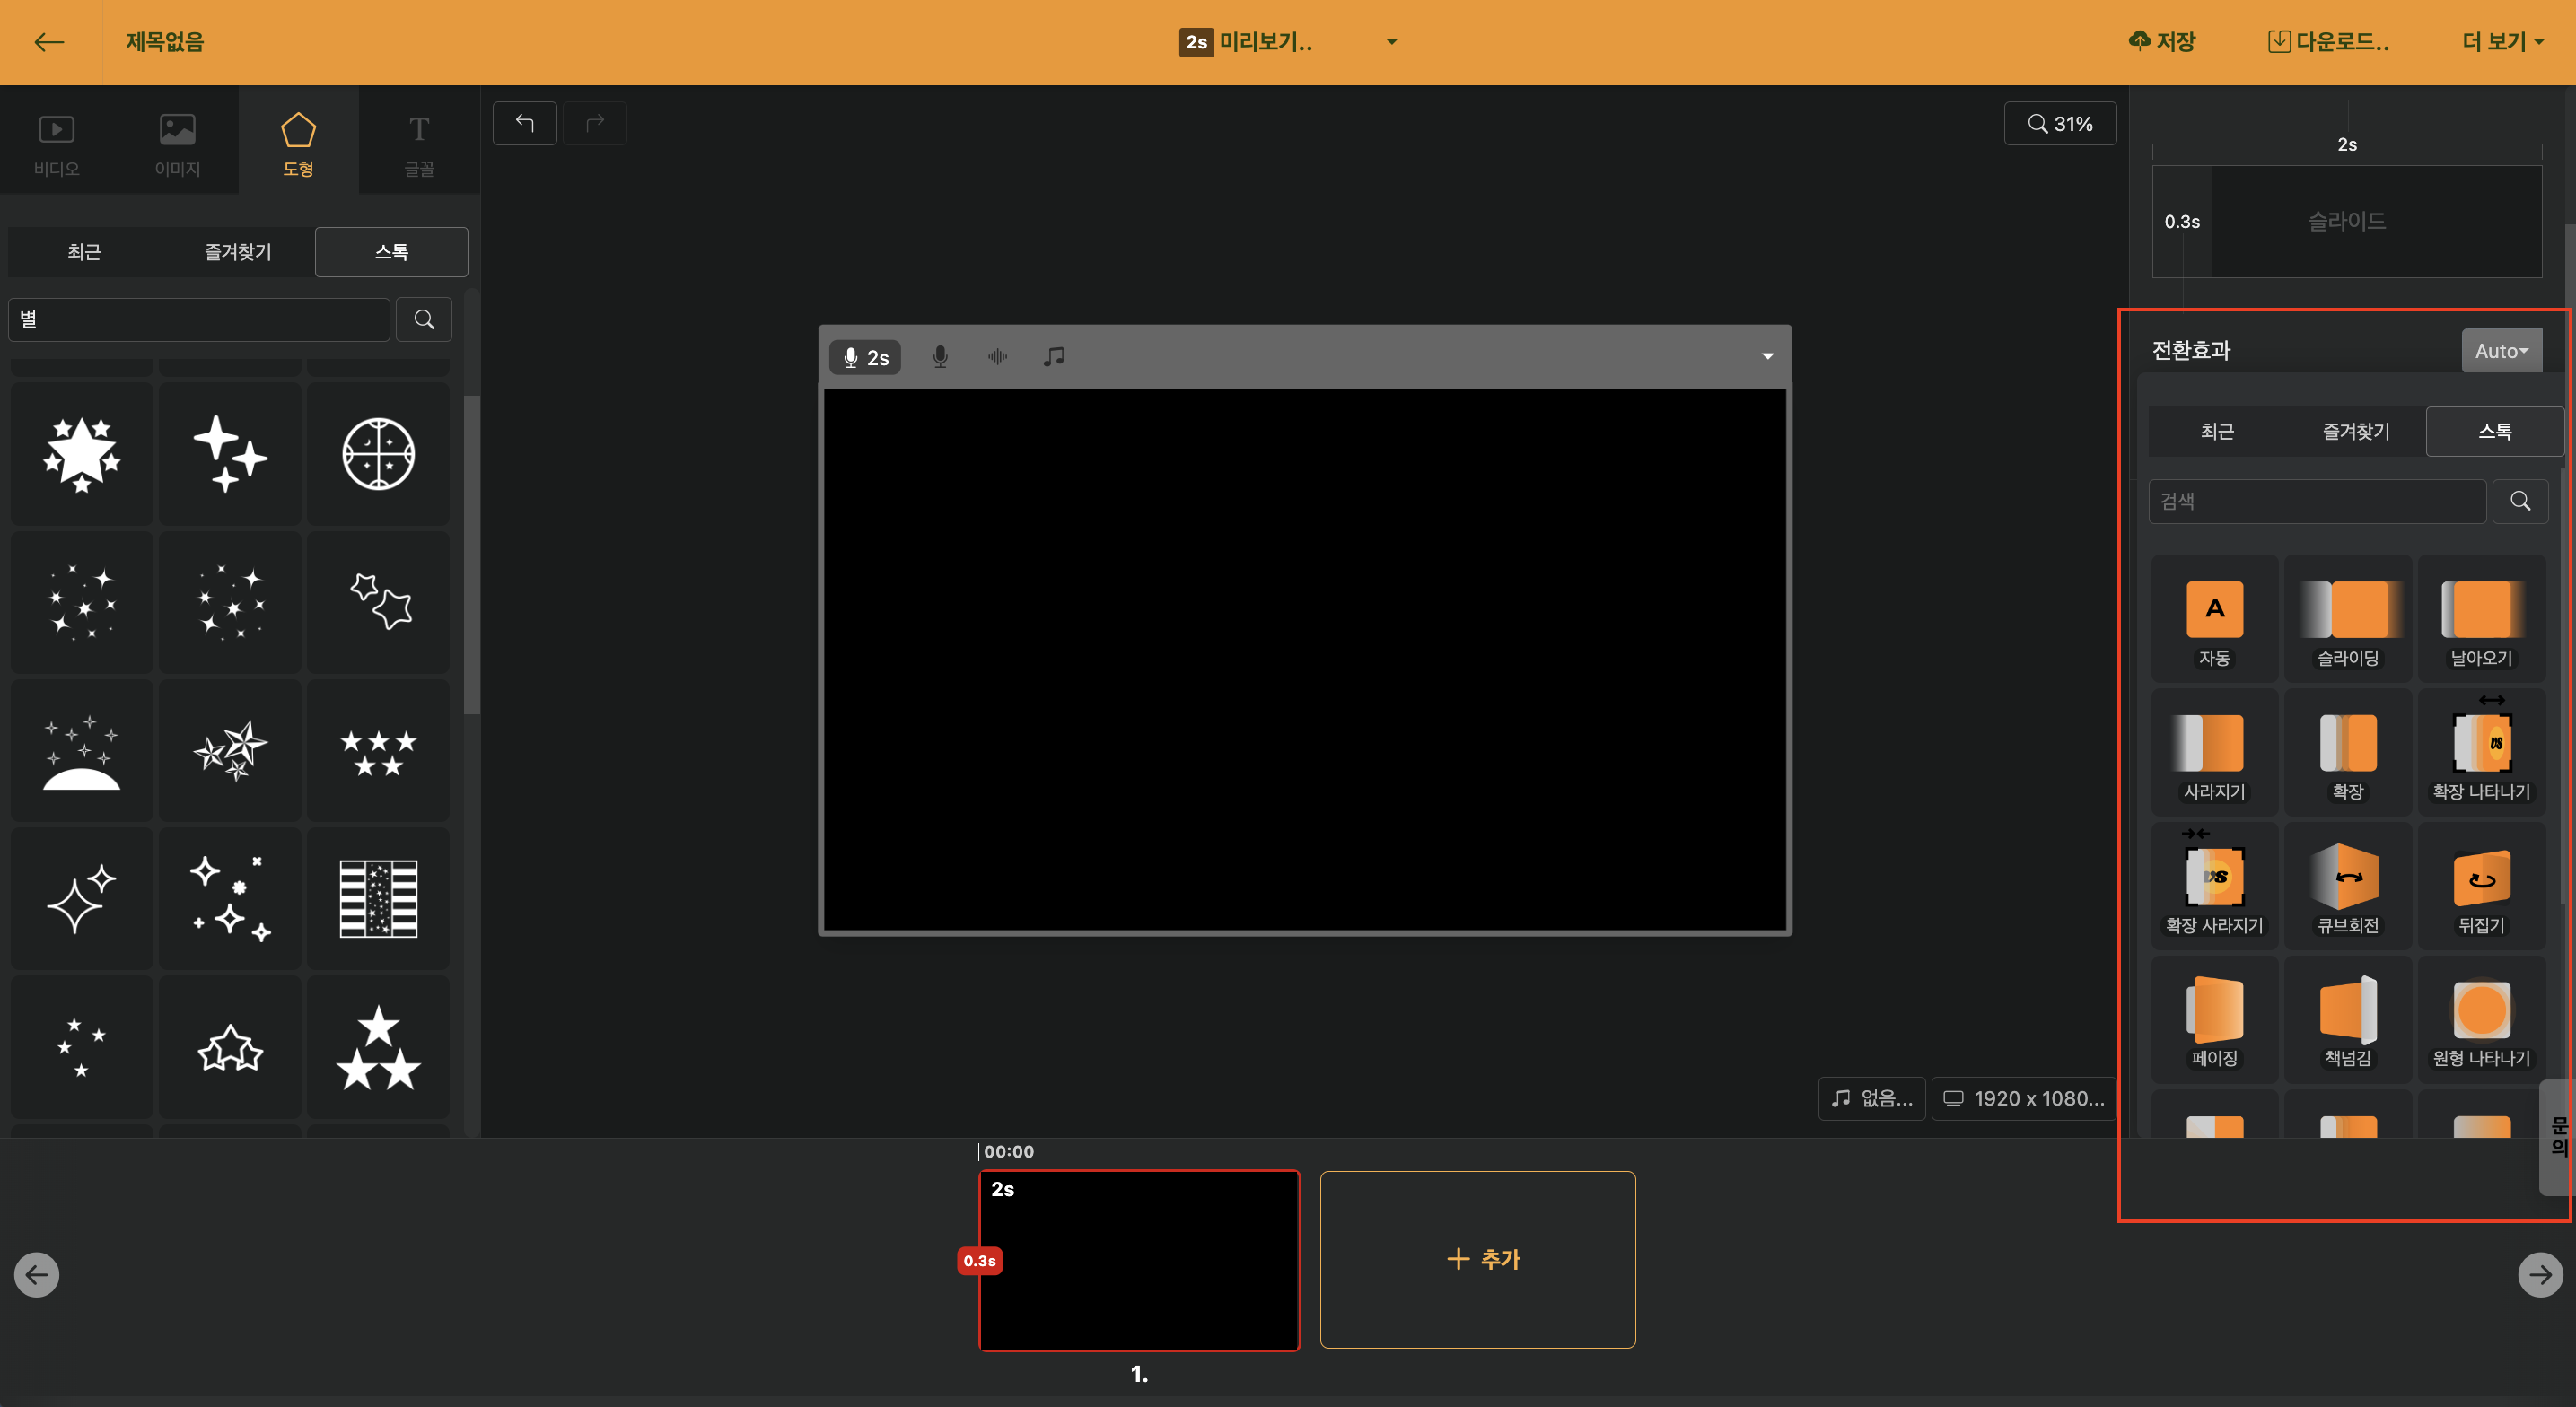
The transition effect is an animation that is triggered when a new slide appears. After setting the desired transition effect, you can quickly verify how it looks through the part preview.
Transition Duration is the duration of the animation effect. For example, if you want the "cube" animation to appear slowly, try inserting 12 seconds and adjust the appropriate time while previewing.
The transition effect time is reflected only within the playback time of the slide. Therefore, even if the transition effect time is 10 seconds, if the playback time of the slide is 5 seconds, the animation effect will be shown in 5 seconds.
Narration is a setting related to speaking during slide playback. Although videos are typically watched visually, setting up narration alongside can enhance the content's transmission ability.
Learn how to freely edit by using multiple slides through an example video demonstrating methods for producing English learning videos that use both Korean and English simultaneously.
https://www.youtube.com/watch?v=faR7f5T9l2Y
You can upload pre-recorded MP3 files. Use the trim feature to precisely insert 'fade in' intervals for each slide. Click here for a detailed introduction to the trim feature.
You can record your voice directly on the website. The recording continues seamlessly, allowing you to time it just right to move on to the next slide. For a splendid content creation method using the voice recording feature, please refer to [Using the Voice Recording Feature].
You can change the AI voice actor and apply different voices for each slide. Generally, after selecting the entire slide, apply the voice. As the supported language varies by character, matching the language of the text will enable a more natural reproduction.

< AI Voice Category Detailed Search >
Videostew uses TTS provided by Google Wavenet, Amazon Polly, Naver Clova, Microsoft Azure, ElevenLabs.
You can set up complex search criteria based on each engine, such as gender, age, emotion, atmosphere, and language, allowing you to quickly find the voice you want.
! Pro Tip: Each slide will have AI-generated voice. Follow the guidelines to ensure each slide has a completed sentence. Use the enter key to provide line breaks and apply [text appearance effects] to create a natural flow.
Change the reading speed of AI voice. Generally, readers prefer a speed of 120% - 130%, but it can vary depending on the characteristics of the AI voice, so you can decide while pre-listening.
You can use this when you want to read all the AI voice in one slide and add a slight pause. By setting the time to around `0.5 seconds`, you can prevent it from moving to the next slide too quickly.
Conversely, if you think the mute time increases when moving to the next slide, you can set it manually. It supports up to `-0.2 seconds`, and generally, `-0.1 seconds` will give a slightly faster transition.

Activating the text manual setting toggle allows you to adjust the reading content as desired, regardless of the text displayed on the screen. It is commonly used to correct pronunciation or when you want to display only the words on the screen and read the detailed content.

Due to network issues, the AI voice may not be output until the end or may be cut off in the middle, or the length of the voice may not be calculated properly. In such cases, press the "Recalculate" button to create a new AI voice and reset the time for each slide.
If the slide repeat playback toggle is deactivated, in the case where the same text is on multiple slides, it will only be read once on the first slide and not read again as it moves on. This can be used when you want to insert animations intermittently while a sentence is being played.
In addition to the AI voices provided by Videostew, you can directly create and use TTS that has learned your voice.
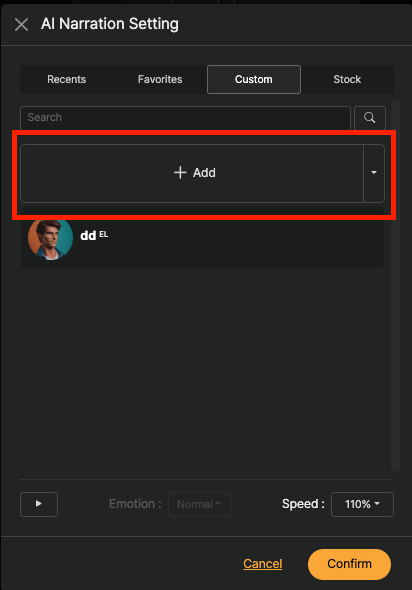
You can start recording your voice by clicking the 'Add' button on the custom tab. You can record in real-time on the website, or you can upload a pre-recorded file.
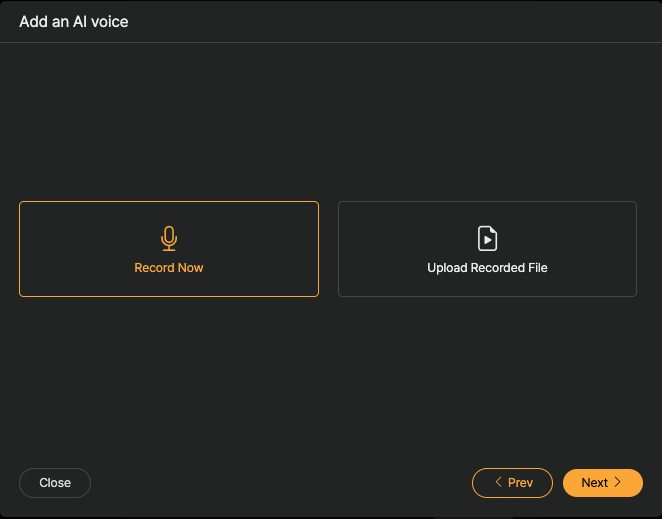
When recording, reading just five sentences is sufficient. When uploading a pre-recorded file, please upload an audio file that is longer than 15 seconds.
! The reason for using voice-cloned TTS is to present a natural-sounding voice. Therefore, it is more effective to create a natural TTS without using professional recording equipment. It is also beneficial if the speaking style you frequently use comes out naturally. If you plan to create conversational content, please record a naturally conversing voice.
Set the sound effect that plays when the slide starts. The sound effect continues even if the slide changes and will last until it finishes.
Clicking "Select" allows you to apply a sound effect to a slide. You can find sound effects by genre, and it is convenient to select while listening to previews by hovering the mouse. If you wish to remove a sound effect, select "None" after making your selection.
Change the speed of the sound effect. You can adjust it appropriately while listening to other elements through the preview.
[Slide repeat playback] When this is enabled, if the same effect is applied to multiple slides, it will be repeatedly played every time a new slide starts. In other words, in the basic state of Videostew, if there is no change between slides, it should proceed normally, but if this option is enabled, it will loop and the effect will start again.
In the disabled state, the transition between slides is not interrupted, so the specified effect will continue to play.
Activating this option will naturally fade out the effect if the effect's duration is longer than the slide's playback time, without exceeding the duration of the slide.
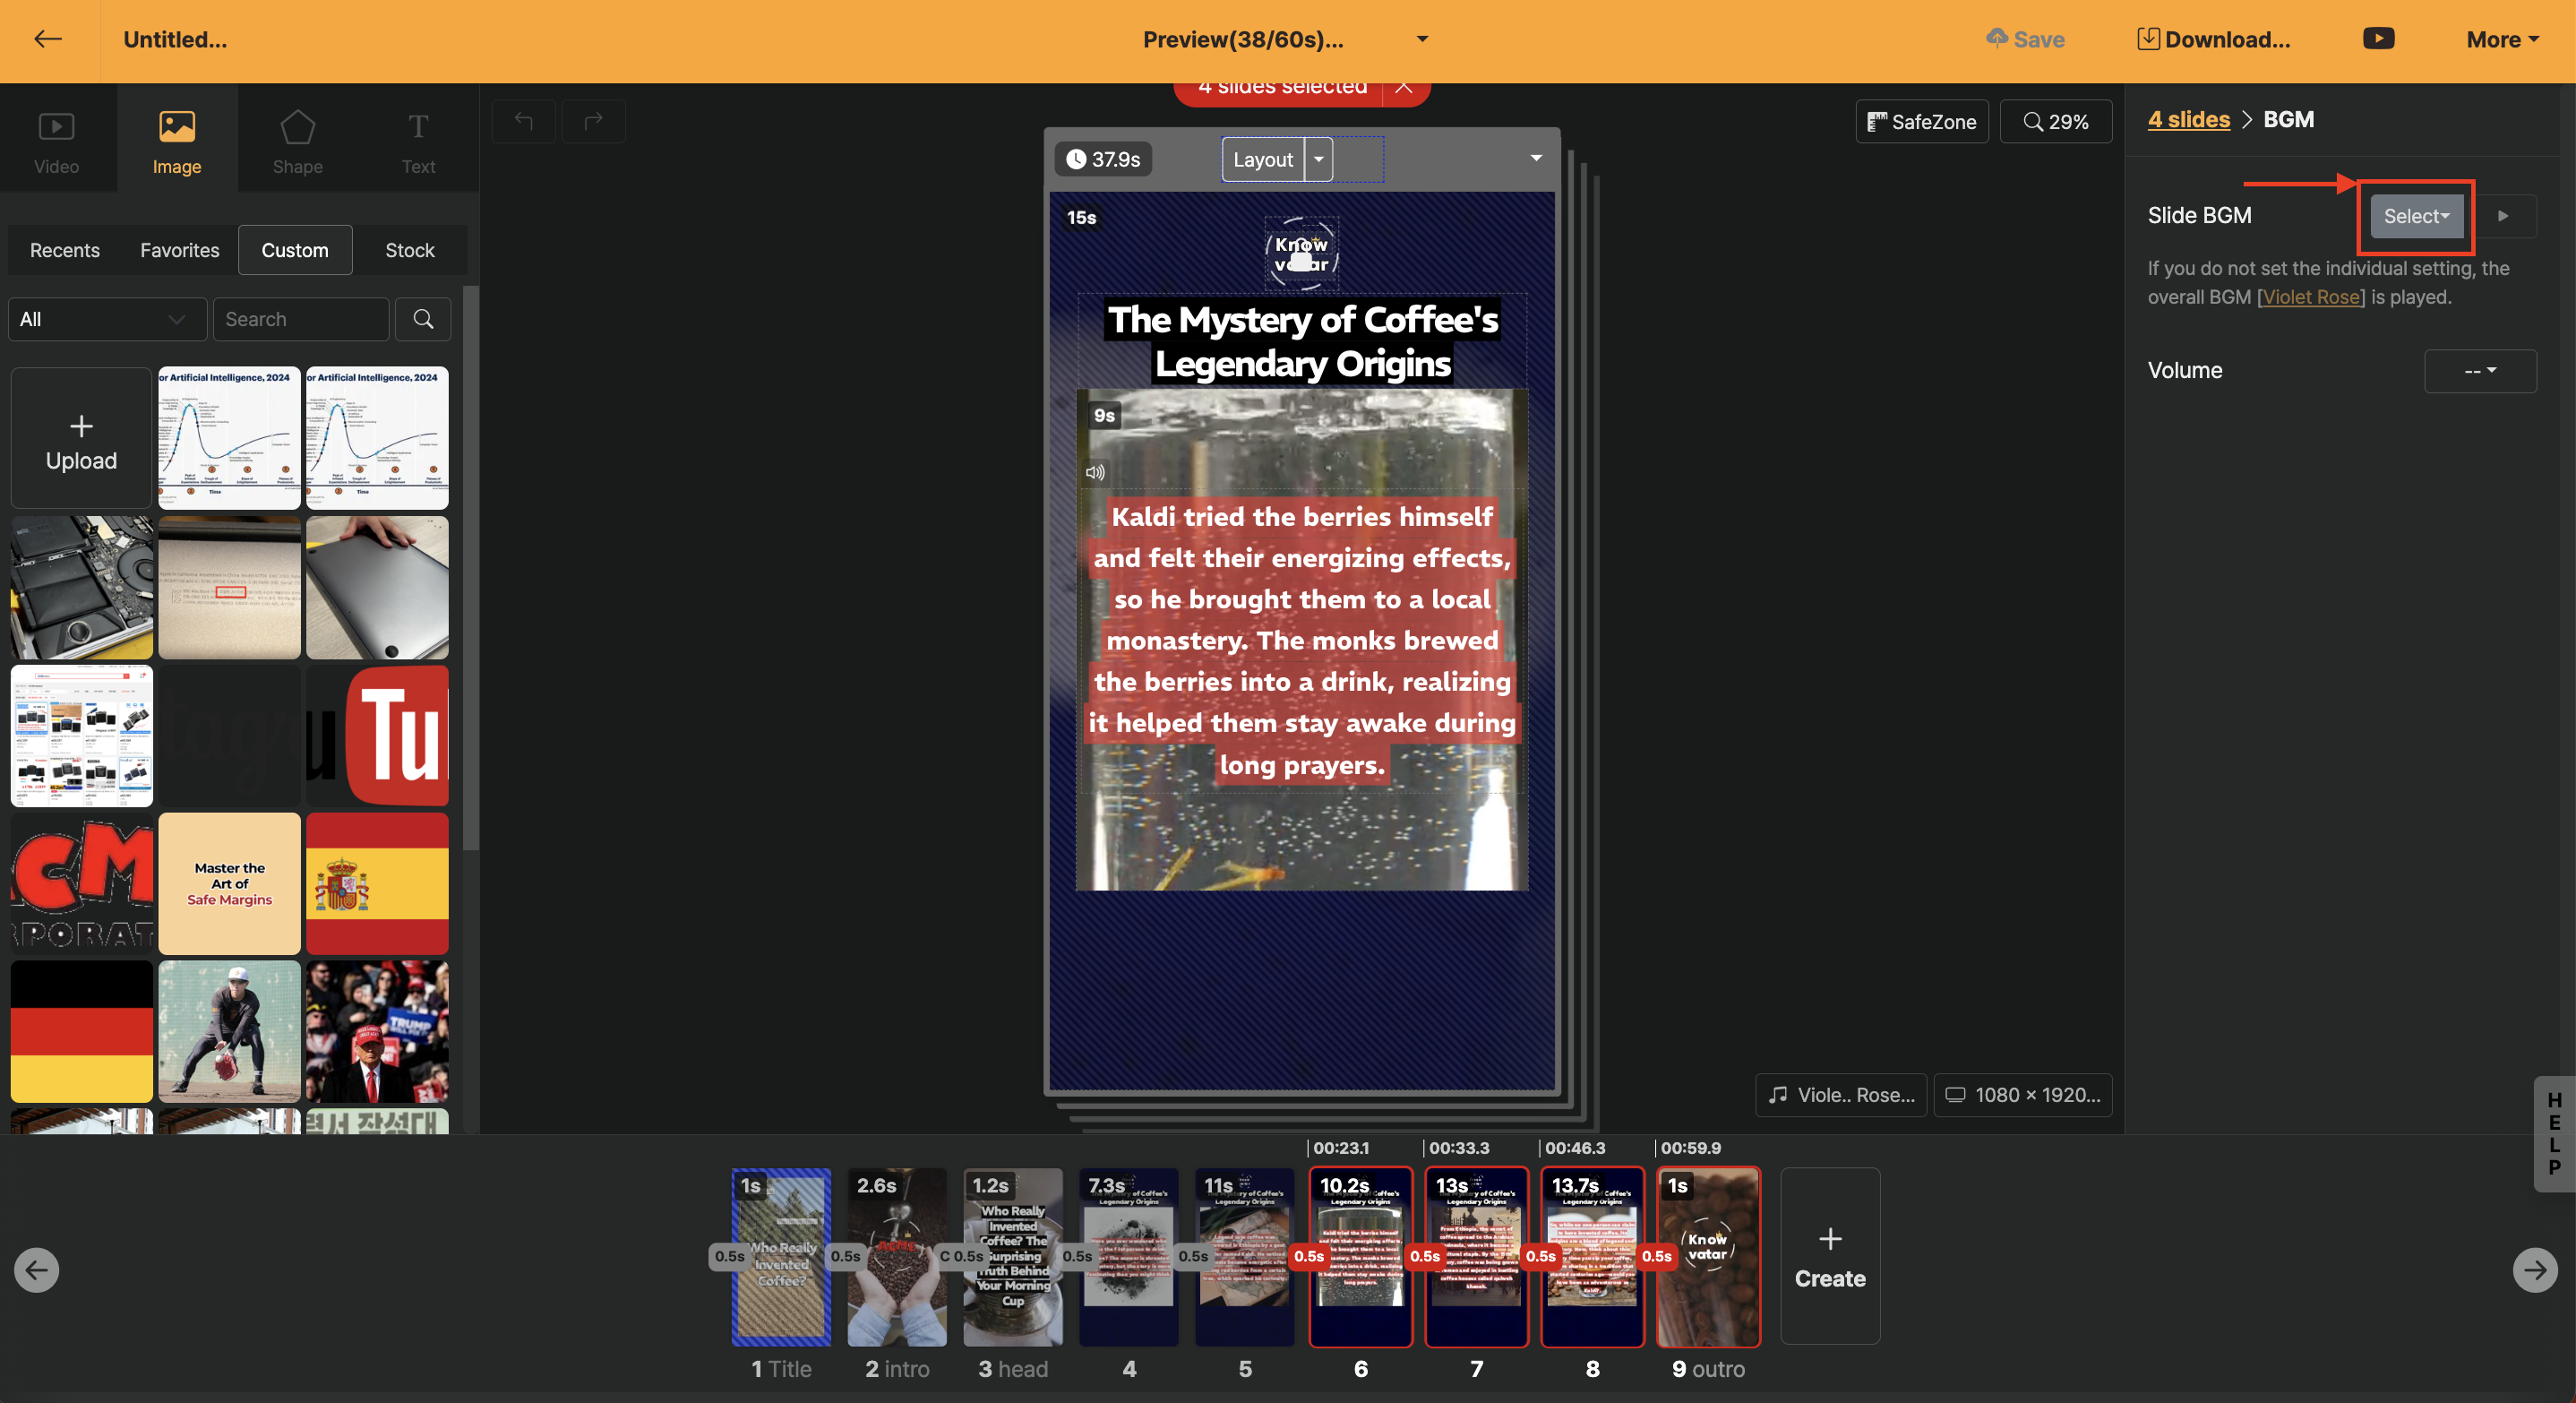
When you want to use more than one BGM in a video, you can set different music for each slide through the slide BGM function.
After clicking the "Select" button, you can choose and apply the music, and if the same sound source is included in the continuous slide, it will be played seamlessly.
You can determine the appropriate volume through the volume menu in the settings panel. (If the sound source is not adjusted separately and only the volume is modified, the global BGM will play again, becoming larger or smaller in a specific slide and automatically applying the fade-in/out effect, playing the music again.)

You can change the slide's background color from the default (black) to a different color. Additionally, you can add other colors by clicking the '+' button and specify gradient effects.
The colors recently used are displayed.
Frequently used colors can be added to Favorites for easy access. Favorites are managed separately for each workspace.

< Add Custom Color >
Click the '+' button to directly add a custom color. You can easily find and add the desired color using the color spectrum in the 'Add Color' window.
There are about 140 default colors prepared in the color palette. Selecting a color will apply it to the background of the slide, and you can also change the colors of multiple slides at once. Please refer to [Edit Multiple Slides at Once] for how to edit multiple slides simultaneously.

< Automatically Construct Layout >
Automatically layout components. You can layout each [Whole], [Left/Right 1/2], [Left/Right 1/3], [Top/Bottom 1/2], [Top/Bottom 1/3], and change the layout by clicking a button multiple times.
Adjust the opacity/border, etc., of the selected component or its position within the slide.
Change the opacity of the component. Generally, you can insert a transparent PNG file and change its opacity.
Add a border to a specific component. You can change the thickness and color of the border.
In blend mode, you can mix several overlapping components to create various visual effects.
Applies a flip effect to the inserted images or video clips.

Manually change the start and end intervals of the video clip. Generally, if the video is a background element that continues to show irrelevant content, there is no need to edit the playback interval.
However, if the video involves a speaker, you may need to adjust the intervals to match the subtitles, so editing the playback interval is essential.
We'll provide detailed instructions on how to change the video playback interval. Ah, changing the playback interval of the video and the uploaded voice file can be done in the same way!
Select the video inserted on the slide and click on the right side to adjust the playback interval.

Double-click or press `s` on the part you want to trim while previewing. A new slide is added with the trimmed area.

Or after specifying several intervals to use with mouse drag, finish to add new slides for each set interval.

You can edit the video playback interval more conveniently using shortcut keys.
Shortcut Key|Role
--|--
`s`/`double-click`|Splits the slide at the mouse-positioned interval.
`+`|Expands the trim timeline.
`-`|Contracts the trim timeline.
`space`|Plays from the selected portion.
`j`|Moves the start point of the selected region forward by 0.1 seconds.
`k`|Moves the start point of the selected region backward by 0.1 seconds.
`l`|Moves the end point of the selected region forward by 0.1 seconds.
`;`|Moves the end point of the selected region backward by 0.1 seconds.
The video fills the specified container (red border) to match its size. (Some parts of the video may be cropped depending on the original size of the video; you can adjust the position or enlarge the video by double-clicking.)

< Adjust the internal display method by zooming in >
The video is displayed at the maximum size within the bounds of the specified container (red border).
Ignore the existing settings and change the container (red border) size to the original size of the video.
Change the size of the sound included in the clip. Through [Preview](/guide/edit/view/top/preview), you can appropriately adjust the volume of BGM, sound effects, or AI voices. If you change it to 0%, you can mute the sound.
Change the playback speed of the video clip to faster/slower. You can change the speed from 20% up to 500% compared to the original speed (100%).
Select the part of the video clip to repeat when the slide length is longer than the video clip length. The default setting is 'Infinite repeat', and you can toggle the button to set the number of repeats. If it's set to 'Repeat once', the video clip will stop at the last scene and continue to play the slide if there is remaining slide playback time.
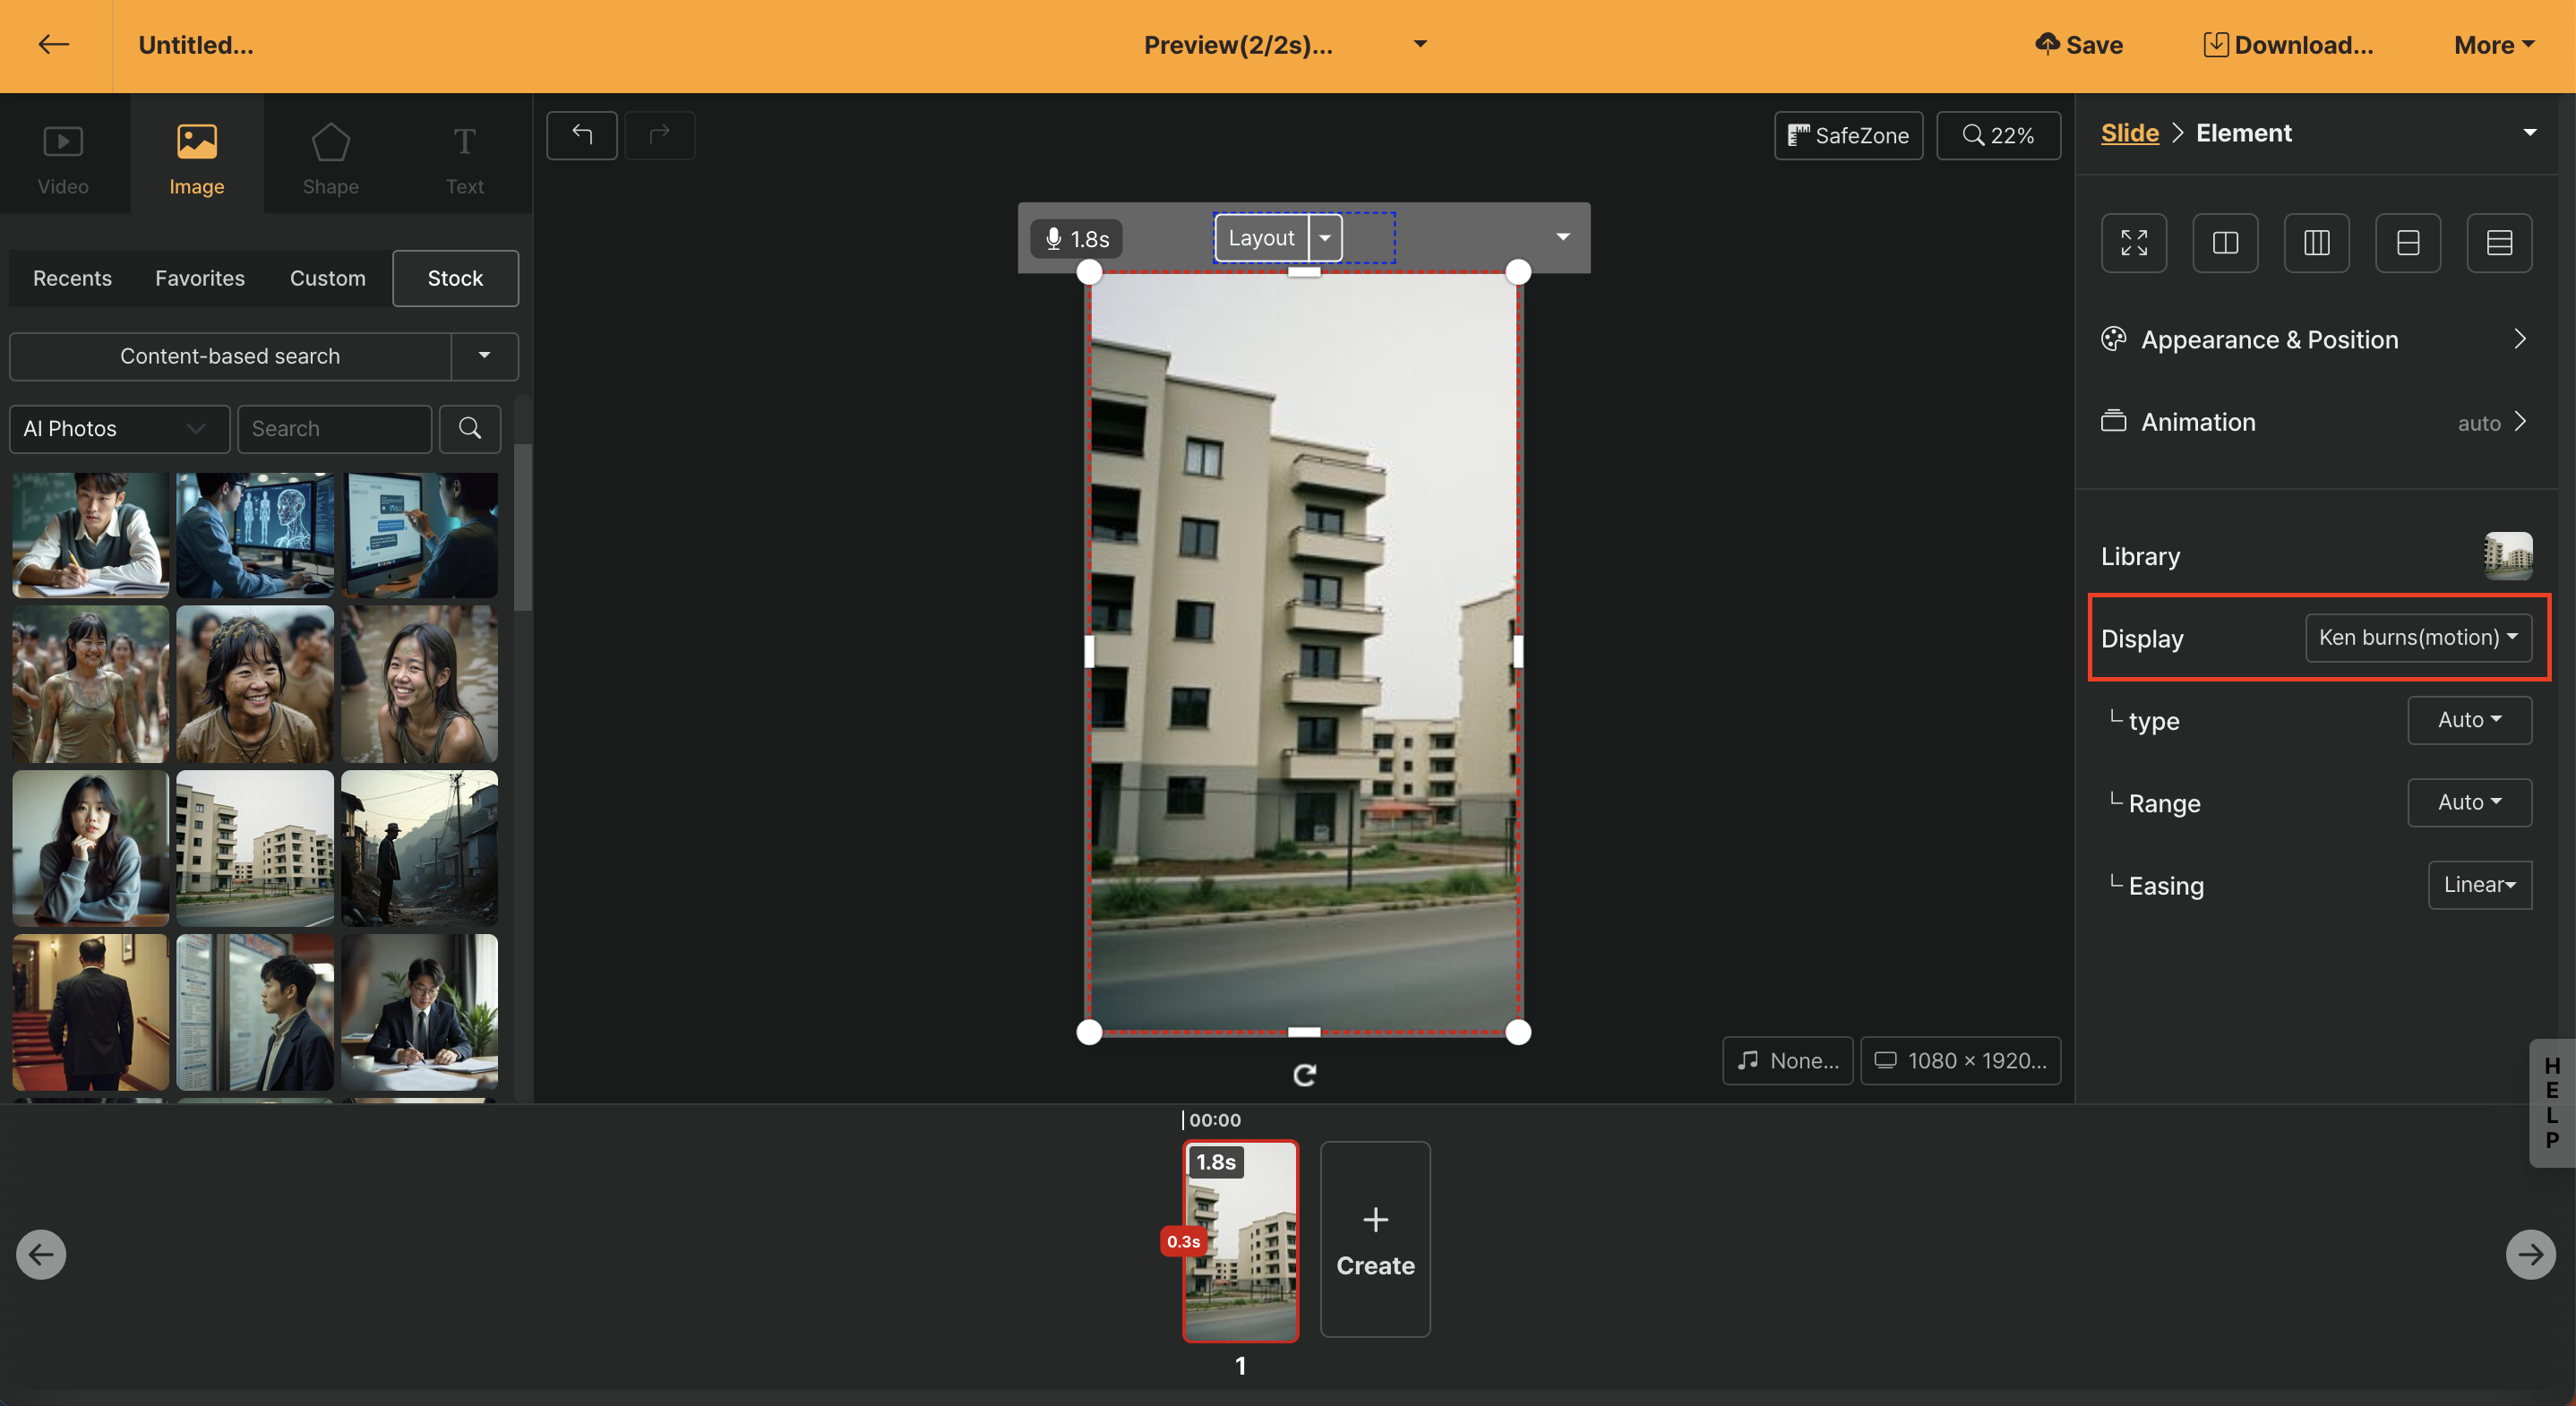
This feature allows you to automatically apply motion animation according to the characteristics of the image elements. The [Automatic] option is basic, and depending on the need, you can double-click the image to directly determine the effect of enlargement or movement, such as pan or zoom in/out.
Menu|Description
--|--
Automatic|Automatically applies appropriate Kenbun effects based on the image ratio or the extent to which the user has enlarged the image.
Expand|When you enlarge a certain area with the image expansion function, the specified area is expanded as the slide is regenerated.
Shrink|When you enlarge a certain area with the image expansion function, an animation that shrinks a certain part according to the moving range is created.
To the left|Applies a panning effect that slowly moves the image to the left.
To the right|Applies a panning effect that slowly moves the image to the right.
Upward|Applies a panning effect that slowly moves the image upward.
Downward|Applies a panning effect that slowly moves the image downward.
The [Automatic] option is the default and you can finely adjust the moving range.
This menu allows you to fine-tune animations when images are panned or enlarged/shrunk. You can specify movements separately from the overall project-applied [Ease (movement effect)]. In the case of Kenbun effects, the default setting `linear` works best.
The fixed image is gradually enlarged, filling the set size. (Some areas may be cropped depending on the original size of the image.)
The image is displayed to fill the specified container (red outline). (Some areas may be cropped depending on the original size of the image, and you can adjust the position or enlarge the image by double-clicking it.)
The original size of the image is adjusted to fit the specified container (red outline).
Ignore the existing settings and change the container (red outline) size to the original size of the image.
You can change the color of the inserted shape. You can also add a different color by pressing the "+" button and specify the gradient effect.
When you double-click on a text element in the [Editing Window](/guide/edit/view/stage) at the center, it switches to an editing mode where you can modify the content. When you select part of the text in this editing mode, a toolbar appears below, with each function as follows:

< When entering editing mode, a toolbar appears >
Button|Function
--|--
B|Applies bold effect to the selected text area.
*I*|Applies italics effect to the selected text area.
U|Adds an underline to the selected text area.
S|Add a cancellation line to the selected area of the text.
A|Changes the color of the selected text area. (Choose from default colors and recently used colors)
A|Changes the background color of the selected text area. (Choose from default colors and recently used colors)
*Tx*|Removes all applied effects.
< Change the color of some text characters >
You can set various animation effects for text elements. The duration that the applied animation takes to appear is as long as the [Transition Duration] on the slider. Therefore, if you want the animation to appear slowly, increase the [Transition Duration]. The functions that can be set in the text animation menu are as follows:
Specifies a repetitive motion for the text. The available repetition effects are as follows. Once an effect is set, a menu to set the "Stop Motion Effect" function appears.
Repetition Effect|Description
--|--
None|Removes all repetition effects
Wiggle|
Bounce|A bouncing effect
Shake|
Up and Down|
Left and Right|
Swing|
Clockwise|The element continues to rotate clockwise
Counterclockwise|The element continues to rotate counterclockwise
Sets various text animations. After setting, you can preview it directly through the [Preview](/guide/edit/view/top/preview) slide.
Animation|Description
--|--
Automatic|The default setting option applies a morphing effect
Sliding|An effect of sliding from the side
Expansion|An effect of expanding in one direction
Cube Rotation|An effect of rotating with a cube-like face
Flip|A flipping effect
Page Turn|
Circle Appear|An effect of a circle gradually getting larger or smaller while appearing
Clock Appear|An effect of a circle filling up like a clock while appearing
Unfold|An effect of appearing bit by bit from one direction
Fade in Slowly|An effect of gradually appearing from a blurred state
Pop|An effect as if the element pops onto the screen or jumps out
Pop Spin|An effect as if the element spins and pops onto the screen or jumps out
After selecting the text element, select 'Animation > Text appearance effect' to set the way texts in a slide are displayed.
In the editing screen, there are various types of texts in a slide, and it has the function to display them well.
Text Registration Effect|Description
--|--
Entire|One text block appears at once
Line by Line|Text appears line by line according to the line break within the text block
Two Lines at a Time|Text appears two lines at a time according to the number of lines in the text block
Paragraph unit|Visible separation of paragraphs (enter) within the text block
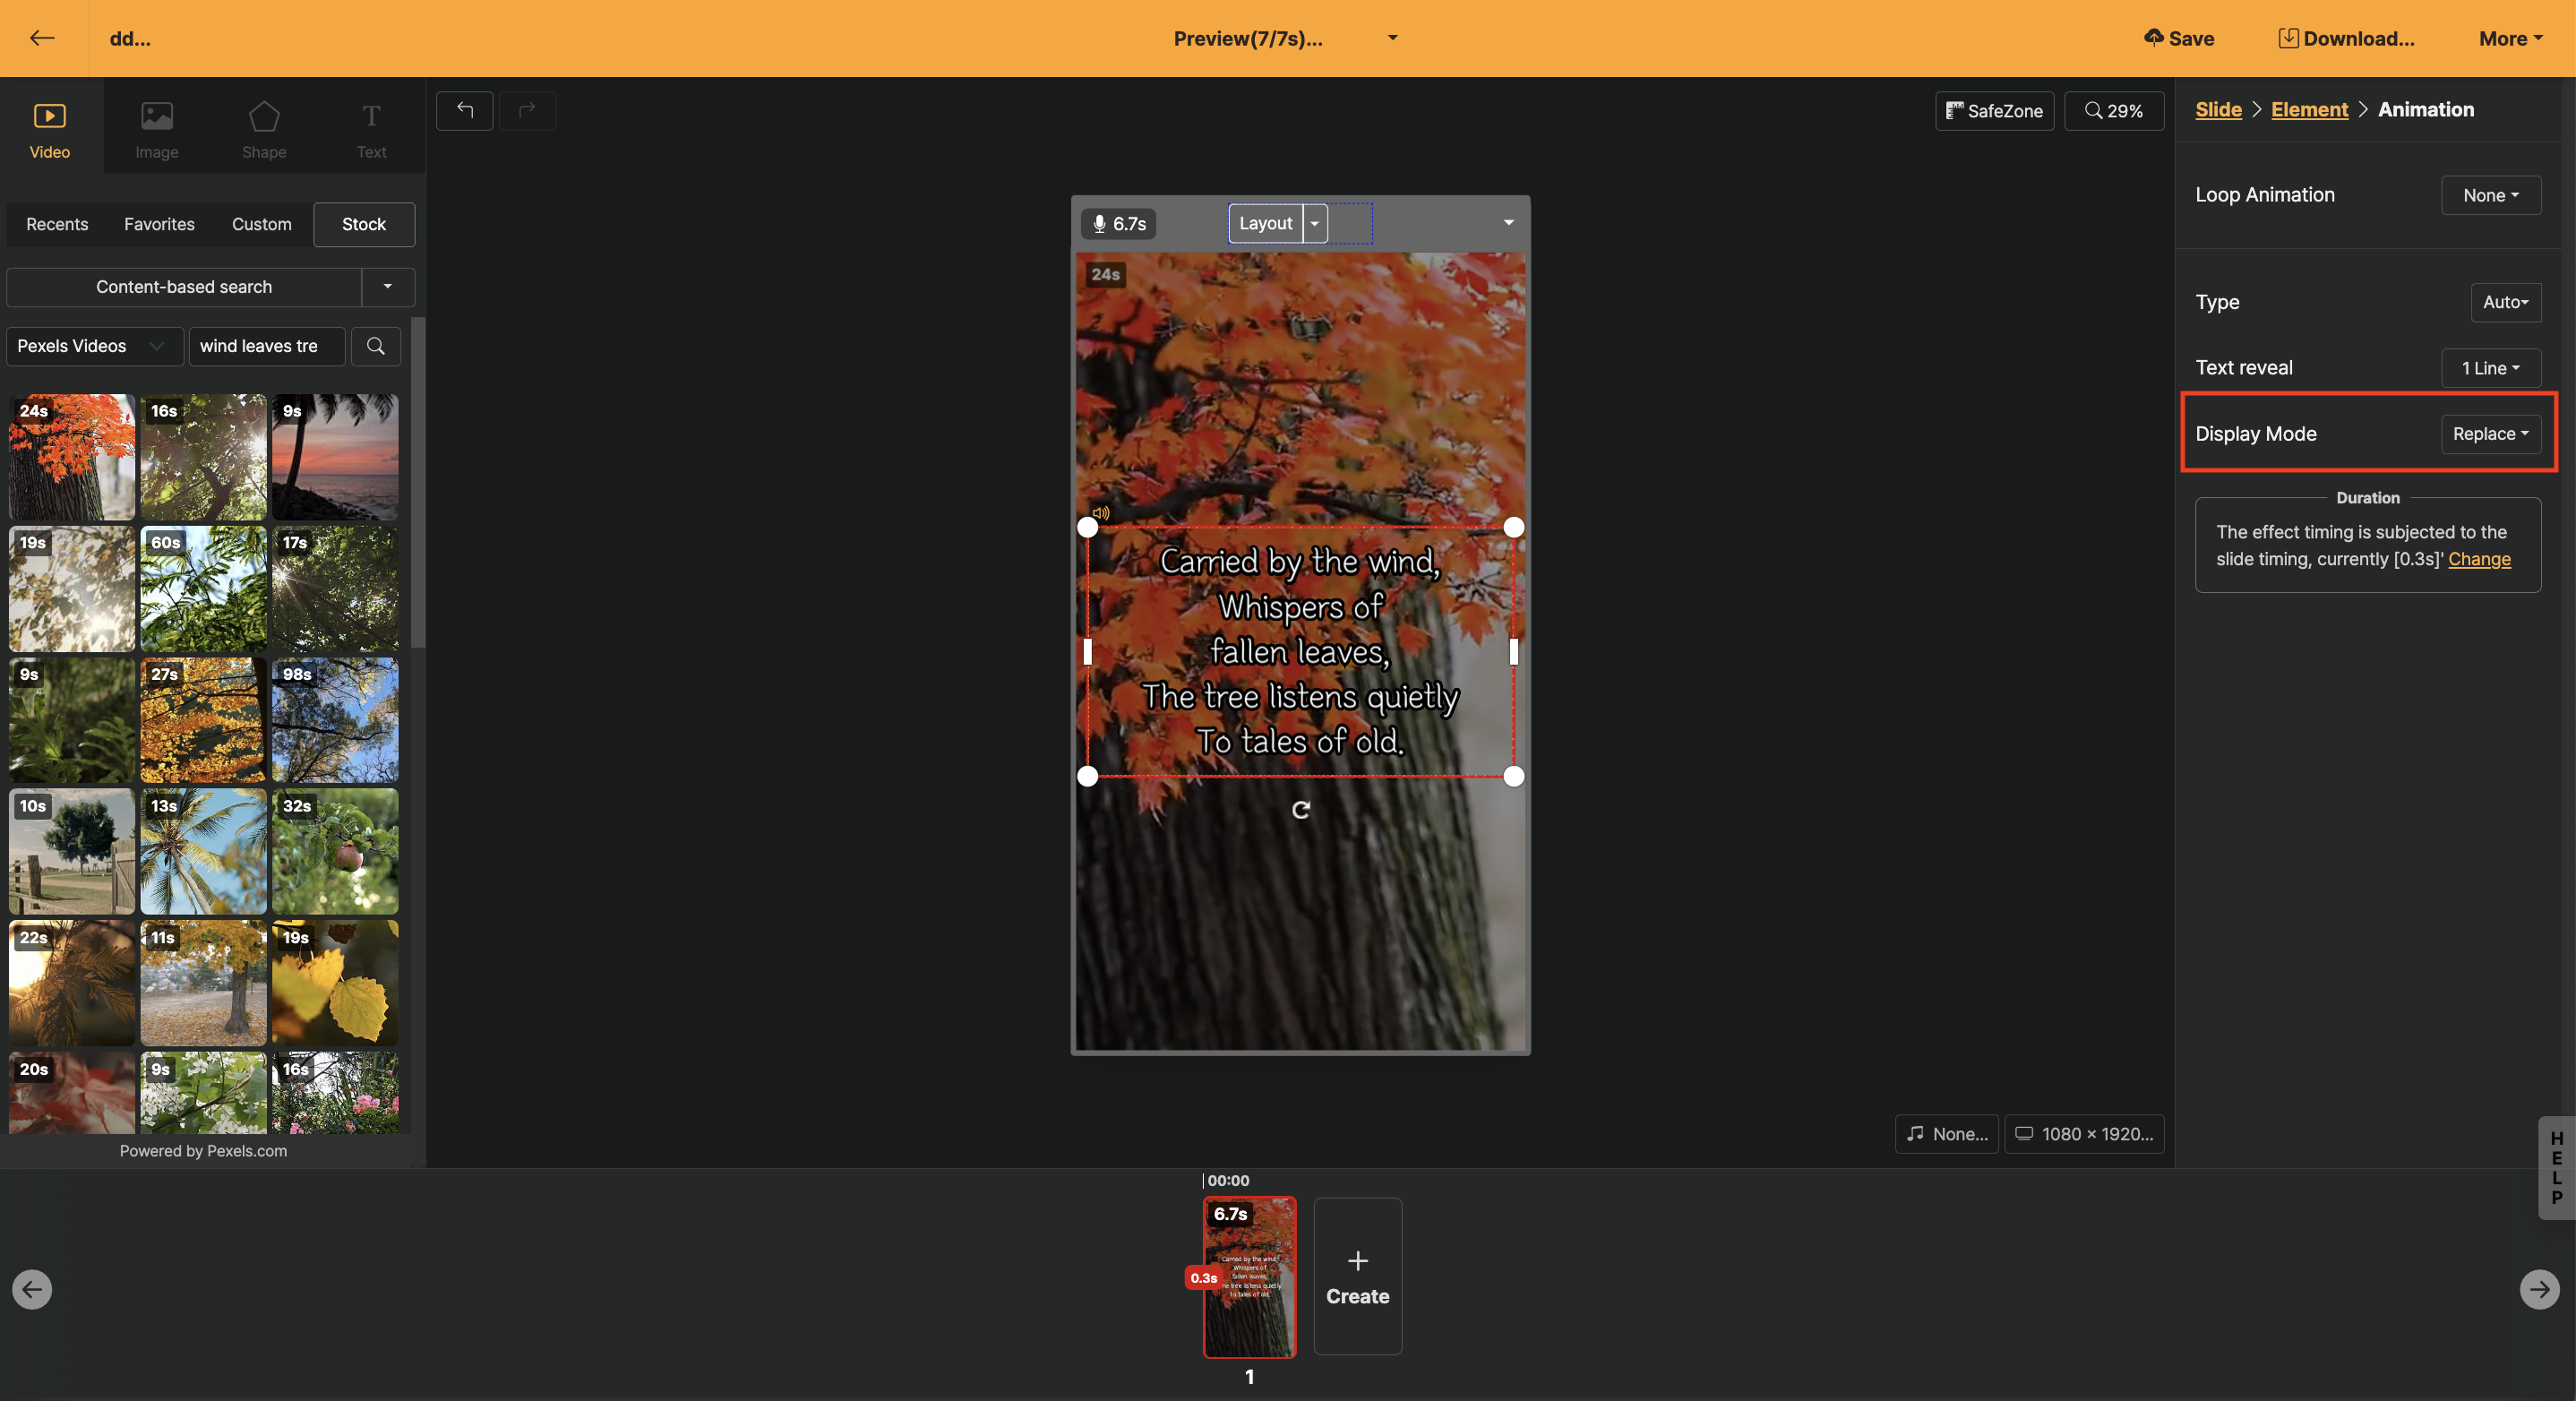
If you set options like "One line at a time" here, a "Additional Format" menu will appear. Please refer to the image below to see each option's format.

< Swap >
A new text appears with animation effects, continuing in one line (or two lines depending on the settings) at the same position.

< Attach >
More lines appear based on [Vertical Alignment], either one line at a time (or two lines at a time). [Vertical Alignment] is most naturally used when fixed "above".
If [AI Voice](/guide/edit/basic/narration/ai-voice) is applied to the slide narration, all the text on the screen will be read sequentially.
However, if there is a text you do not want to read, you can select the text element and then click "Read by AI Voice". Besides this method, if you want to read the text on the screen completely without ignoring it, please refer to [Automatic Text Specification].
Readability enhancement uses the 'text wrapping' feature to modify settings so that text on the screen is easier to read. You can apply effects such as "None", "Boxed", "Line by line", "Outline", and "Shadow", and please refer to the image below for each effect.
.png?_=1hvr7qu)
Additionally, the color of the box and outline can be changed in the "Readability color" menu.
! The "automatic slide separation" feature can be set in [Text Animation](/guide/edit/basic/text/text-animation)'s [Text Appearance Effect].
Slide division can be set as "One line at a time", "Two lines at a time", [Paragraph unit], and when [Automatic Slide Division] is applied, it will be displayed as shown below.
< Preview of Automatic Slide Division application >
You can select the desired font family to change the font. The font library is organized into tabs such as "Recent", "Favorites", "User", and "Stock".
To change the font family of multiple slides at once, please refer to the content of the [Edit multiple slides at once](/guide/tips/multi-update) action.
Change the color of the entire text element. All colors of the text box will change, and you can combine up to three colors to create a gradient effect.

< Text Color Change >
To change the color of some text, you can drag the desired text and then use the inline editor feature that appears at the top. In the inline editor, you can select from the default colors or recently used colors. If you want a specific color, setting it as a background color once will display it in the recent colors.

< Change part of the text color >
Change the alignment of the text within the box to "Left", "Center", or "Right".
Change the font size from 10 px to 256 px. For vertical type scroll video content, we recommend using 80 px to 90 px.
Change the size of the left and bottom margins of the text box.
Change the line spacing when multiple lines of text are entered into a text box.
Change the spacing of the font size. It can be adjusted from -40% to 200%, with 0% being the default value.
Changes the vertical alignment inside the text box. The default option is "Auto", and you can set it to "Top", "Middle", or "Bottom".

Activating height fixation allows you to change the vertical size of the text box. This is useful when specifying a consistent box size across multiple slides.
Change the alignment of the text within the box to "Left", "Center", or "Right".
Activating height lock adds handlers to the top/bottom of the box, allowing you to change the height of the text box.
Generally, when using text boxes in auto mode, even if the text is one or two lines, you can maintain the same box size.